
Do you want to create a WordPress AJAX contact form that submits without reloading the page?
Think about the last time you filled out a contact form online. You typed your name, your email, your message. You clicked send. Then the screen went white for a second, the page reloaded, and you had no idea if it worked. So you waited. Maybe you clicked send again just to be safe.
Your visitors go through that same awkward moment on your site right now.
Great news—AJAX handles that issue. It enables your form to submit data seamlessly in the background, so visitors remain on the same page, no white screen appears. No page refresh is needed, and there’s no doubt. After clicking send, they see a thank-you message and continue onward.
And yes, you can set this up on WordPress without writing code from scratch.
In this article, I will show you the benefits of a WordPress AJAX contact form and walk you through creating one with Ninja Forms. You will also learn how to add your AJAX contact form to a popup with MailOptin and how to connect your form to an email marketing platform or CRM, along with best practices for creating an AJAX contact form.
Benefits of Using a WordPress AJAX Contact Form on Your Site
1. Your form responds right away: This is the benefit people notice first. Your visitor clicks send and gets an answer almost instantly. No blank screen. No waiting. No wondering whether the click registered. That quick reply alone changes how the whole interaction feels.
2. Visitors never lose their place: A page reload throws people back to the top. On a long page, that means scrolling all over again to find where they were. AJAX keeps them exactly where they stand. They send their message, see the confirmation, and carry on reading. Nothing shifts under them.
3. Fewer people give up halfway: Every hurdle between typing a message and sending it costs you. A reload is a hurdle. A slow response is a hurdle. Confusion about whether it worked is a hurdle. AJAX clears them out. The path from intent to sent message gets shorter, and more people walk all the way down it.
4. Mistakes get caught as they happen: With AJAX, you can point out a missing email or an empty field the moment it occurs, right next to the input. Nobody has to submit, wait for a reload, and then hunt through a list of errors. They fix it on the spot and keep going. That small courtesy saves many abandoned messages.
5. Your site feels current: People compare everything to the apps and sites they use every day. Those respond the instant you tap. When your form does the same, your site feels like it belongs in that company. When it reloads and stalls, it feels a step behind, and visitors notice even if they never say so.
6. Makes the form easier to use on mobile: Many visitors access websites from their phones, sometimes with slow or unstable connections. A full-page reload means loading the entire page again to submit a short message. AJAX sends the form data in the background and returns the response without refreshing the page. This can make the submission process faster and less frustrating for mobile visitors.
7. Your server catches a break: Every full reload pulls down all your images, scripts, and styles a second time. Do that often enough and the load adds up. AJAX moves only the data and the response. Less work for your server, less bandwidth used, and a site that holds up better when traffic picks up.
Creating a WordPress AJAX Contact Form With Ninja Forms
Ninja Forms makes it easy to create an AJAX contact form in WordPress without writing code. Its visual builder lets you add the fields you need, customize the form, and publish it on your site.
In the steps below, we will show you how to create a WordPress AJAX contact form with Ninja Forms.
Step 1: Install and Activate Ninja Forms
Log in to your WordPress dashboard, go to Plugins > Add New Plugin, and search for Ninja Forms.
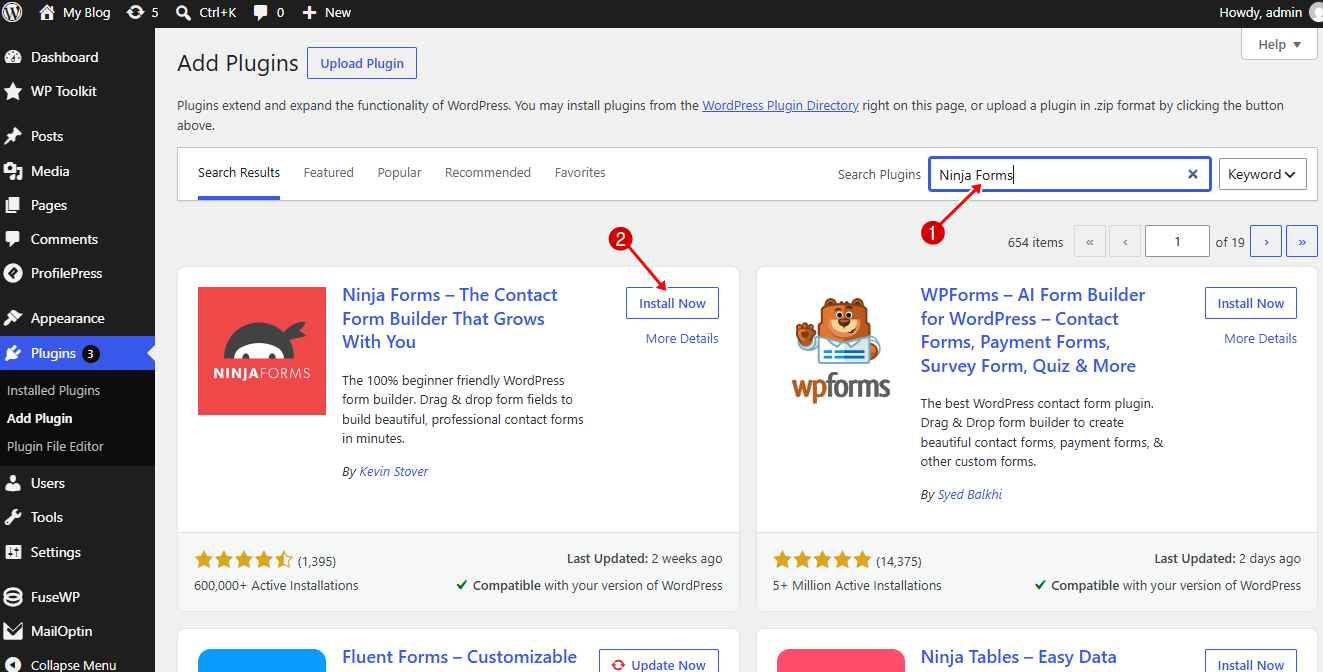
Click Install Now and then Activate.
Once activated, you should see a Ninja Forms menu in your WordPress dashboard.
Step 2: Create a New Contact Form
Go to Ninja Forms > Add New.
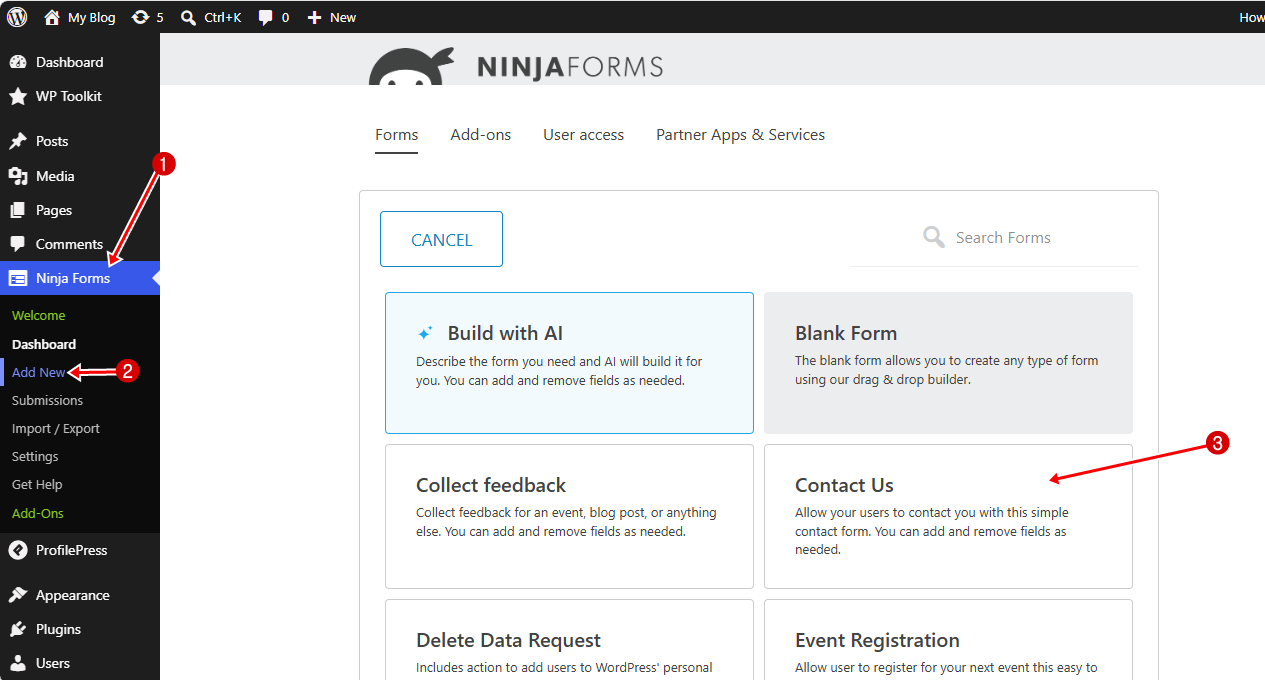
Ninja Forms provides templates to help you get started quickly. For this guide, we’ll use the “Contact Us” template.
Next, you’ll go to the form builder to customize the template to your needs. This is where the real work happens.
Here you can add or remove fields, change field labels, make specific fields required, and adjust the form’s layout.
For our WordPress AJAX contact form, we will add fields for Name, Email Address, and Message. You can also change the button text and other form settings to match your website.
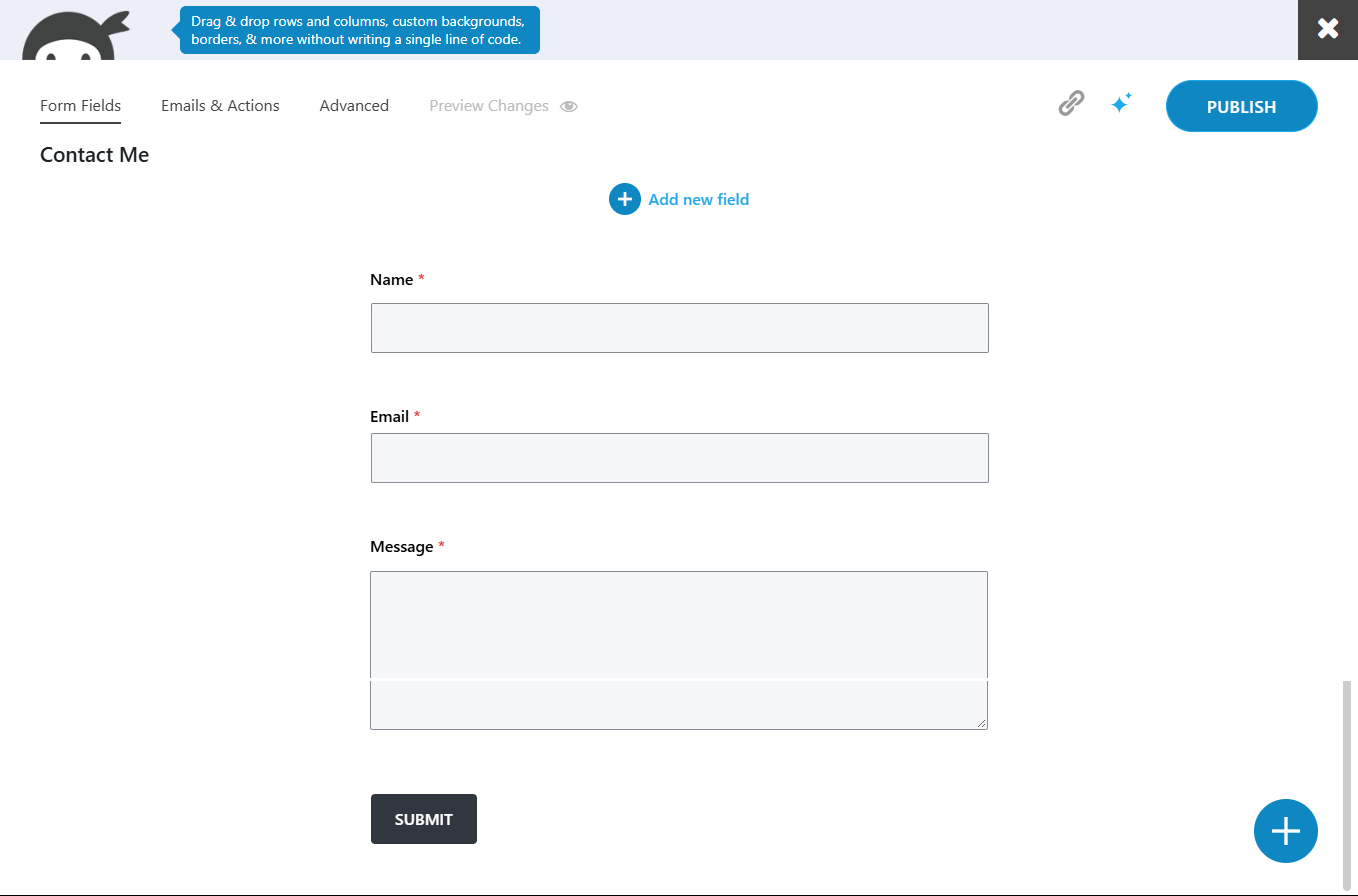
Once the fields look right, move on to the Emails and Actions tab. This is where you set the address that receives submissions, write the subject line, and craft the success message your visitor will see after they hit send.
When everything is in place, click Publish. Ninja Forms will hand you a shortcode.
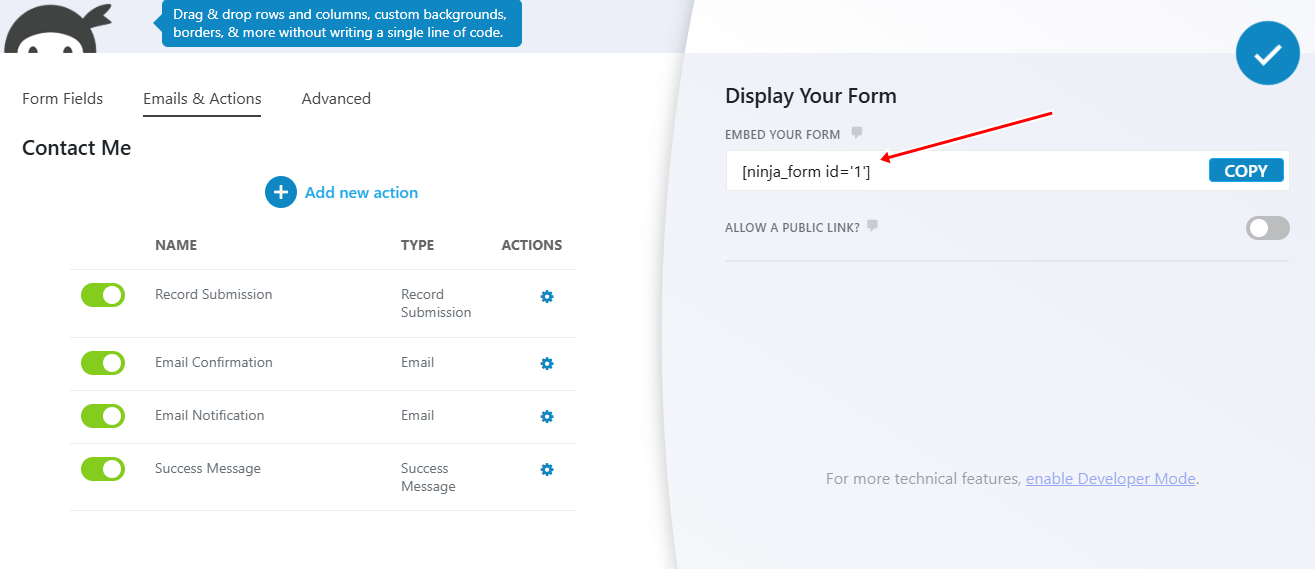
Copy it, paste it into a Shortcode block on the page where you want the form to appear, and update the page.
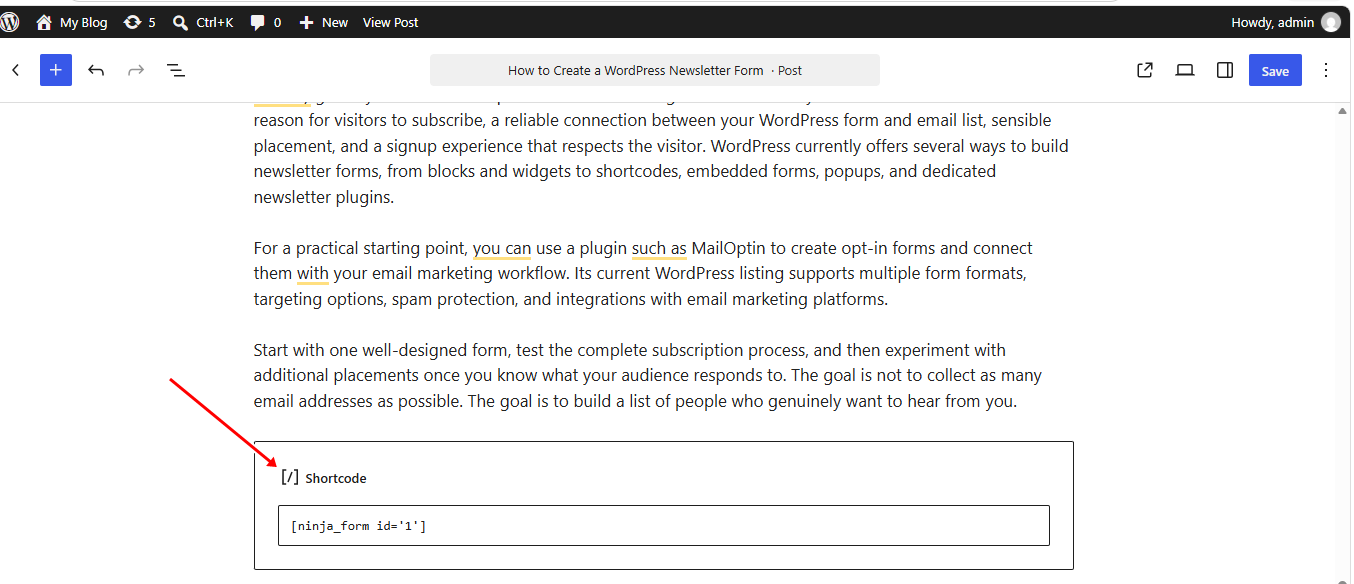
That is the whole process. Your form is now live, and because Ninja Forms uses AJAX by default, it will submit without reloading the page.
If you would rather display your contact form in a popup, the next section will show you how to do that using MailOptin.
Adding Your AJAX Contact Form to a Popup With MailOptin
MailOptin is an excellent WordPress popup maker and form builder that lets you display forms, targeted messages, and calls to action across your website. You can use it to create popups, slide-ins, notification bars, sidebar forms, and other optin campaigns.
Below, we will show you how to use MailOptin to display the contact form we created earlier in a popup.
Step 1: Install and Activate MailOptin
First, purchase the MailOptin plugin, then download the ZIP file to your computer.
Next, log in to your WordPress dashboard and go to Plugins > Add New Plugin. Click the Upload Plugin button at the top of the page.
Click Choose File, select the MailOptin ZIP file you downloaded, and then click Install Now.
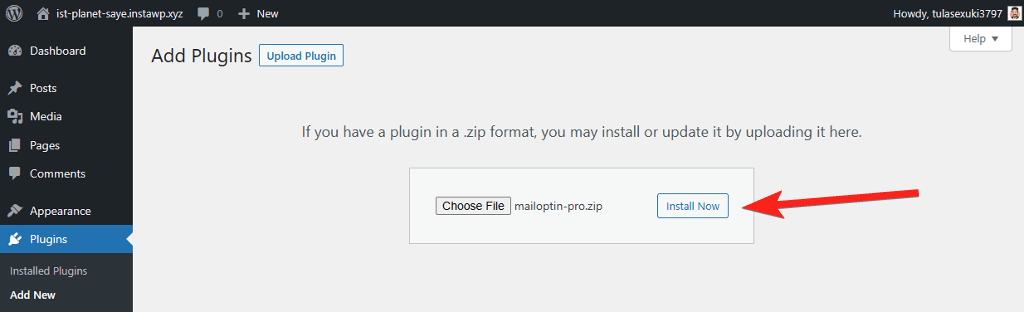
Once the installation is complete, click Activate Plugin. MailOptin will now be ready to use on your WordPress website.
Step 2: Create Your Ninja Forms Contact Form
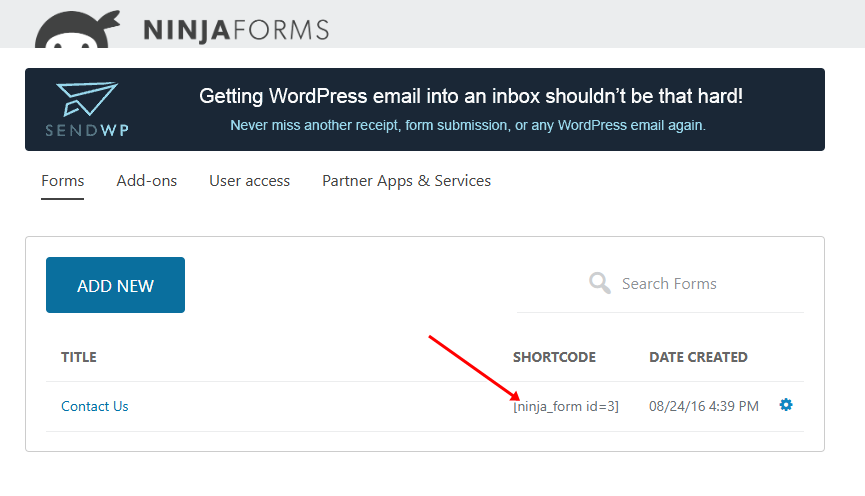
If you want to use the contact form you created earlier, copy its shortcode. However, if you prefer to use a different form, follow the process shown earlier to create a new contact form with Ninja Forms.
Once you have created the form, copy its shortcode. You will need it in the next step to add the contact form to your MailOptin popup.
Step 3: Create a Popup
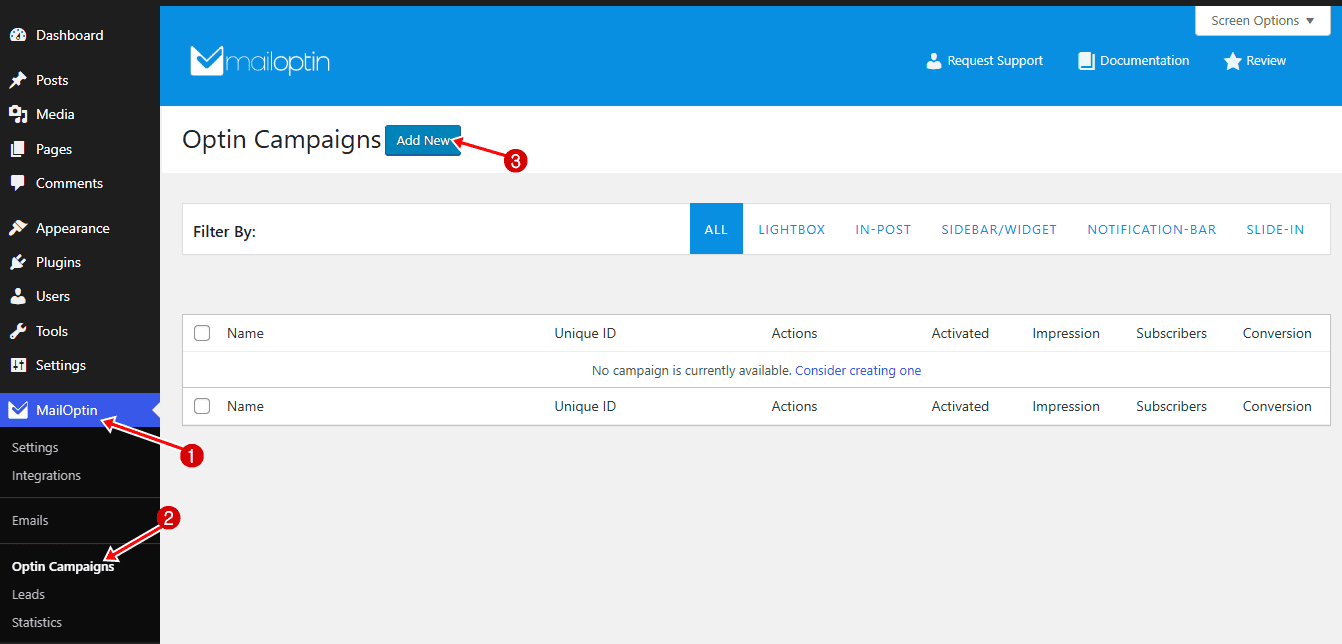
Go to MailOptin > Optin Campaigns, Click Add New.
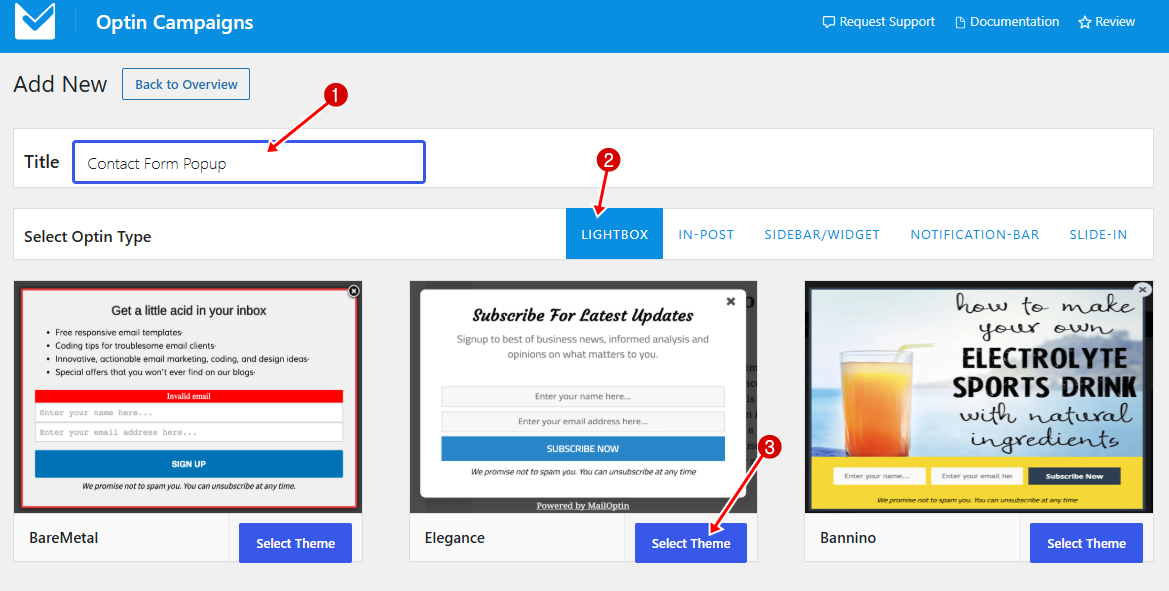
Enter a name for the popup, select Lightbox, then choose a template.
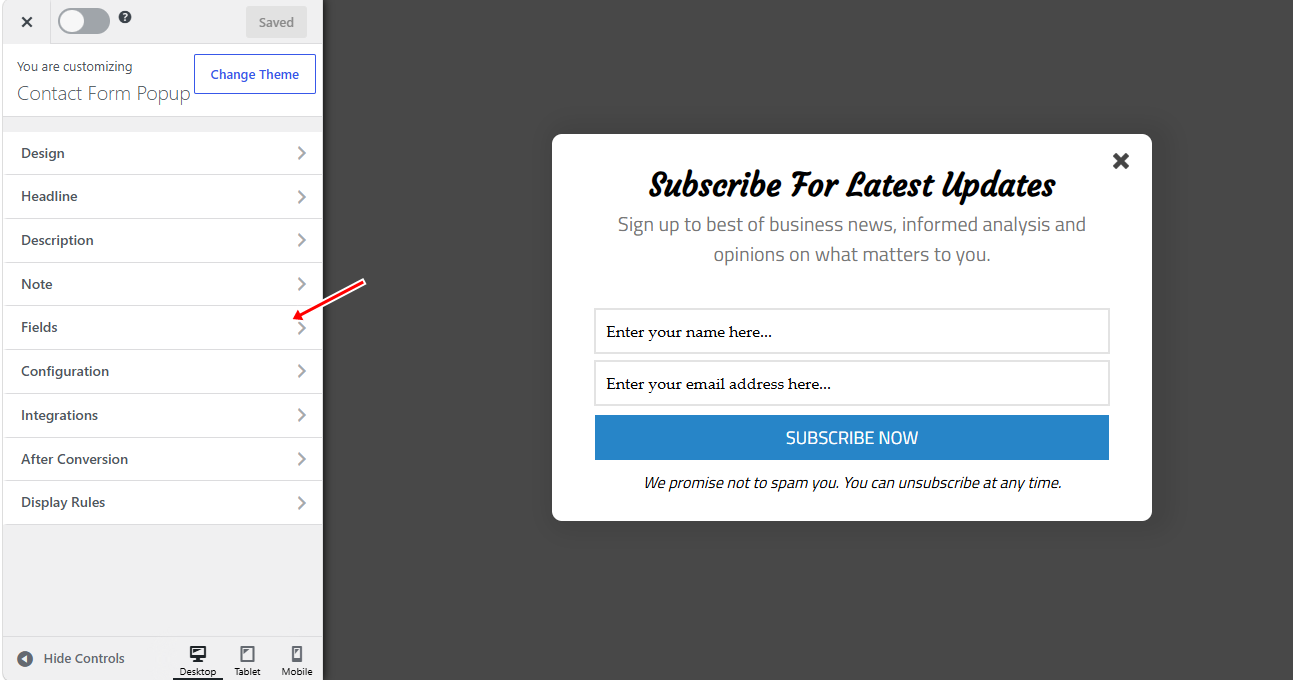
Next, you’ll be taken to the MailOptin campaign editor. From the left sidebar, select the Fields option.
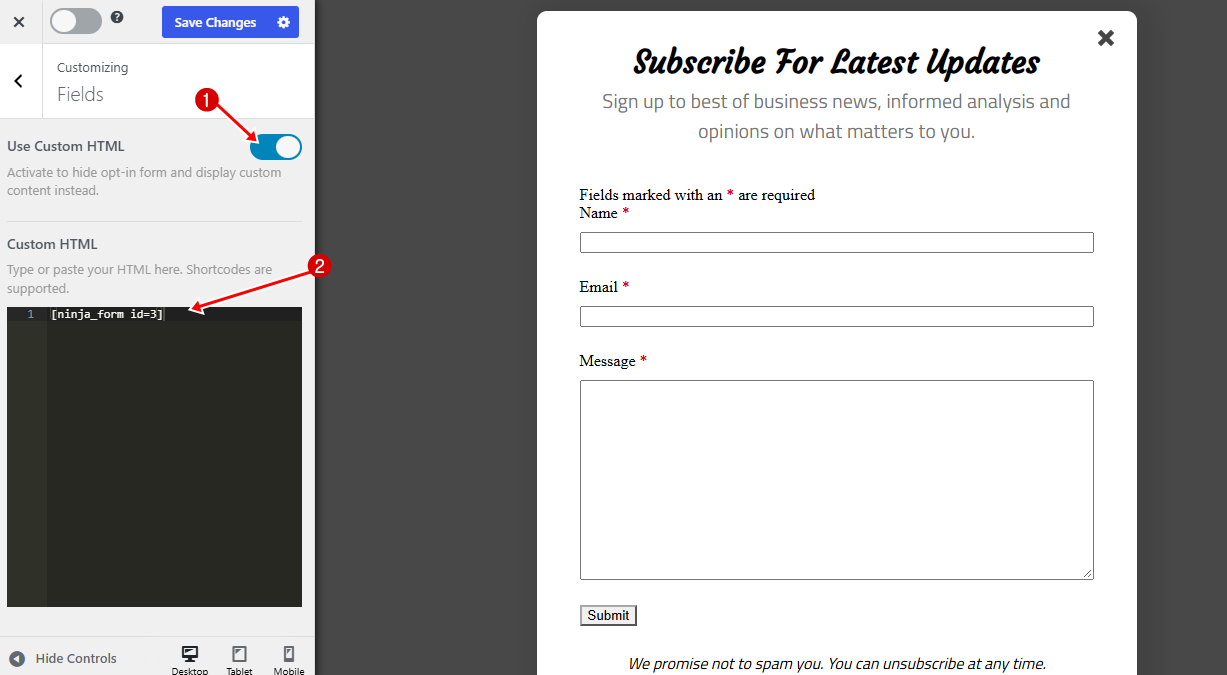
Then, click the Custom HTML toggle at the top. Enter the shortcode you copied in the previous step into the Custom HTML field.
Once you add the shortcode, you’ll see a preview of how your contact form popup will appear on your website.
To edit the heading or subheading, click on the text. You’ll then see the available customization options in the left sidebar, where you can change the text and adjust its appearance to match your website.
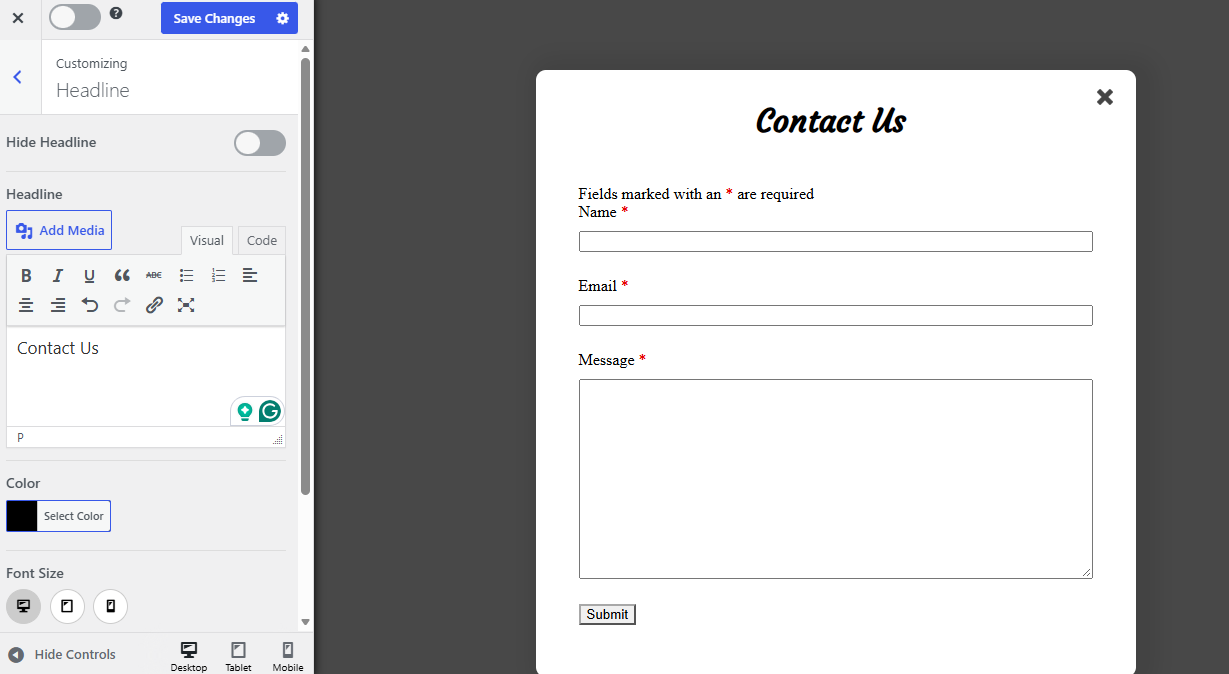
Step 4: Configure the Popup Display Rules
After customizing your WordPress popup form, decide where and when your contact form popup should appear on your website.
MailOptin offers several display options, letting you control which visitors see the popup and when it appears. For example, you can choose to display it:
- On specific pages or posts
- After a visitor spends a certain amount of time on a page
- When a visitor scrolls to a specific percentage of the page
- When a visitor is about to leave your website
- After a visitor views a certain number of pages
- When a visitor clicks a button or link
To configure these settings, open the Display Rules panel and set the conditions based on how you want the WordPress popup to work.
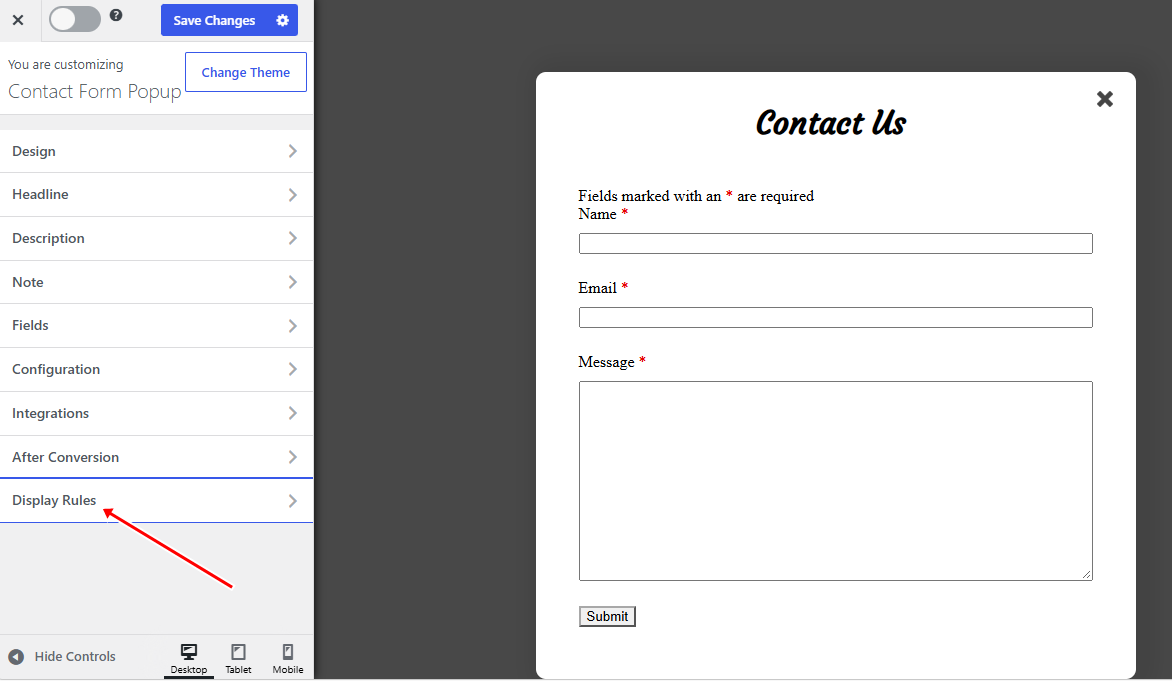
If you want the contact form popup to appear throughout your WordPress website, enable Globally Load Optin. This makes the optin available across your site.
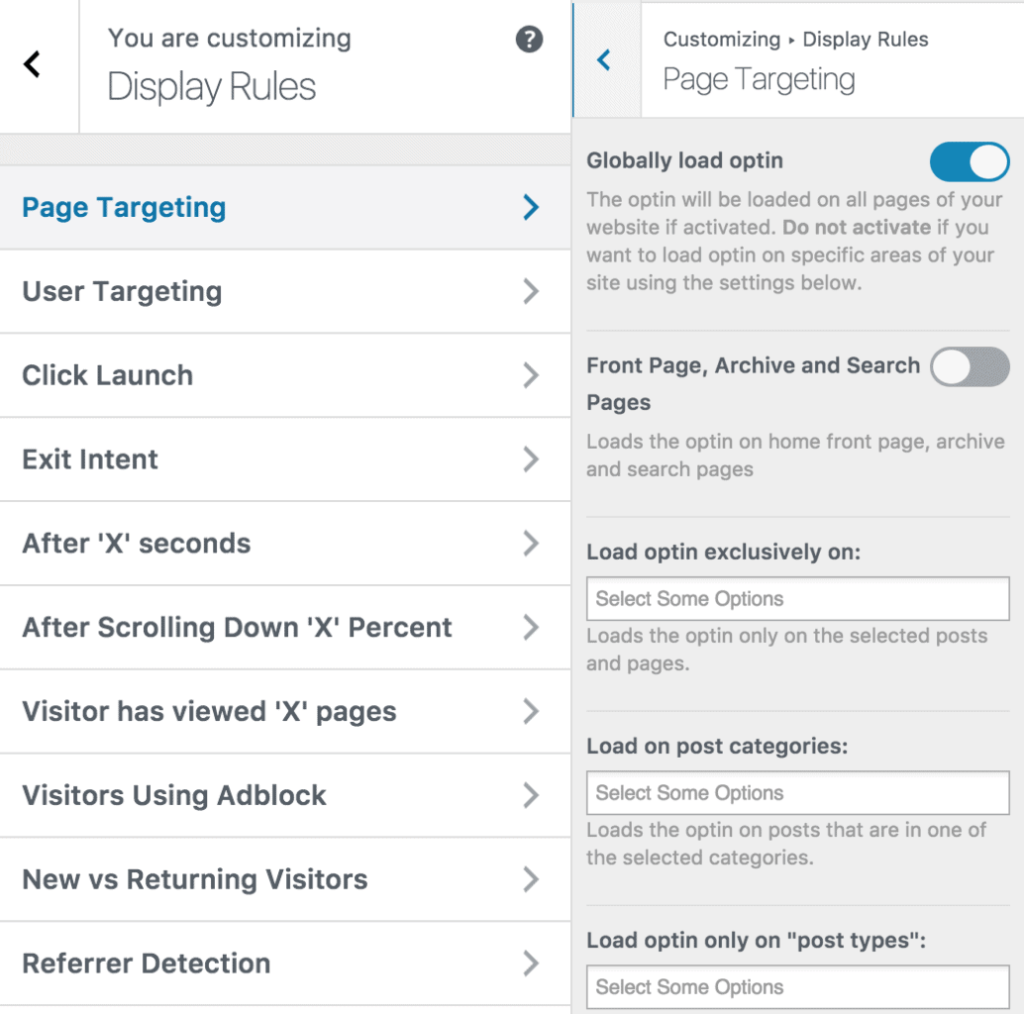
If you only want the popup to appear in specific locations, use MailOptin’s page-level targeting options to select the pages or posts where you want it to appear.
Once you’ve set your preferred display rules, click Save and then activate the optin campaign using the toggle at the top of the builder.
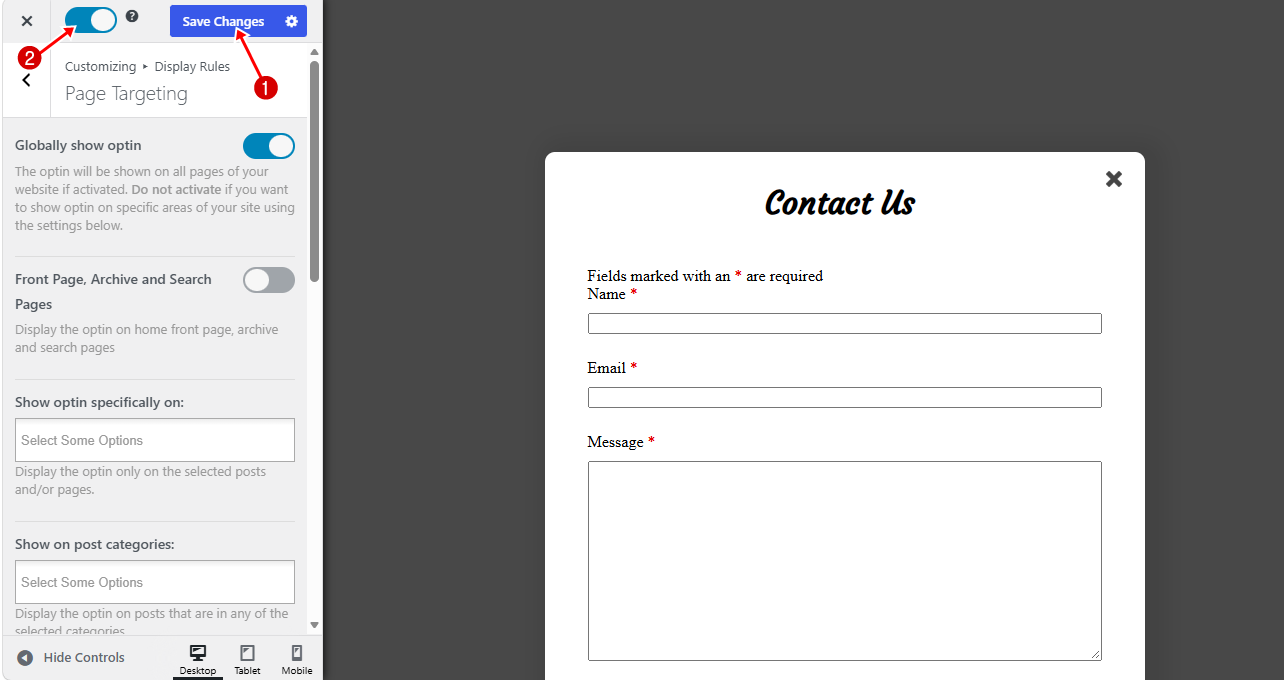
That’s it. Your Ninja Forms contact form is now ready to appear as a popup on your WordPress website.
Note that MailOptin integrates with not only Ninja Forms but also other popular WordPress form plugins, including WPForms, Gravity Forms, Contact Form 7, Formidable Forms, Fluent Forms, Forminator, and WS Form. So, no matter which plugin you use to build your form, you can use MailOptin to display it as a popup.
Bonus: Connect Your AJAX Contact Form to Email Marketing Platform & CRM
A contact form does more than collect messages. Depending on your website and consent process, you may also want to add contacts to your email marketing platform.
For example, someone who submits a contact form may also want to receive updates, product information, or newsletters. This is where FuseWP can be useful.
FuseWP connects supported WordPress forms with email marketing and CRM platforms. It can sync form submissions, map custom fields, and apply tags depending on the integration.
FuseWP currently supports many WordPress form plugins, including Ninja Forms, Gravity Forms, WPForms, Contact Form 7, Everest Forms, Formidable Forms, SureForms, WS Form, and Fluent Forms.
Below, we will show you how to sync Ninja Forms leads to your email marketing software.
Step 1: Install and Activate FuseWP
Start by purchasing a FuseWP license. After checkout, you will receive an email with your download link and license key. Download the plugin from that link.
Next, log into your WordPress dashboard and go to Plugins. Click Add New, then Upload Plugin. Choose the ZIP file you just downloaded and click Install Now.
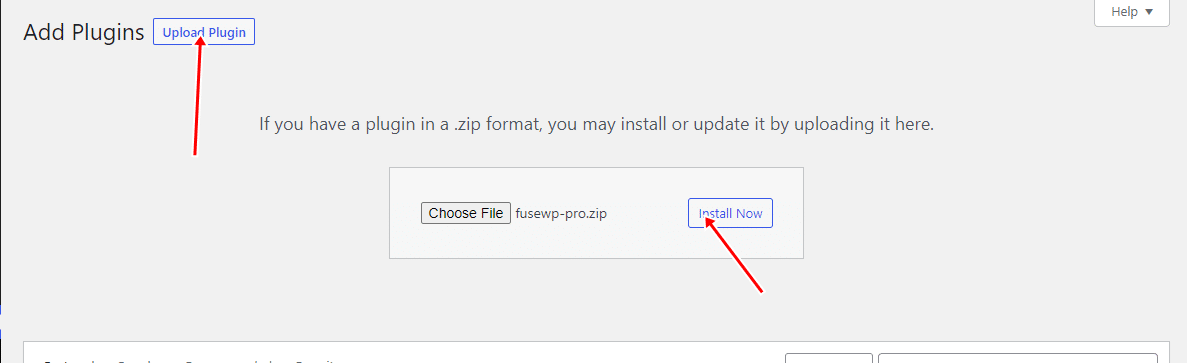
Give it a few seconds to finish, then click Activate Plugin.
Step 2: Integrating FuseWP with Your CRM
To get started integrating FuseWP with your email marketing software or CRM, go to FuseWP > Settings and scroll down to the Integration section.
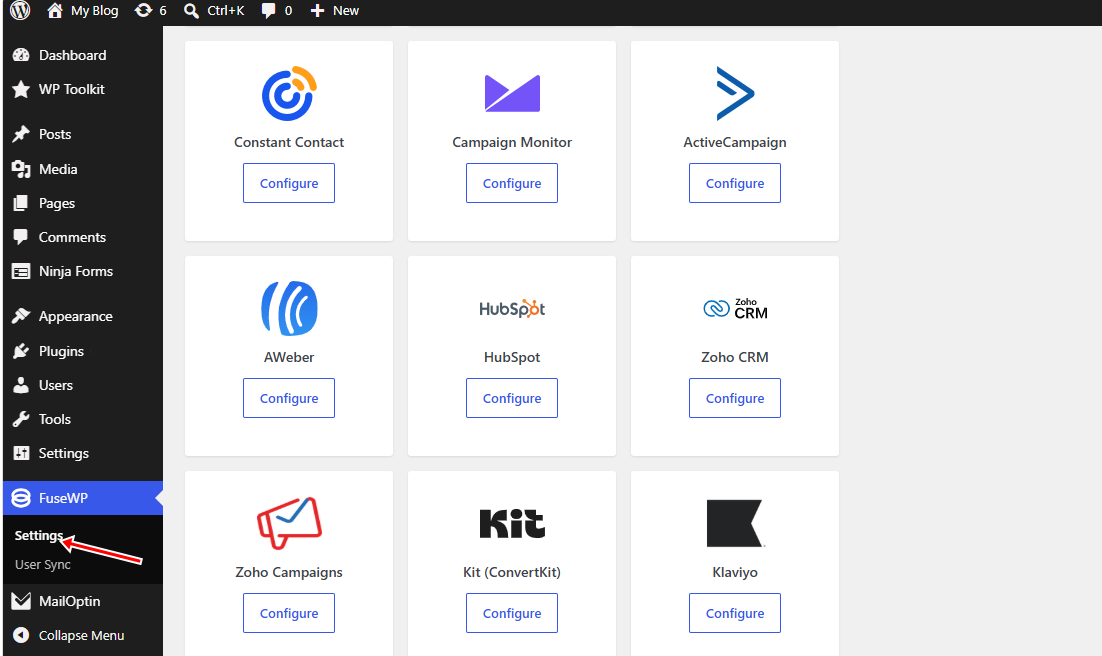
FuseWP supports several email marketing platforms and CRMs, including Mailchimp, ActiveCampaign, Salesforce, Constant Contact, Campaign Monitor, AWeber, Zoho CRM, Zoho Campaigns, Kit (ConvertKit), Drip, Brevo (Sendinblue), HubSpot, MailerLite, Sendy, Klaviyo, Google Sheets, Keap (Infusionsoft), EmailOctopus, Flodesk, HighLevel, Omnisend, Ortto, GetResponse, Mailjet, Encharge, beehiiv, Sender.net, BirdSend, Bento, Mailercloud, Engage.so, SendPulse, Copper CRM, FluentCRM, MailPoet, Groundhogg.
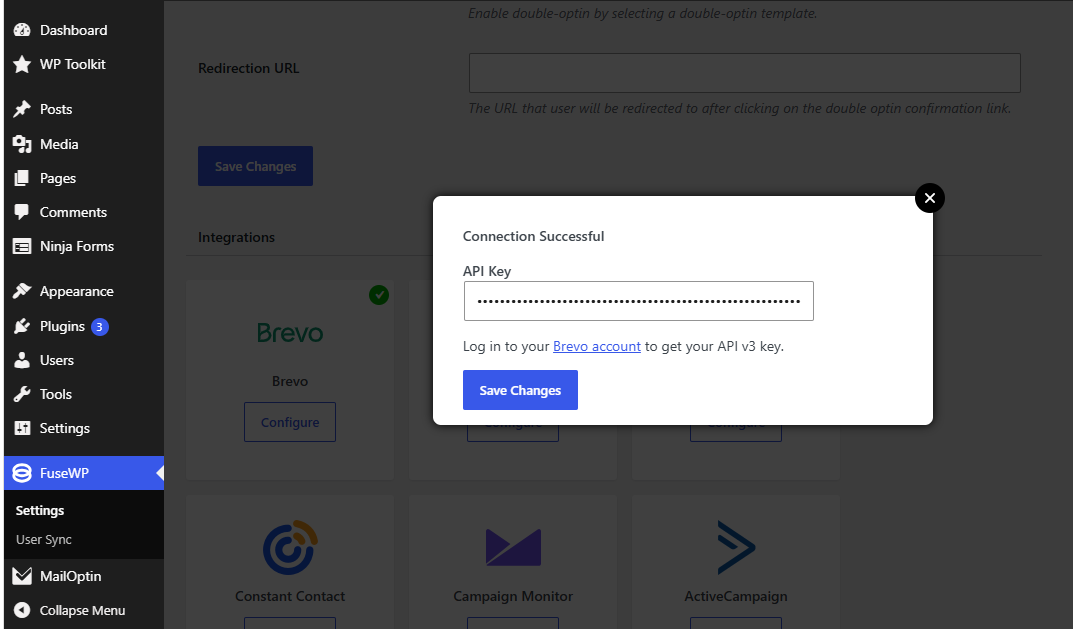
For this guide, we’ll use Brevo as our email marketing platform. Find Brevo in the Integration section and click the Configure button to open its settings.
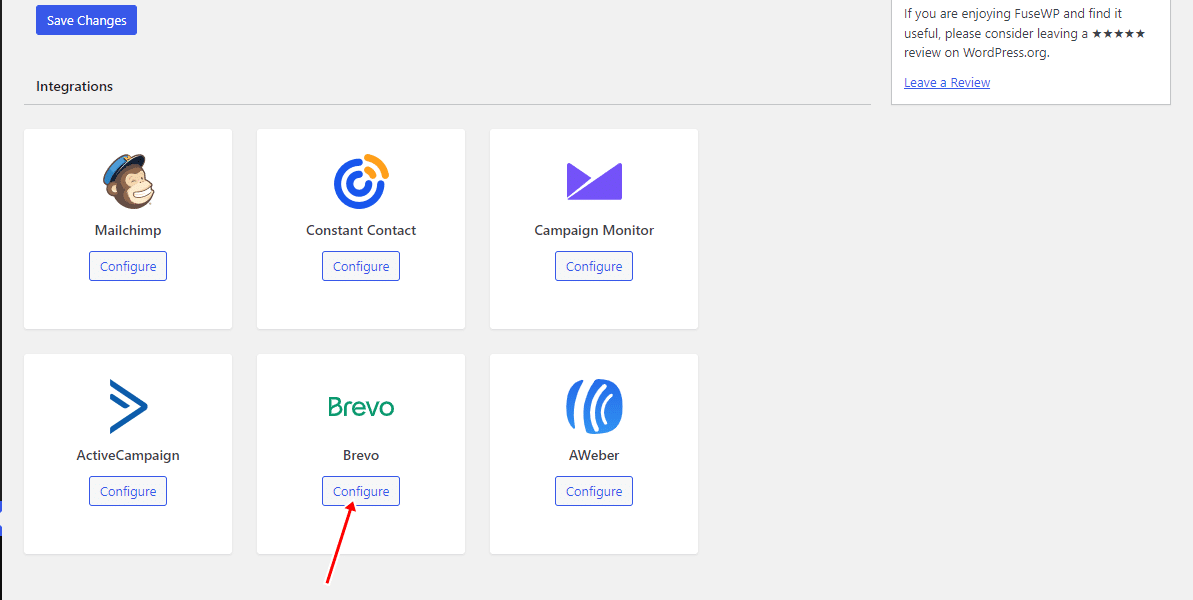
Next, FuseWP will ask you to enter your Brevo API key. To get it, log in to your Brevo account and go to Your account name > SMTP & API > API Keys.
On the API Keys page, click Generate a new API key to create a new key.
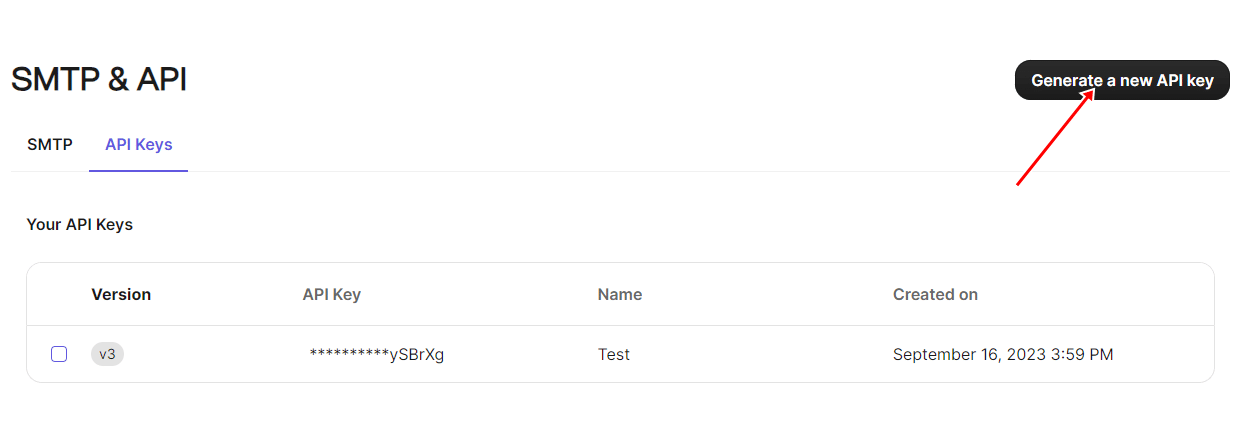
Next, enter a name for your API key, then click Generate. Once the key has been created, copy it and return to FuseWP.
Paste the API key into the appropriate field, then click Save Changes to complete the connection.
Step 3: Sync Ninja Forms Leads to Brevo
Now that FuseWP is connected to Brevo, you can create a sync rule to automatically send new leads from your WordPress AJAX contact form to your Brevo account.
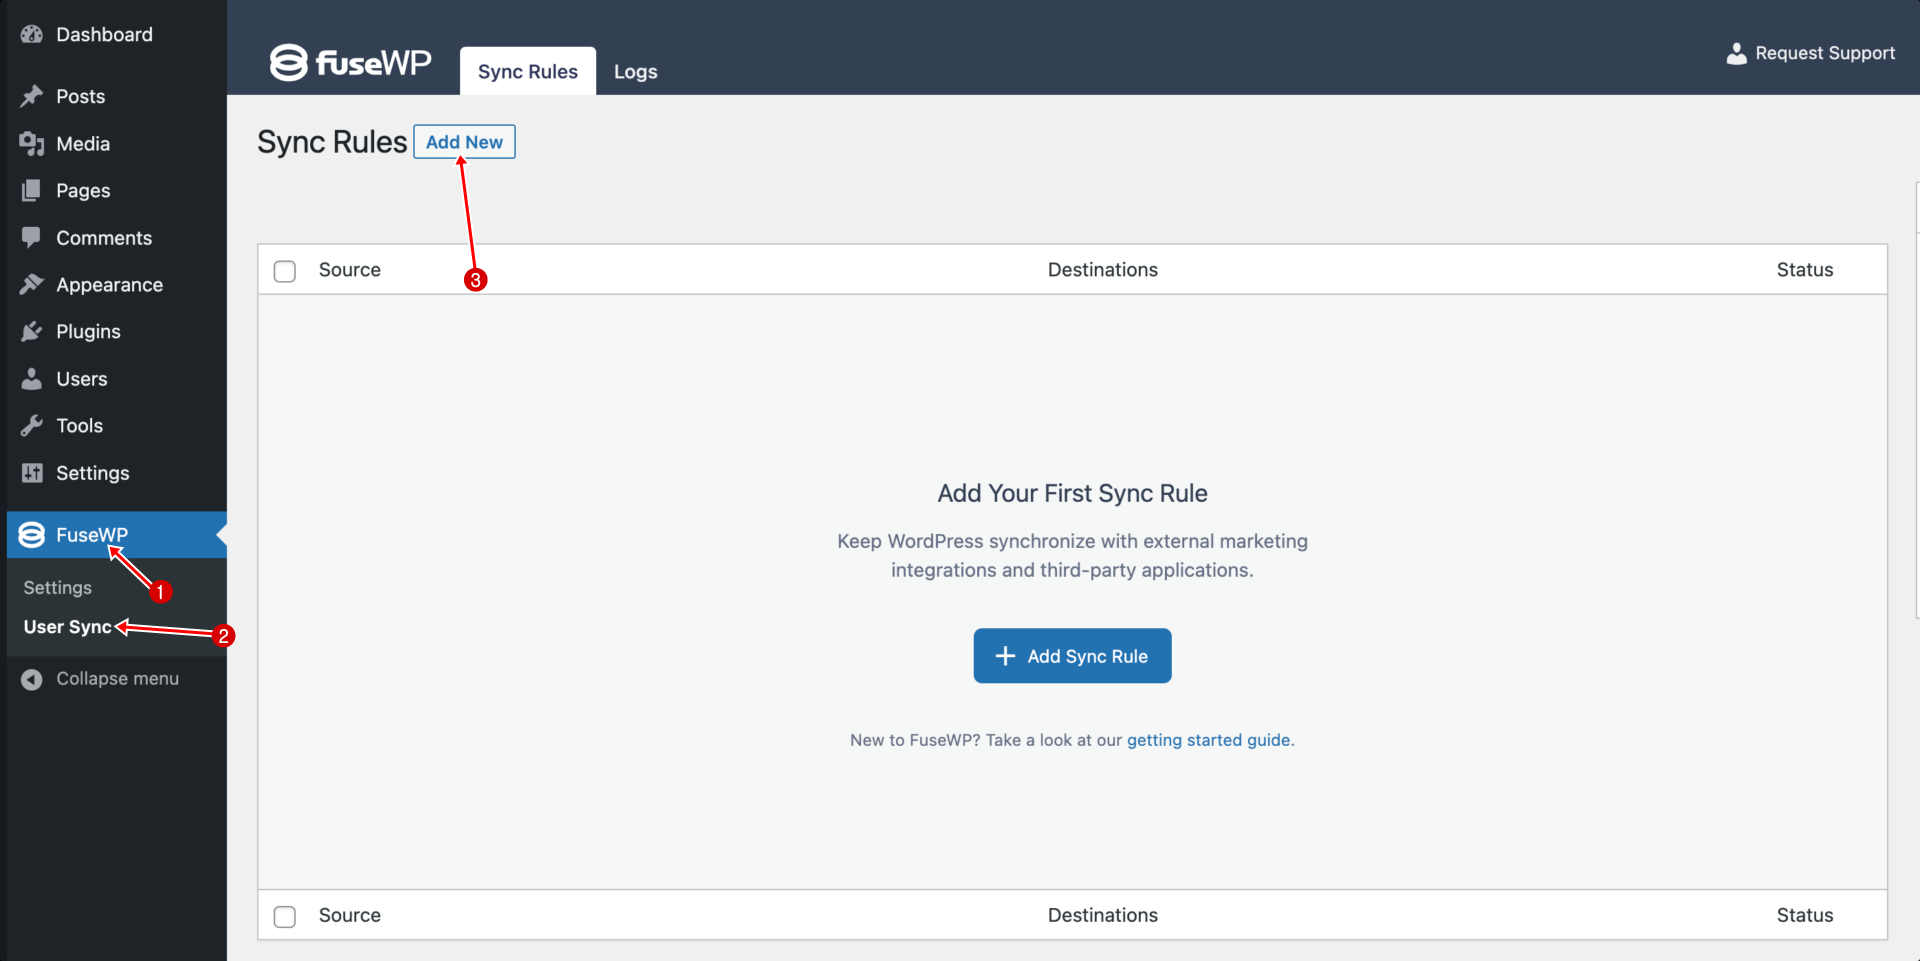
To do this, go to FuseWP > User Sync and click Add New.
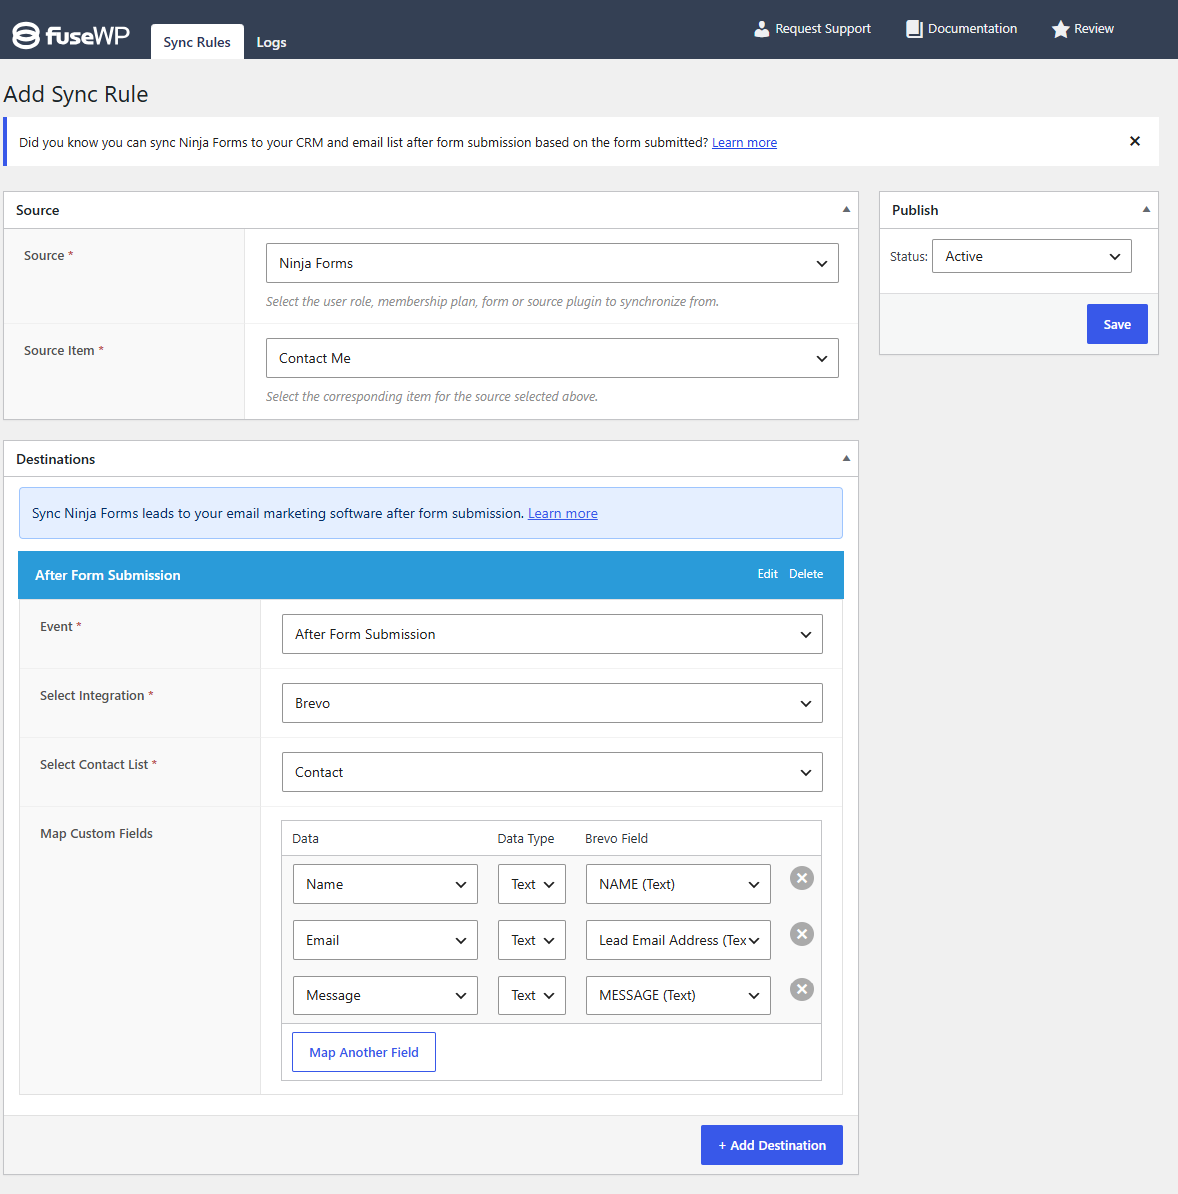
On the next page, select Ninja Forms as the source and choose the specific form you want to sync.
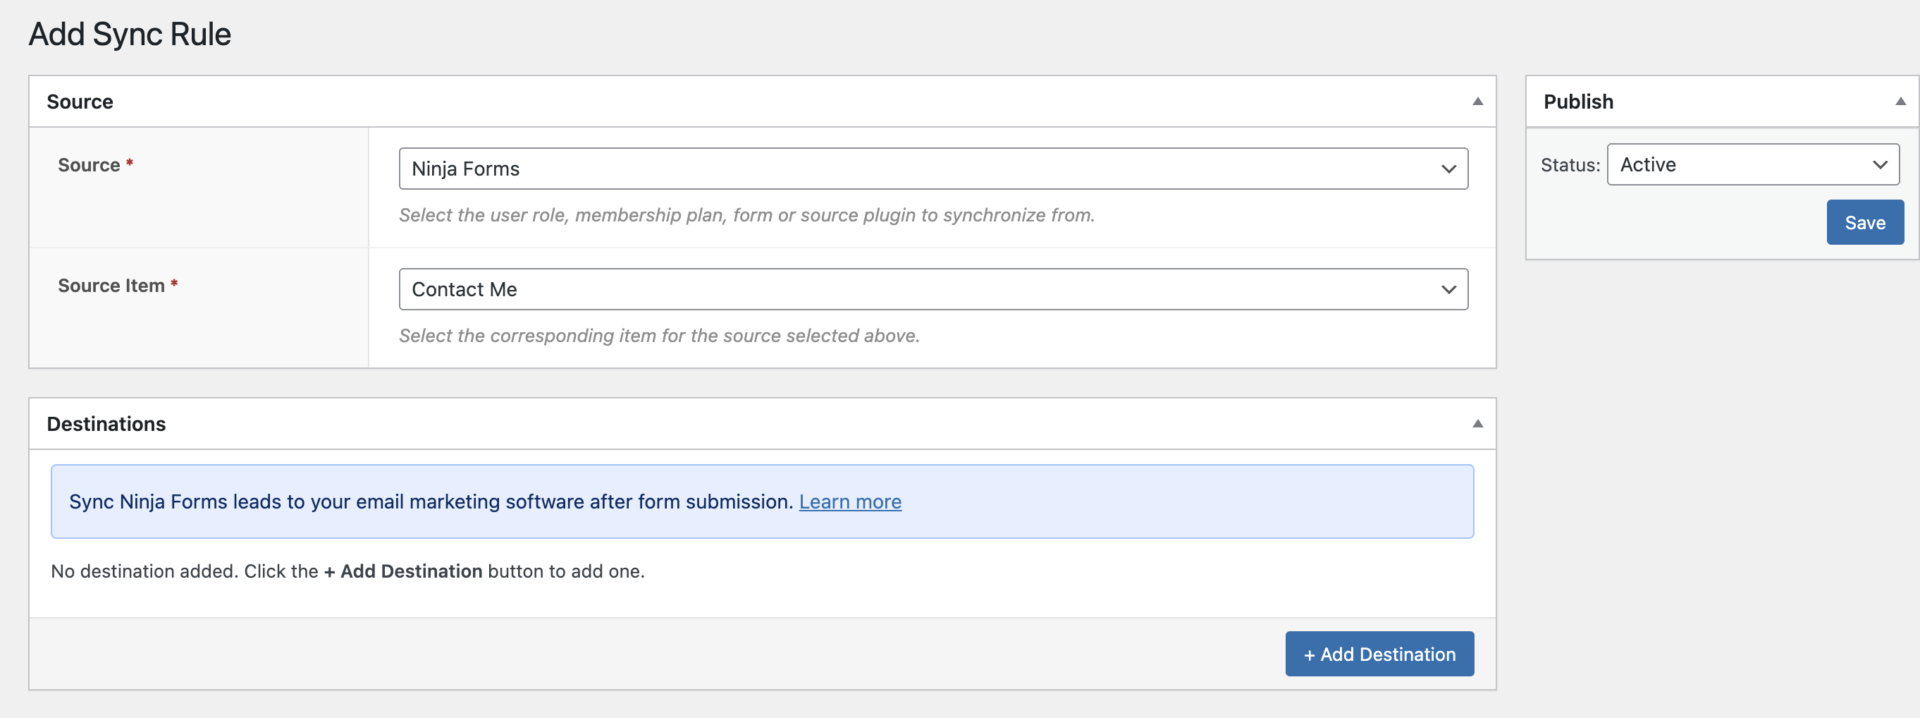
Next, in the Destinations section, select Brevo and choose the list where you want to add the form submissions. You can also assign tags to help organize your contacts.
For example, in the screenshot below, visitors who submit the “Contact Me” form will be automatically added to your selected Brevo list “Contact”.
Once you’ve configured the sync rule to your preference, click Save.
If you already have WordPress AJAX contact form submissions saved as Ninja Forms entries, you can also use FuseWP’s Bulk Sync feature to send those existing contacts to your connected CRM or email marketing platform.
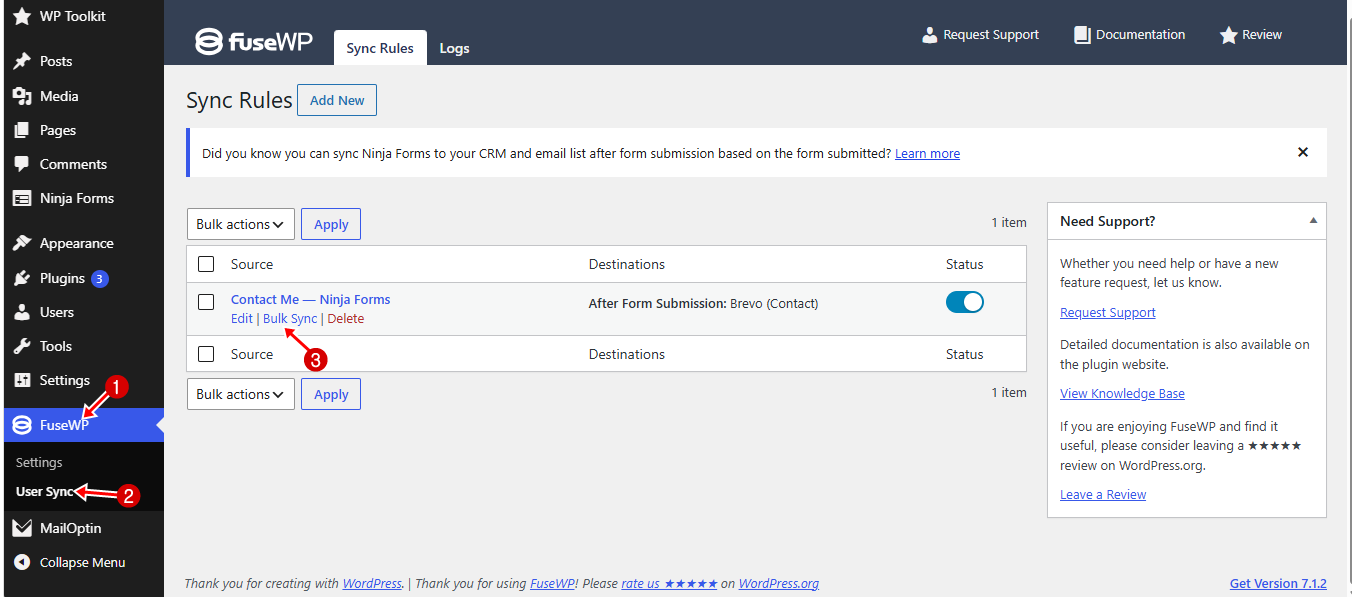
With this done, you have successfully synced your WordPress AJAX contact form entries with your preferred CRM or email marketing platform.
Best Practices for an AJAX Contact Form
Now that you know how to create a WordPress AJAX contact form, add it to a popup, and sync your form entries with an email marketing platform or CRM, here are some best practices to follow:
1. Keep the Form Short: Only ask visitors for information you actually need. A contact form with too many fields can lengthen the submission process and may cause visitors to leave before completing it.
2. Use Clear Field Labels: Make sure each field clearly tells visitors what information they need to enter. Use labels such as Name, Email Address, and Message instead of unclear or confusing text. Also mark required fields clearly so visitors know what they must provide before submitting the form.
3. Add Spam Protection: Contact forms can attract spam submissions, especially when they are available across your website. Use spam protection such as honeypot fields, reCAPTCHA, or Cloudflare Turnstile where appropriate. This can help reduce unwanted submissions while keeping the form accessible to genuine visitors.
4. Test the Form Before Publishing: Always test your AJAX contact form before making it available to visitors. Submit a test message and check that the form displays the expected response without reloading the page. Also confirm that the notification email arrives correctly and that the submission is saved in your WordPress dashboard if your form setup stores entries.
If you are displaying the form inside a MailOptin popup, test the popup as well. Make sure it opens correctly, the form fields work, and the submission process functions as expected.
6. Make the Form Mobile-Friendly: Many visitors will access your website from smartphones and tablets. Check that your form fits properly on smaller screens and that the fields and submit button are easy to use. If you are using the form inside a popup, make sure the popup does not cover the entire screen or make it difficult for mobile visitors to close.
Wrapping Up: Create Your WordPress AJAX Contact Form Today
You now have everything you need to create a WordPress AJAX contact form that submits without reloading the page.
Think back to where we started. A visitor fills in your form, hits send, and the screen goes white. They wait. They wonder if it worked. Some of them leave. That small moment of friction can cost you valuable messages, and now you know how to remove it.
Implement what we taught you today by creating your form with an AJAX form builder such as Ninja Forms, adding it to a popup with MailOptin if needed, and connecting your submissions to your email marketing platform or CRM with FuseWP.
Remember to keep your form short, use clear fields, and test the submission process before making it live. Once everything works as expected, publish your form and give your visitors a faster, more convenient way to get in touch with you.