Do you want to add a newsletter signup form after your WordPress post content to convert more readers into email subscribers?
Think about what usually happens when someone finishes reading one of your blog posts. They scroll to the end, pause for a second, and then leave the page. Maybe they enjoyed the article. Maybe they even found it helpful enough to share. But if there’s no clear way for them to stay connected with you, that reader is gone the moment they close the tab.
When a visitor reaches the end of your article, they’ve already spent time with your ideas. They’ve followed your explanation, read your tips, and hopefully learned something useful. At that moment, inviting them to join your newsletter feels natural. It doesn’t interrupt their reading experience. Instead, it offers a simple next step for readers who want more content like the one they just enjoyed.
In this article, we will explain why you should add a newsletter signup form after WordPress post content and show you how to set it up using MailOptin.
Why Add a Newsletter Signup Form After WordPress Post Content
Below are some important reasons why placing a signup form after your WordPress post content works so well.
- Targets Interested Readers: When someone reads your blog post from beginning to end, it usually means they found the information useful or interesting. These readers are far more likely to subscribe compared to visitors who leave your page after a few seconds.
- Improves Email List Growth: Growing an email list is a challenge for many website owners. Often, signup forms are only on the homepage or sidebar so that visitors might miss them. Adding a signup form at the end of WordPress posts turns every article into a chance to gain subscribers. Visitors arriving from search, social media, or internal links will see the form when they finish the post.
- Better Reading Experience: Many websites use pop-ups or slide-in forms to collect email addresses, but these can interrupt and annoy readers. Placing a signup form after the content avoids this by letting readers focus on the article first, with the invitation appearing only afterward, creating a smoother experience.
- Increases Reader Engagement: When readers subscribe to your newsletter, they are more likely to return to your website. A newsletter allows you to share new blog posts, updates, and important announcements directly with your audience. By placing the signup form at the end of your posts, you give readers an easy way to stay connected with your content. Over time, this helps build a stronger relationship between you and your audience.
Add a Newsletter Signup Form After WordPress Post Content Using MailOptin
Now that you know the benefits of adding a newsletter signup form after WordPress post content, let’s look at how you can set it up using MailOptin.
You may be wondering why we are using MailOptin for this guide.
The truth is, there are several methods you can use to add a newsletter signup form after WordPress post content. However, using a plugin is the easiest and most practical option, especially if you want to avoid coding or complicated technical steps.
We are using MailOptin because it is an excellent plugin that combines lead generation, email automation, and smart display targeting in one package.
MailOptin gives you the ability to display signup forms at the right time. Instead of showing forms randomly across your website, you can configure smart triggers such as scroll percentage, time spent on page, exit intent behavior, or page views.
Another important advantage is automation. MailOptin can automatically send new post notifications to subscribers whenever you publish new content. This helps you keep your audience engaged without manually sending emails every time you publish an article.
You can also create email digest newsletters, schedule campaigns, and build automated marketing sequences based on user behavior. These features make it easier to maintain consistent communication with your audience.
Step 1: Install and Activate MailOptin
To get started, visit the MailOptin website and purchase a license. After completing your purchase, you will receive an email containing the plugin download link and your unique license key.
Next, log in to your WordPress dashboard. Navigate to Plugins > Add New, then click the Upload Plugin button.
From there, select the plugin ZIP file you downloaded and click Install Now to begin the installation process.
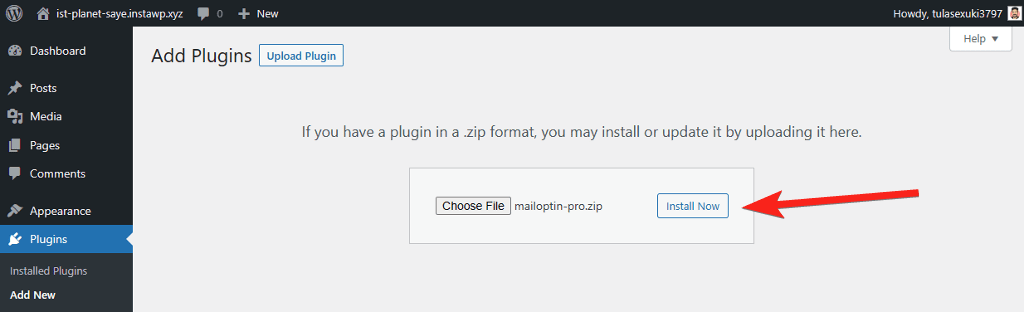
After the installation is complete, click Activate Plugin.

Step 2: Connect MailOptin to Your Email Marketing Service
The next important step is connecting MailOptin to your preferred email marketing service. This connection ensures that every new subscriber is automatically added to your email marketing platform, making it easier for you to manage contacts, create campaigns, and send updates whenever you publish new content.
MailOptin integrates smoothly with many popular email marketing platforms, including Mailchimp, Drip, AWeber, Kit, MailerLite, Constant Contact, GetResponse, Sendy, Campaign Monitor, ActiveCampaign, Brevo, and several others.
To set this up, log in to your WordPress dashboard and navigate to MailOptin > Integrations.

On the integrations page, select your preferred email marketing provider from the list of available options. Then follow the connection instructions. In most cases, you will need to copy an API key from your email marketing account and paste it into MailOptin to complete the connection.
For example, if you are using Brevo, click on Configure under the Brevo logo. Next, log in to your Brevo account, generate or copy your API key, return to WordPress, paste the API key into the required field, and click Save Changes.

Once this is done, you will see Connected under Brevo, showing that you have successfully connected MailOptin to your Brevo account.

If you prefer not to connect to an external email service, you can still collect and store subscribers using the MailOptin Leads feature, which saves subscriber information directly in your WordPress dashboard.
Step 3: Create a New Optin Campaign
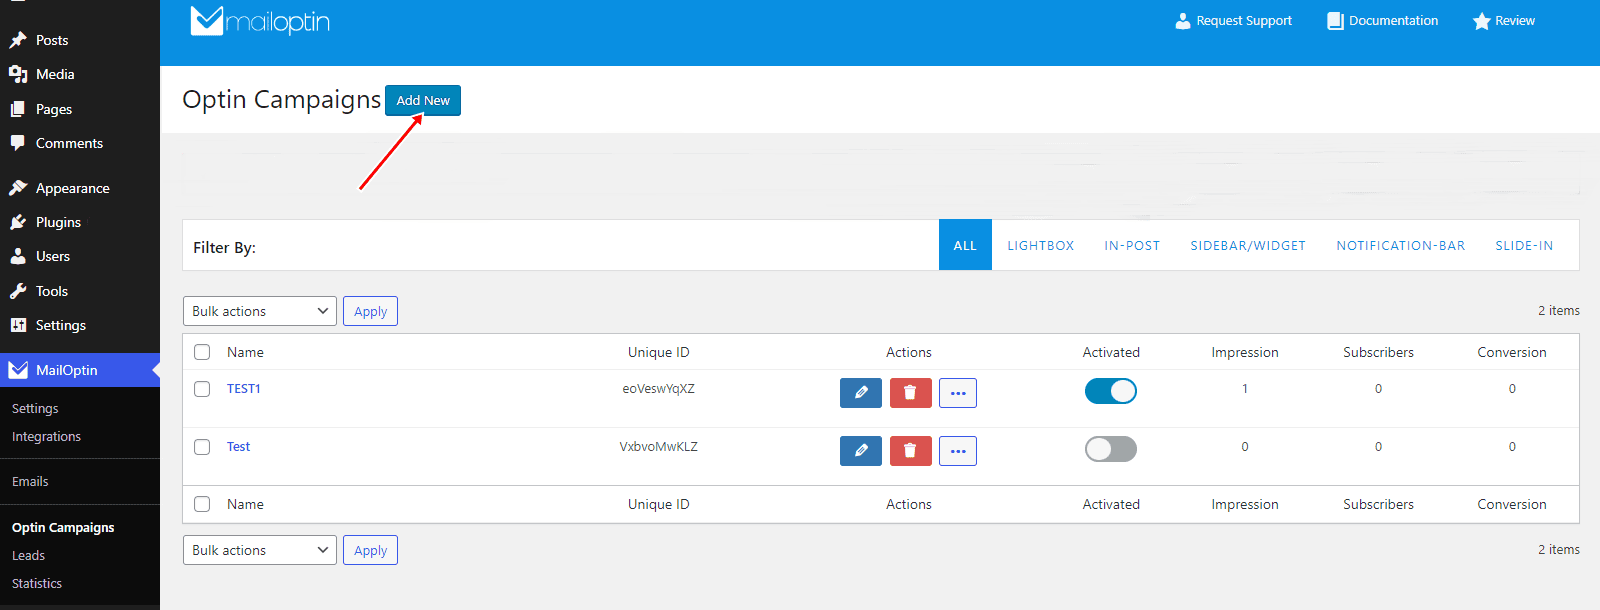
The next step is creating your optin campaign. Go to your WordPress dashboard and navigate to MailOptin > Optin Campaigns, then click Add New to begin.
Next, enter a name for your optin campaign, then select the In-Post optin type since you want the newsletter signup form to appear after your WordPress post content.
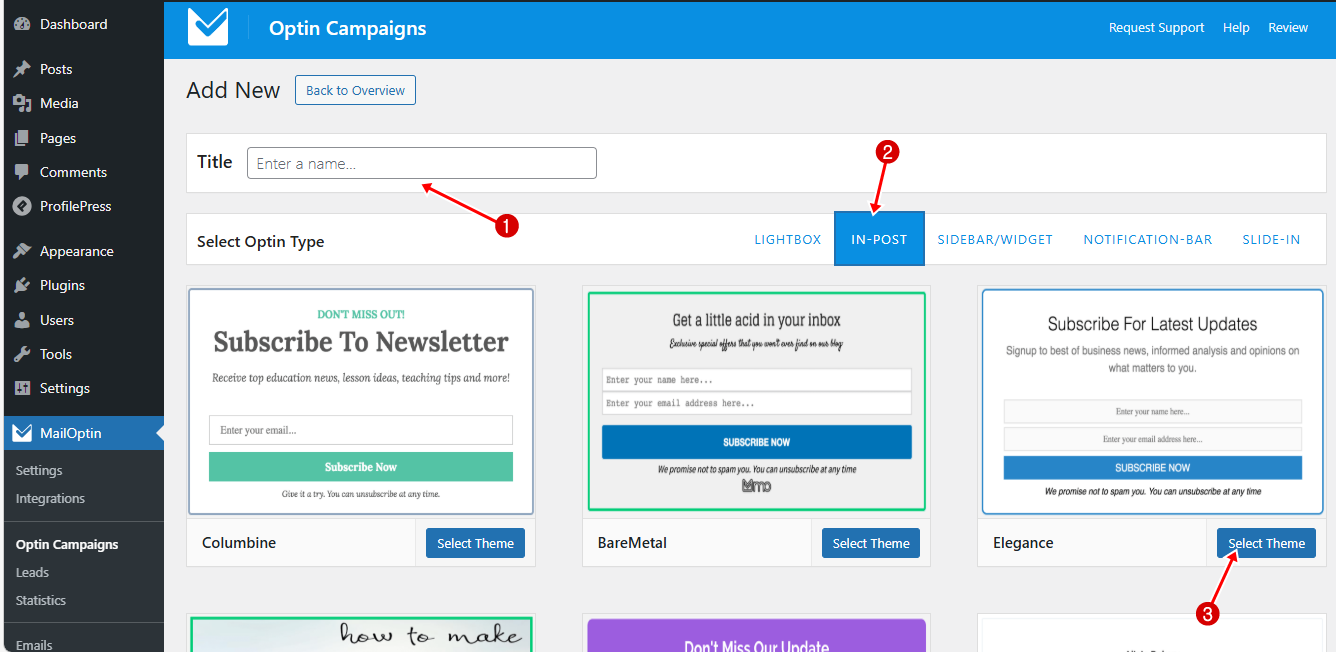
After selecting the optin type, choose a design theme for your form.
MailOptin provides a wide range of ready-made templates that you can preview and select. These templates are professionally designed, clean, and modern, helping your signup form look attractive while still matching your website style.
Once you select a template, you will be taken to the optin editor page.
Step 4: Customizing the Newsletter Signup Form
MailOptin lets you customize various parts of your signup form, including the headline, description, colors, and button styles. You can adjust these elements to make the form more attractive and better suited to your website design.
In this section, we will walk through the different options available in the editor.

Design
This section allows you to control how your optin form appears on your website and how well it blends with your content.

Here, you can adjust the form width so it fits nicely within your post layout without looking too wide or too small. You can also change the background and border colors to match the style and feel of your website.
If you want more advanced styling options, MailOptin also allows you to add custom CSS for deeper design changes. This is useful if you have specific styling ideas or want the form to match a unique website layout.
The main idea is to keep things neat and easy on the eyes. Your form should catch attention, but it should not feel noisy or cluttered. A clean design usually performs better because readers can quickly understand the message and know exactly what action to take.
Headline
The Headline section is where you capture your readers’ attention and communicate the main message of your signup form.
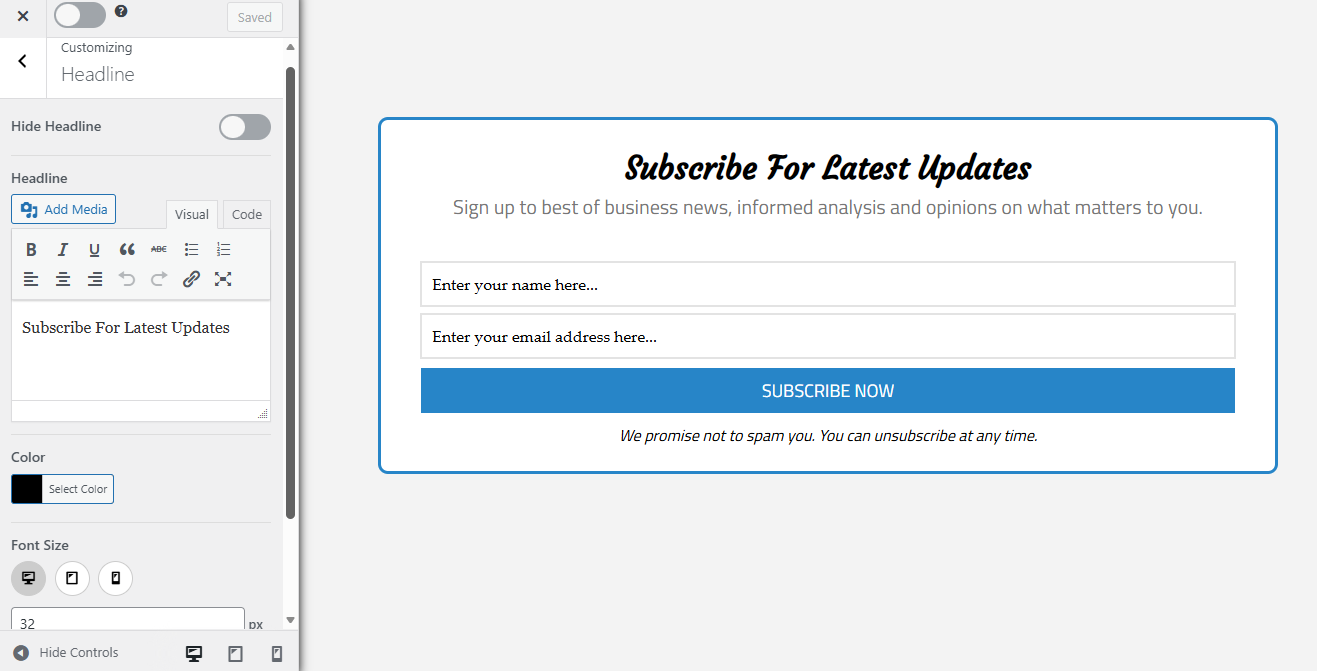
If you prefer a cleaner look, you can choose to hide the headline. However, keeping it visible usually helps encourage more subscriptions because it immediately tells visitors what they are signing up for.
You can also edit the headline text to make it more attractive and engaging. MailOptin lets you adjust the font size, change the font style, and modify the text color to match your website branding.
If you want, you can also add a small image or icon to make the form look more visually appealing.
Description
This section is where you can provide more details about what readers will gain by subscribing to your newsletter.

You can hide this section if you want a shorter form layout, or edit the text to clearly highlight the benefits subscribers will receive, such as exclusive updates, helpful tips, or new post notifications.
Just like the headline settings, you can also adjust the font size, font style, and text color to match your website design. If you want to make the form more visually interesting, you can add small media elements such as icons or images.
Note

The Note section appears below the main form fields and is usually used to add small extra details for visitors. This is where you can include privacy messages, short reassurances, or simple statements like “We promise not to spam you. You can unsubscribe at any time,” which helps build trust with readers before they subscribe.
If you do not need this section, you can choose to hide it. If you decide to use it, you can still edit the text, change the font size and style, adjust the text color, and even add small media elements if you want.
There is also an option called close optin on click, which allows the form to close when a visitor clicks on the note text. This can improve user experience by giving readers more control over what they see on the page.
Another helpful feature is the acceptance checkbox. This is useful if you want subscribers to agree to your terms, privacy policy, or consent requirements before completing the signup process. This helps keep your email list compliant while also building trust with your audience.
Fields
The Fields section is where you decide what information visitors will provide when they subscribe to your newsletter.

You can add or remove fields depending on the details you want to collect from subscribers. You can also mark certain fields as required to ensure important information is always collected.
Beyond collecting information, you can also customize the form’s appearance. You can edit the submit button text, adjust field colors, change font styles, and modify the background to match your website design.
If you need more advanced customization, MailOptin allows you to add custom HTML or even replace the optin form with a call-to-action button. This is helpful if you want more control over how visitors interact with the form.
Configuration
This section lets you decide where the optin form will appear within your blog post.
You can choose between before, in the middle of, or after the content. Since the goal is to display the newsletter signup form after your WordPress post content, choose after content.
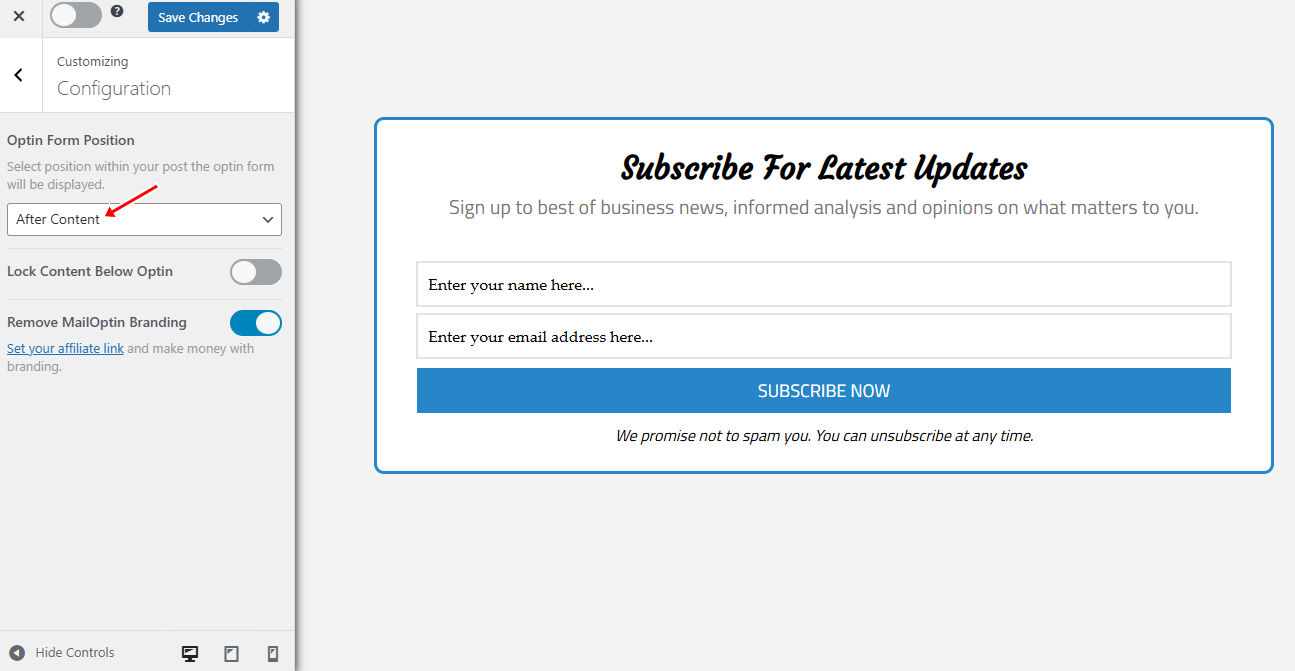
In this section, you can also enable locking content below optin, which restricts access to content until a user subscribes. You will also find an option to remove MailOptin branding.
Integration
Once your form design and display settings are ready, the next step is to decide where your subscriber information will be stored.
To do this, click on the Integration tab and choose the email marketing service you connected earlier in Step 2. This ensures that every new subscriber who signs up through the form will be sent directly to your selected email list.

If you prefer not to connect an external email service, you can turn on the MailOptin Leads Only option. This allows you to collect and manage subscribers directly from your WordPress dashboard using the MailOptin Leads feature.
After Conversion
Within this section, you choose what happens after someone signs up through your form.

You can show a success message confirming that their subscription was successful or redirect to a thank-you page.
In this section, you can also enable an autoresponder to send an email to subscribers immediately after they sign up. You can choose how the optin form appears to users who are already subscribed and set up email notifications so you are alerted whenever a new lead joins your list.
There is also an option to add a success-triggered script, such as a tracking or pixel code, which runs after someone subscribes
Display Rules
This section controls where the optin form will appear on your website.
Since the form has already been set to appear after your post content in the Configuration section, the next step is deciding where it should be displayed.
If you want the newsletter signup form to appear on every post and page on your site, go to Display Rules > Page-Level Targeting and select Globally Load Optin.
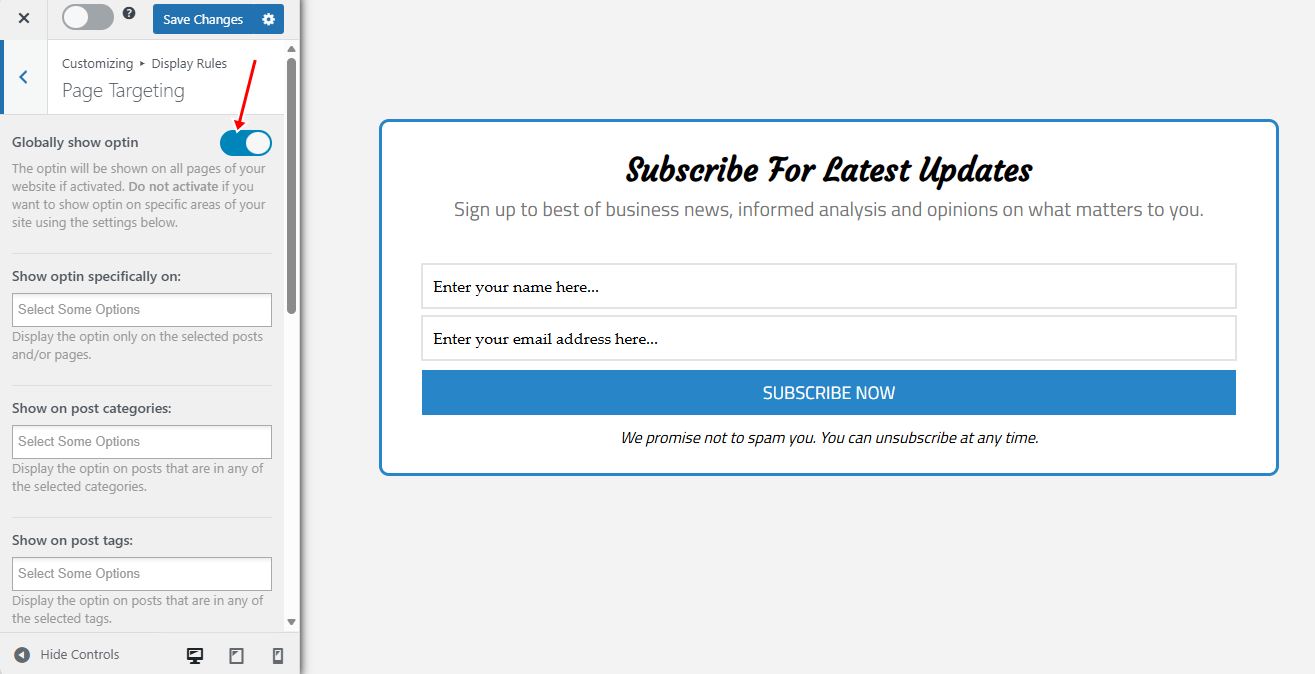
If you would rather show it only in certain places, you can use the page-level targeting settings to choose specific posts, pages, or sections of your site.
Embed & Shortcode
This section provides another way to display your optin form. Instead of relying on display rules, you can place the form anywhere on your site using a shortcode or template tag. This allows you to insert the signup form directly into posts, pages, or theme files.

Step 5: Publish the Campaign
After finishing the design and adjusting the display settings, the next step is to publish your optin campaign.
To do this, move to the top right corner of the page and click Save Changes to store your settings. After that, turn the activation toggle to On. This activates the campaign and allows the signup form to appear on your website.

Once the campaign is active, open any blog post on your site and scroll to the bottom of the article. You should now see the newsletter signup form displayed right after the post content, based on the position you selected earlier.
Below is an example of how the form appears on our demo website.

Step 6: Track Newsletter Signup Performance
After adding your newsletter signup form, the next step is to monitor how well it performs. Tracking performance helps you understand whether visitors are actually subscribing after reading your posts.
MailOptin includes built-in analytics that provide useful information, including impressions, subscribers, and conversions.
Impressions indicate how many times the form was displayed, while subscribers indicate how many visitors subscribed. The conversion helps you see the percentage of visitors who joined your email list after seeing the form.
You can view this data by going to MailOptin > Optin Campaigns in your WordPress dashboard.

Reviewing these numbers can help you improve your results. For example, if the conversion rate is low, you might try updating the headline, adjusting the description, or changing the call-to-action text. Small changes can often lead to more signups.
By regularly checking your campaign performance, you can continue improving your newsletter signup form and grow your email list more effectively.
Final Thoughts
We hope this article helped you learn how to add a newsletter signup form after WordPress post content to grow your email list and improve engagement with your audience.
Remember to keep your forms simple, write clear, friendly messages, and always focus on providing value to your readers. Doing this will help you attract more subscribers and improve your results over time as you continue publishing quality content.
Get MailOptin today and start applying what you have learned.