Have you ever wondered how to create a subscription website using WordPress and turn your expertise, content, or services into a steady stream of recurring revenue?
Subscription-based websites are one of the fastest-growing online business models, powering platforms like Netflix, Skillshare, and countless niche membership sites. The good news is, you don’t need a big budget or a team of developers to launch your own.
With WordPress and the right membership plugin, you can set up a fully functional subscription website where users pay for exclusive access to your content, courses, downloads, or community.
In this guide, we’ll cover everything you need to know to build a subscription website with WordPress. You’ll learn what a subscription website is, why WordPress is the best platform for it, what you’ll need to get started, and the exact steps to set up your site from the ground up.
What Is a Subscription Website?
A subscription website is an online platform where users pay a recurring fee weekly, monthly, or yearly to access exclusive content, services, or products. Unlike traditional websites, where visitors can freely access all content, subscription sites create members-only areas that are accessible only to paying subscribers or registered members.
This model is widely used by businesses, content creators, and educators because it provides predictable and recurring income while delivering ongoing value to subscribers.
Here are a few common examples of subscription websites:
Online Course Platforms: Educators and coaches use subscription models to give students access to lessons, tutorials, and course materials.
Digital Product Libraries: Designers, writers, or developers sell access to a growing collection of templates, stock images, or software.
Membership Communities: Niche communities or forums charge membership fees for networking opportunities and exclusive resources.
Service-Based Platforms: Professionals, such as fitness trainers or consultants, provide ongoing access to training programs or coaching sessions.
Content Creators: Bloggers, podcasters, and YouTubers offer bonus content, behind-the-scenes material, or early releases to paying members.
What makes a subscription website so powerful is its ability to generate consistent revenue. Instead of relying on one-time sales or ad income, you can focus on delivering ongoing value while enjoying predictable monthly earnings.
Now that you know what a subscription website is and have seen some common examples, let’s move on to the next section, where we’ll discuss why WordPress is the best platform for building your subscription website.
Why Use WordPress for Your Subscription Website?
When it comes to building a subscription website, WordPress is the top choice. As the world’s most widely used content management system (CMS), it powers millions of websites and offers everything you need to grow a subscription-based business.
Here’s why WordPress is perfect for subscription websites:
Easy to Use and Highly Customizable: You don’t need to be a developer to build a subscription site with WordPress. It’s designed for beginners but also offers endless customization through thousands of plugins and themes. This means you can start simple and add more features as your business grows, without needing to rebuild your site.
Full Control Over Your Business: Unlike third-party platforms that take a cut of your earnings or limit your customization options, WordPress gives you complete ownership of your site and content. You decide how your website looks, what features it offers, and how you manage subscriptions, without platform restrictions.
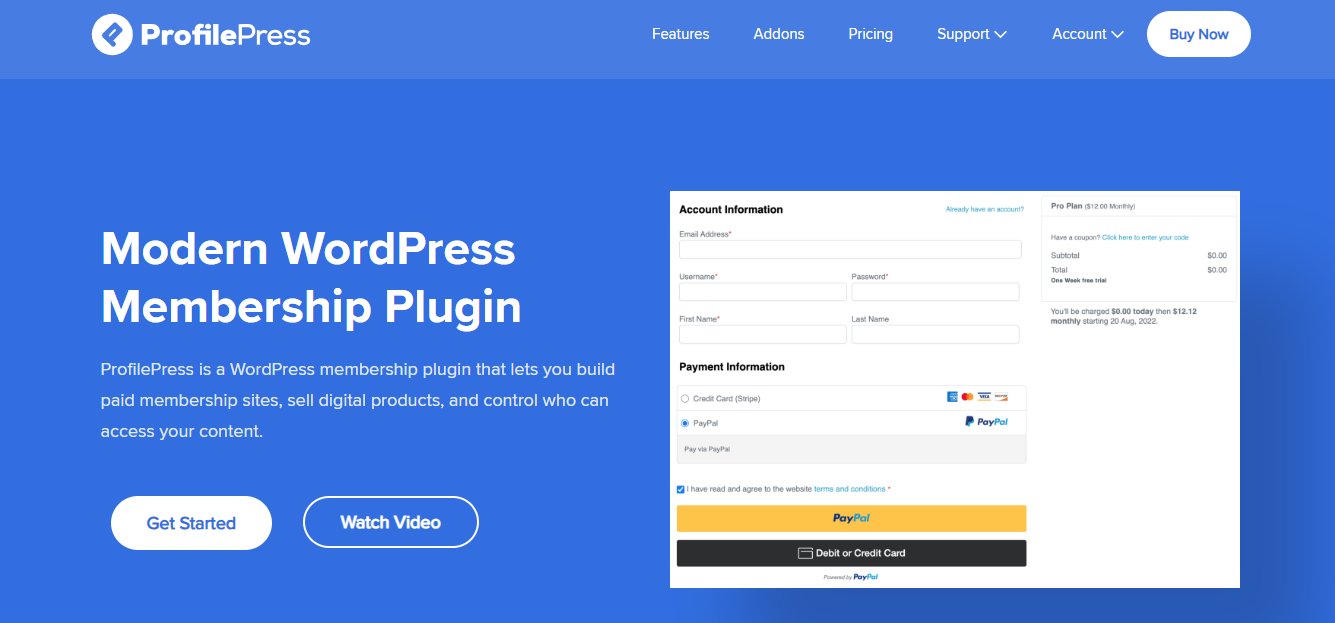
Cost-Effective Setup: Building a subscription site on a custom-coded platform can cost thousands of dollars upfront. With WordPress, all you need is a domain, hosting, and the right plugin (like ProfilePress), making it a much more affordable and scalable solution for creators, educators, and businesses.
Huge Ecosystem of Themes and Plugins: WordPress has a massive library of themes to design your site and plugins to extend its functionality. With ProfilePress, for example, you can manage subscriptions, collect payments, restrict content, and customize your checkout process all from your WordPress dashboard.
SEO and Marketing Advantages: A subscription site needs visibility to attract paying members, and WordPress is one of the most SEO-friendly platforms available. Plugins like CrawlWP give you automatic indexing and SEO insights for your subscription site, while FuseWP lets you connect it to your CRM and email marketing platforms.
Scalability for Future Growth: As your subscription business expands, WordPress grows with you. Whether you’re adding more content, integrating an online store, or introducing a learning management system (LMS), WordPress can handle it all without forcing you to switch platforms.
What You’ll Need to Make a Subscription Website
Now that you know why WordPress is the best platform for your subscription business, let’s look at the essential components you’ll need to get your site up and running.
1. Decide on the Type of Subscription Site You’re Trying to Build: Before buying a domain or installing WordPress, it’s important to decide on the subscription model you want to offer. This decision shapes everything from your theme and content structure to your pricing plans and marketing strategy.
Taking time to clarify your model early ensures you focus on the right features and create a site that meets your audience’s needs.
2. A Domain Name: Your domain name is your online identity. It’s the first impression your audience will have of your subscription site, so choose something that reflects your brand or niche.
Tips for Choosing a Domain
- Keep it short and easy to remember (e.g., ‘yogahub.com’).
- Use a .com extension if available, though alternatives like ‘.co’, ‘.net’, or niche-specific extensions can also work.
- Avoid unnecessary numbers or symbols that make your name harder to type or recall.
You can purchase your domain from registrars like Namecheap or through your hosting provider.
3. Web Hosting: Your hosting provider is where your website files live. For a subscription site, you need fast, reliable hosting to ensure your users have a smooth experience.
Recommended Hosting Options:
- Shared Hosting: Affordable and suitable for small, low-traffic sites.
- Managed WordPress Hosting: Ideal for business owners who want optimized performance, enhanced security, and expert support.
- VPS or Cloud Hosting: Best for scaling your site as your subscriber base grows.
Providers like SiteGround, Hostinger, and Cloudways are great starting points.
4. An SSL Certificate: Since you’ll handle sensitive user data and process payments, security is crucial. An SSL certificate encrypts your site and adds the trusted padlock icon in browsers. Many hosting plans now include a free SSL certificate that you can enable.
5. WordPress Installed: WordPress is the backbone of your subscription website. Most hosting providers offer 1-click WordPress installation, so even if you’re not tech-savvy, you can set up your site quickly and start customizing it without coding knowledge.
6. A WordPress Theme: Your theme determines your site’s overall design, layout, and user experience. For a subscription website, choose a lightweight, mobile-responsive theme that integrates well with page builders and membership plugins. A good theme will ensure your site loads quickly, looks professional, and provides a smooth experience for your members.
Recommended Themes:
- Astra: Fast, flexible, and works great for any niche.
- Kadence: Perfect for content-rich or course-based sites.
- GeneratePress: Lightweight and SEO-friendly for speed-focused setups.
7. A Subscription Plugin: This is the plugin that transforms your standard WordPress site into a fully functional subscription platform.
We recommend ProfilePress because it’s an all-in-one ecommerce and membership plugin designed for building subscription websites. Unlike other membership plugins, ProfilePress combines user management, payment collection, subscription plans, and content protection in one solution.
Here’s why it’s ideal for your subscription website:
- Multiple Payment Options: Accept payments via Stripe, PayPal, RazorPay, Paystack, Mollie, or Bank Transfer.
- Recurring and One-time Payments: Sell memberships, courses, or downloadable products with flexible billing.
- Content Restriction: Protect posts, pages, categories, and custom content behind a paywall.
- Customizable Forms: Build registration, login, and checkout forms with a drag-and-drop builder.
- User Profiles and Directories: Create stunning member profiles and searchable directories.
- Advanced Features: Social login, email confirmation, metered paywalls, affiliate program integration, and more.
With ProfilePress, you can manage memberships, payments, content protection, and user engagement from a single dashboard.
With these essentials in place, you’ll have the foundation needed to create a professional, scalable subscription website.
Now let’s move on to the step-by-step process of building your site.
Steps to Create a Subscription Website Using WordPress
By now, you should have already decided on the type of subscription site you want to build, registered your domain and hosting, installed WordPress, and activated your chosen theme.
With those essentials in place, the next step is to install and configure ProfilePress, the plugin that will transform your WordPress site into a fully functional subscription platform.
Install and Activate the ProfilePress Plugin
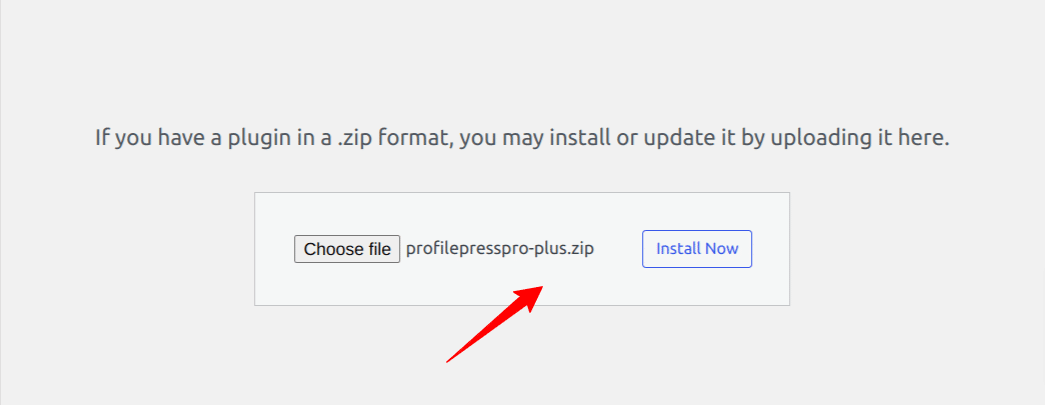
To do this, visit the ProfilePress website to purchase the plugin. Once your purchase is complete, download the plugin’s ZIP file from your account dashboard to your computer.
Next, log in to your WordPress admin dashboard and navigate to Plugins > Add New.
Click Upload Plugin, then either drag and drop the ZIP file into the upload box or click Choose File to select it manually.
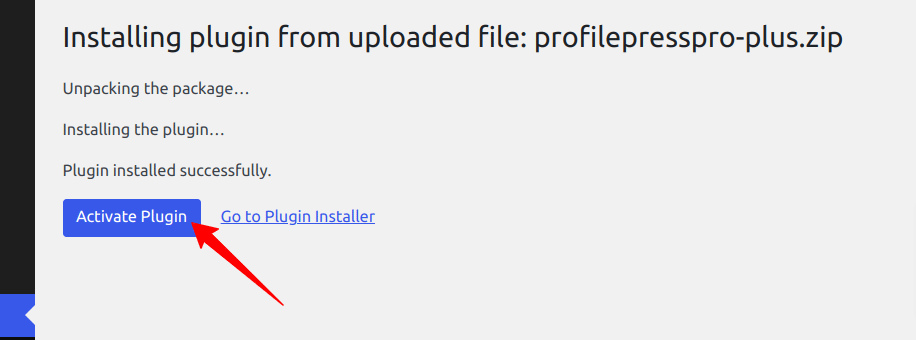
After uploading, click Install Now.
After the installation is complete, click the Activate Plugin button.
Next, you’ll see a prompt that reads: “ProfilePress needs to create several pages.” Click Create Pages to automatically generate the necessary pages and complete the plugin setup.

With these pages in place, you’re ready to set up your payment method so you can start accepting subscription payments.
Set up a Payment Gateway
ProfilePress supports multiple payment gateways, including Stripe, PayPal, RazorPay, Paystack, Mollie, and Bank Transfer. Offering a variety of payment options makes it easier for subscribers to complete their purchase, no matter where they are.
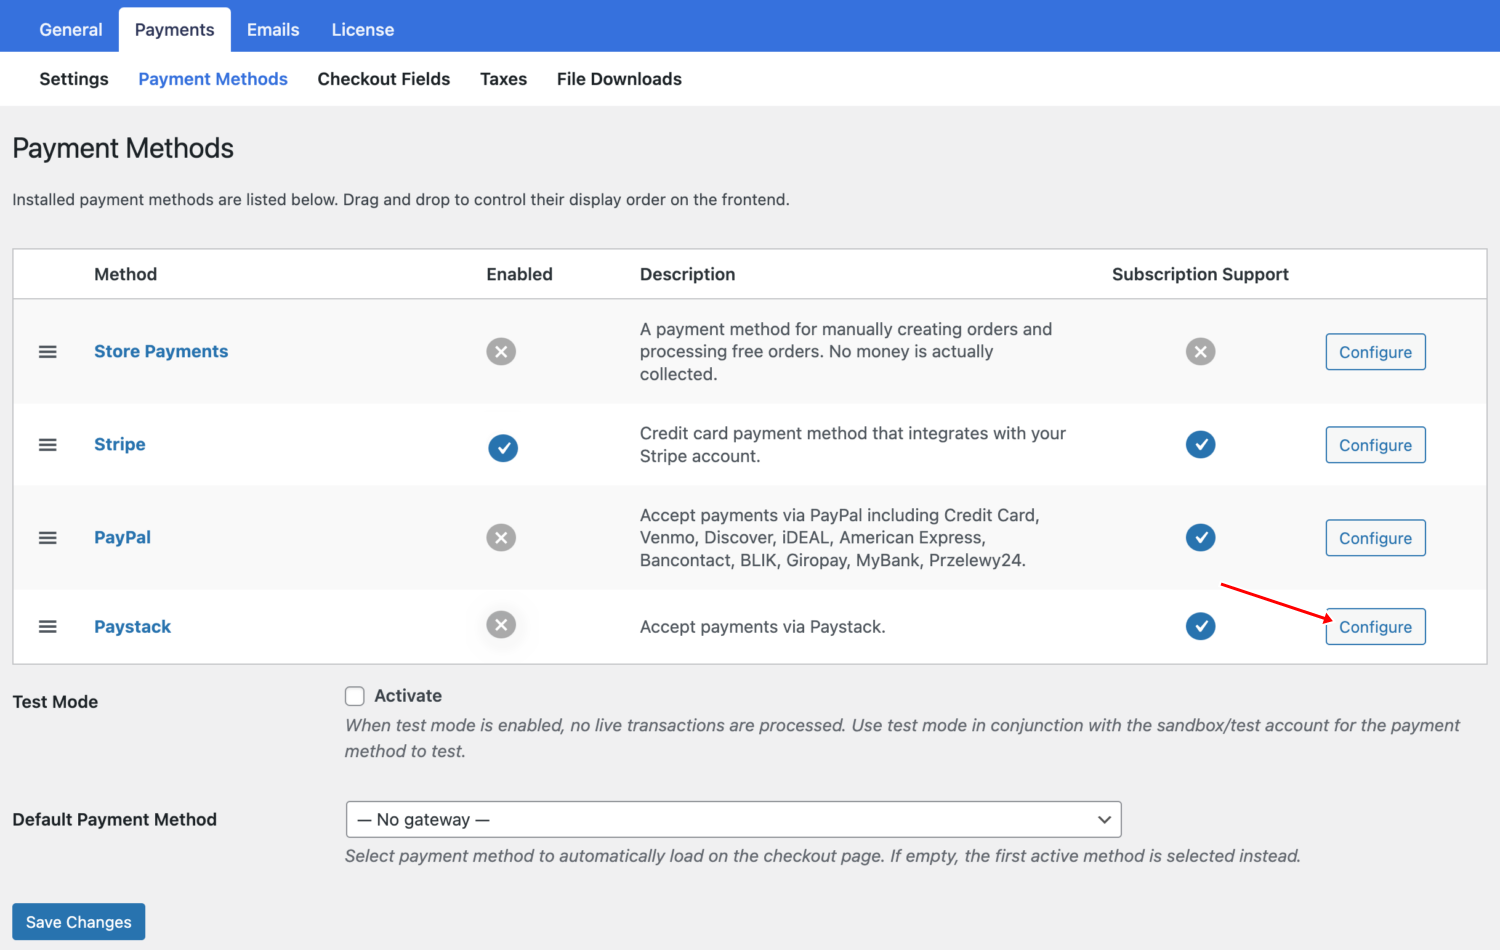
To set up your preferred payment gateway, go to ProfilePress > Settings > Payments > Payment Methods in your WordPress dashboard.
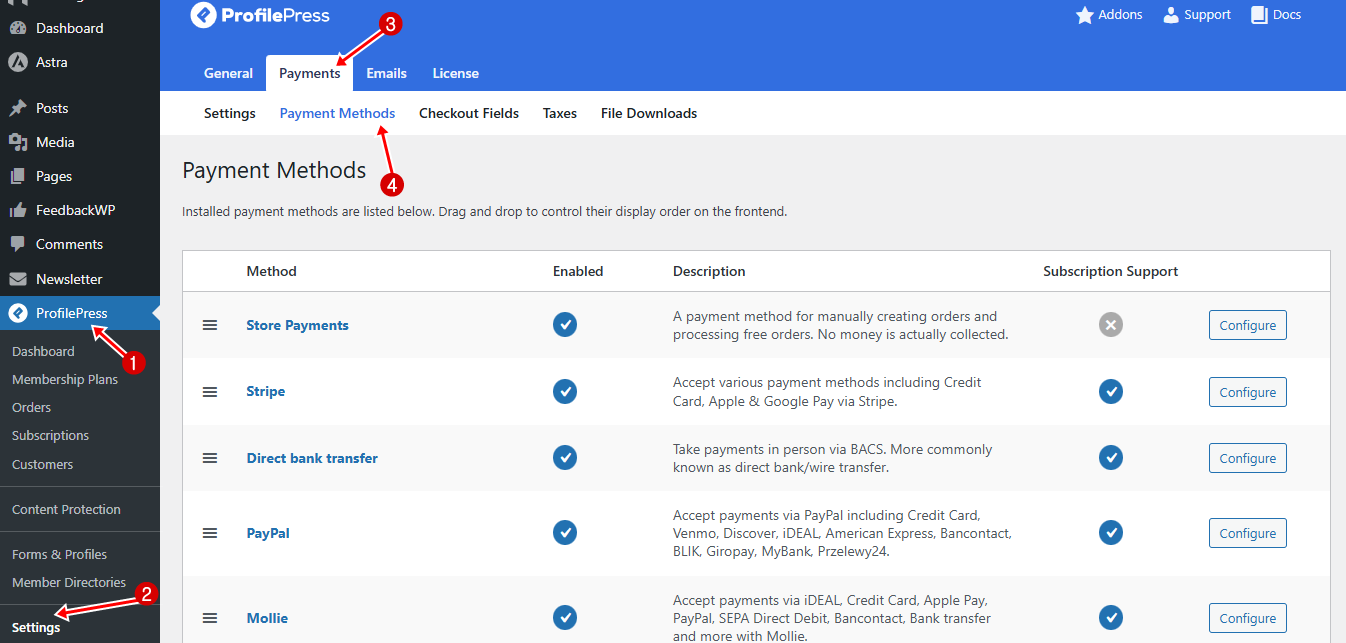
Enter the required API keys or login credentials provided by each payment service.
Once your payment methods are configured, click Save to apply the changes and start receiving payments.
In this guide, we’ll walk through the setup for Stripe and Paystack.
Setting Up Stripe
ProfilePress integrates seamlessly with Stripe, enabling you to accept payments through a wide variety of methods, including debit and credit cards, Link, ACH Direct Debit, Apple Pay, Google Pay, Alipay, Bancontact, bank transfers, BLIK, EPS, FPX, Giropay, iDEAL, Sofort, P24, Affirm, Afterpay, Clearpay, Klarna, Cash App Pay, GrabPay, WeChat Pay, SEPA Direct Debit, and Bacs Direct Debit.
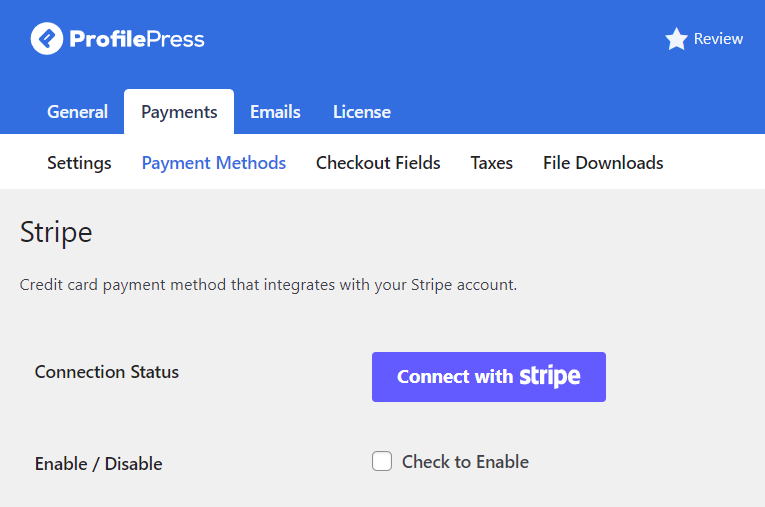
To connect Stripe to your site, click on the Configure button next to Stripe.

Next, click “Connect with Stripe” to continue.
You’ll then be redirected to the Stripe website, where you can either create a new account or log in to an existing one.
Once logged in, select the account you’d like to link with ProfilePress and click Connect to complete the integration.
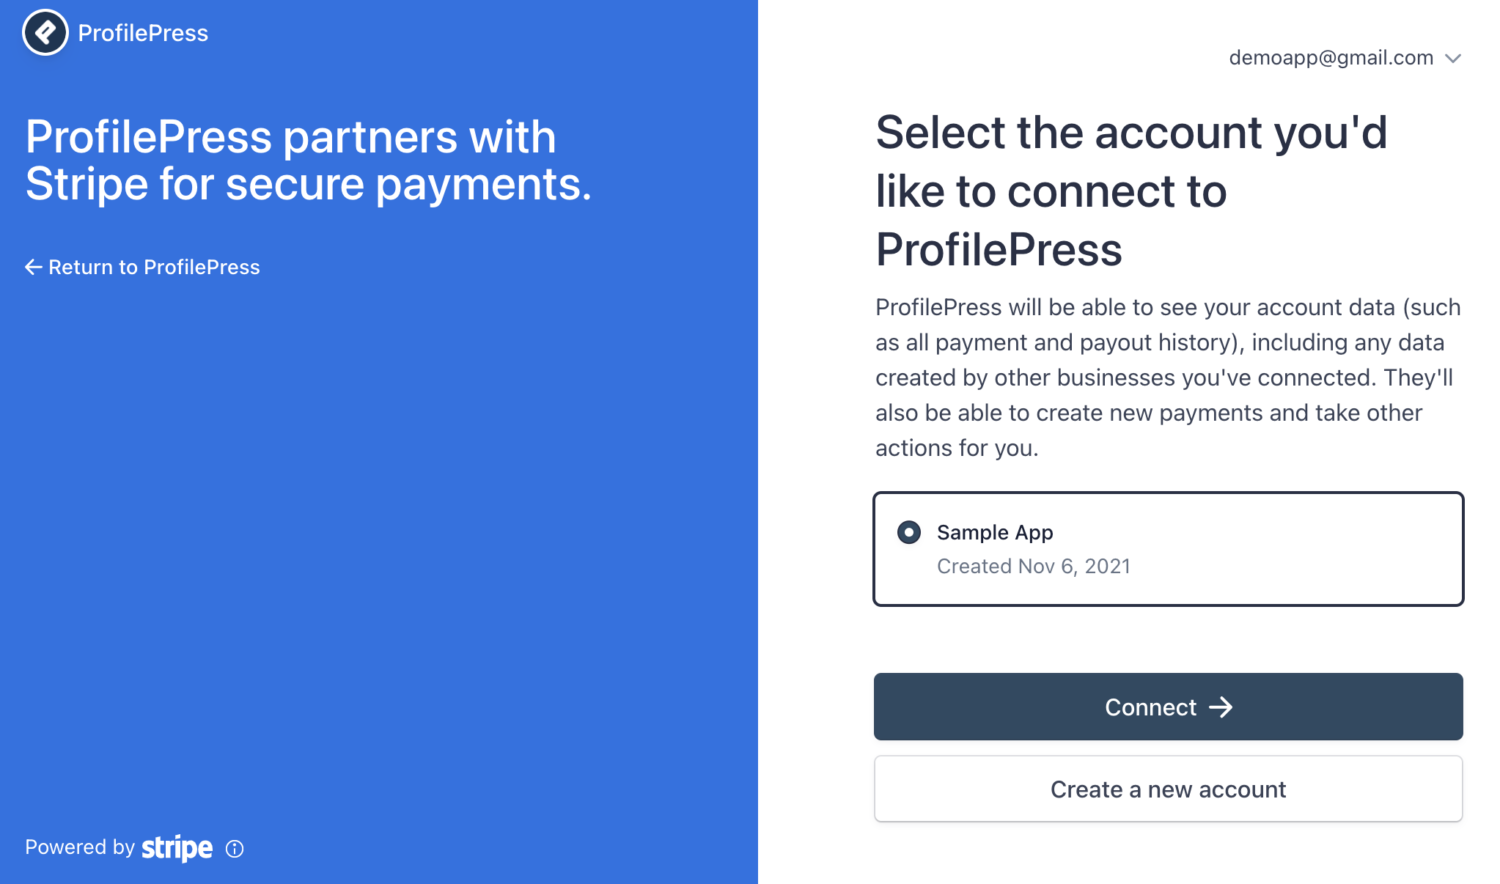
Once done, you’ll be automatically taken back to your website.
Next, enable the payment method by checking the box labeled “Check to Enable”.
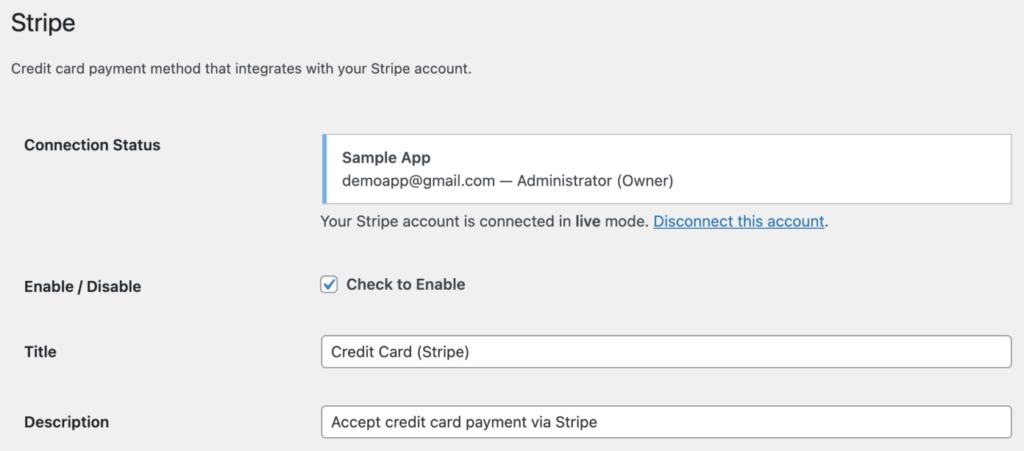
After completing the setup, click Save Changes. Stripe will now be active and ready to process payments on your WordPress website.
Next, let’s configure Paystack.
Setting Up Paystack
Paystack is one of Africa’s leading payment gateways, trusted by thousands of businesses to process secure online transactions.
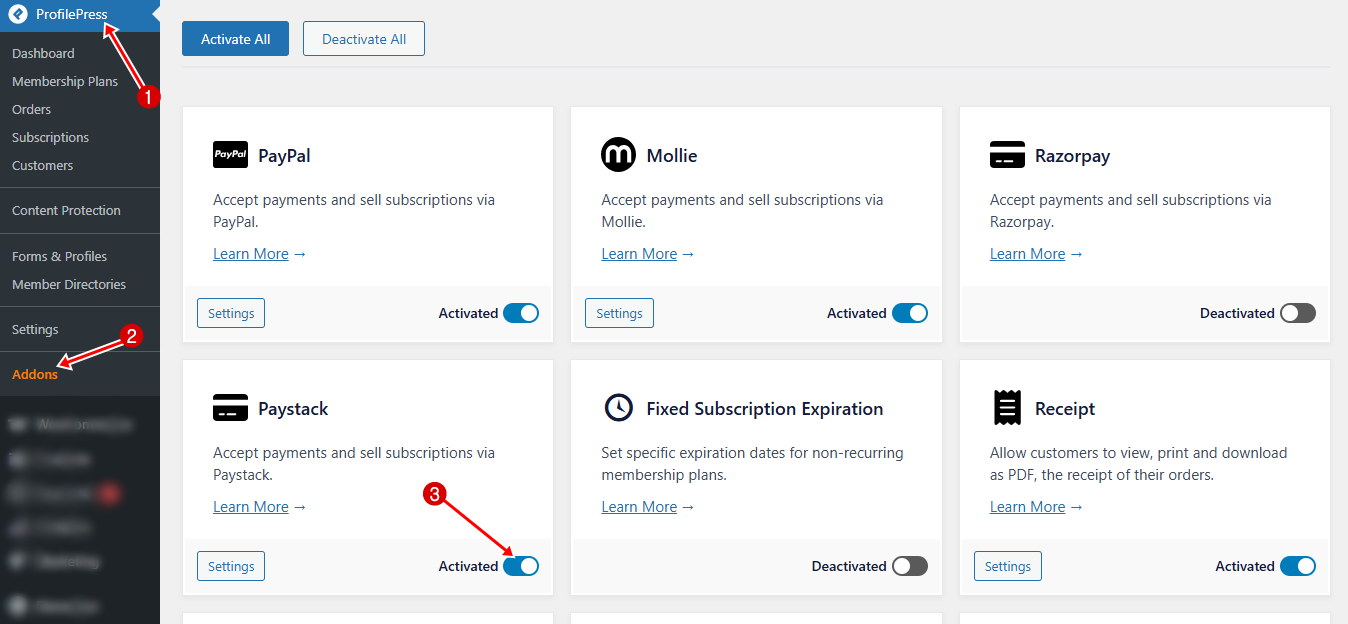
To start accepting payments through Paystack on your subscription website, navigate to ProfilePress > Addons in your WordPress dashboard and activate the Paystack addon.
Next, navigate to ProfilePress > Settings > Payments > Payment Methods in your WordPress dashboard and click the Configure button for Paystack.
To set this up, log in to your Paystack dashboard. From the left-hand menu, go to Settings > API Keys & Webhooks.
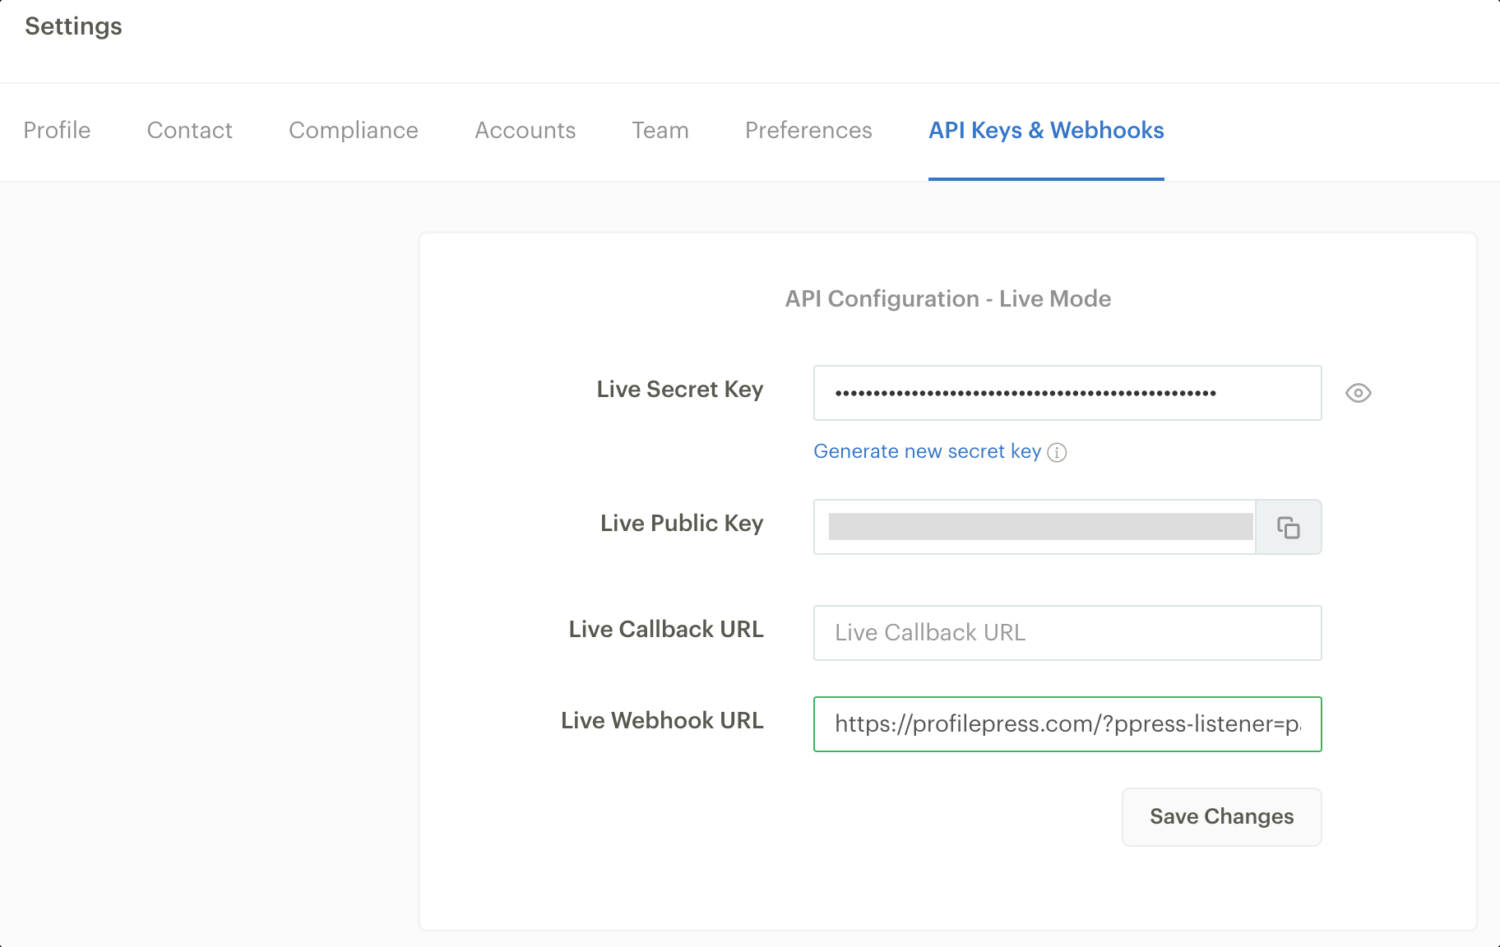
There, you’ll find your Live Public Key and Secret Key (or your Test Keys if you have test mode enabled in ProfilePress). Copy these keys and paste them into the corresponding fields in the Paystack settings section of ProfilePress.
Next, you’ll need to add your Webhook URL in Paystack so it can send payment notifications to your WordPress site. You can find this URL in the Webhook Setup section of ProfilePress’s Paystack settings page.
Once your API keys and webhook are in place, enable the payment method by checking the box labeled “Check to Enable.”
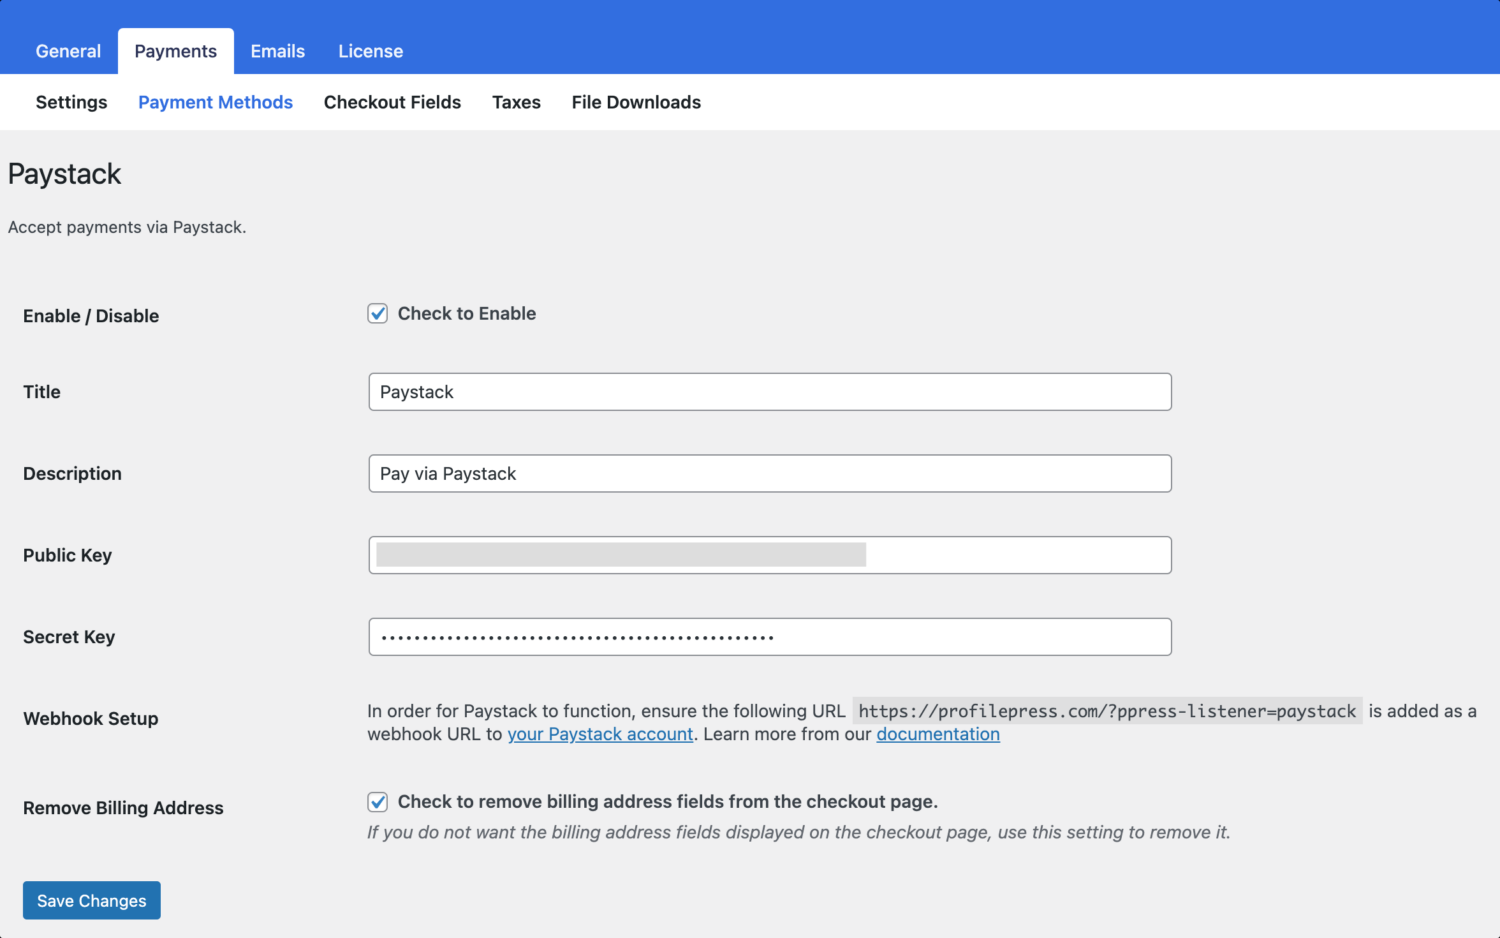
Then click Save Changes to apply your settings.
Once this is done, Paystack will be active and ready to process payments on your WordPress subscription website securely.
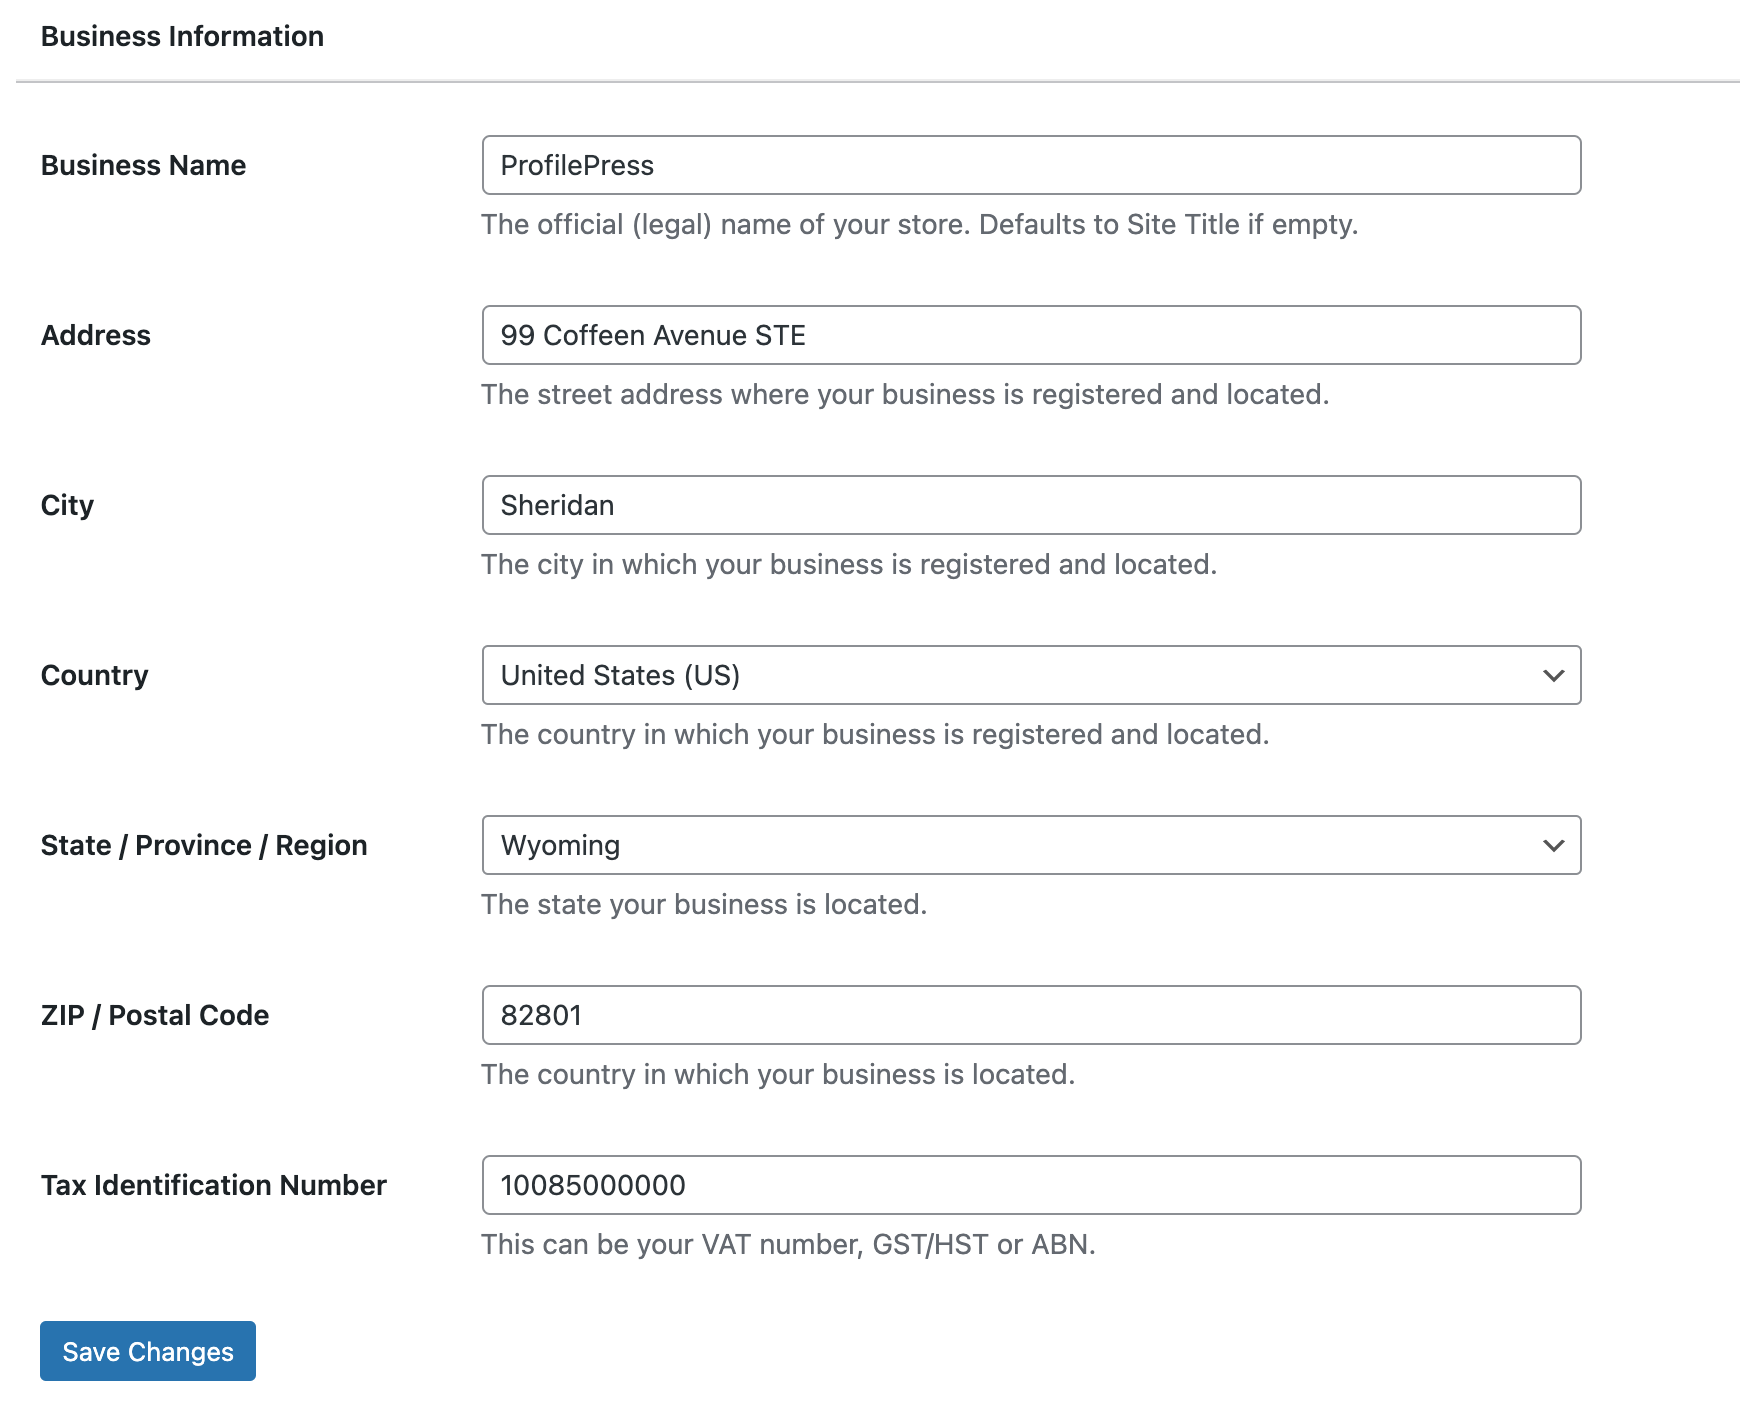
Add Your Business Information
After connecting your preferred payment gateway, the next step is to add your business details.
To do this, go to ProfilePress > Dashboard in your WordPress admin area and select Add Your Business Information.
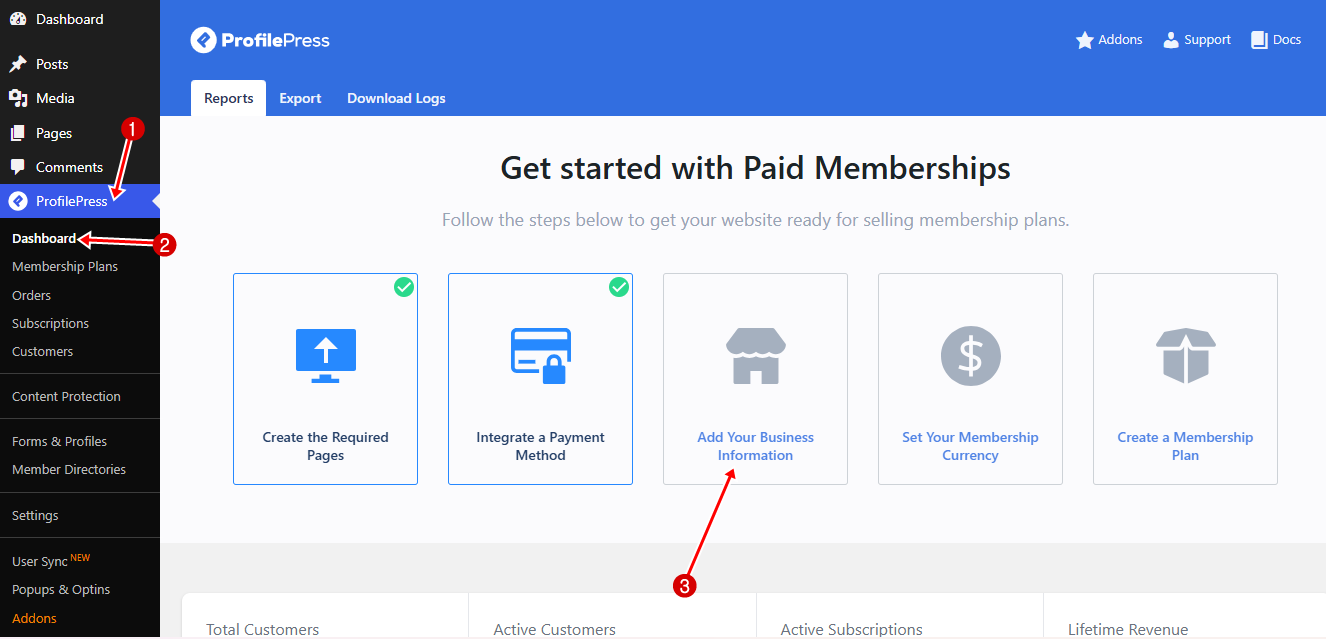
Fill in your business name, address, and tax identification number in the provided fields, then click Save Changes.
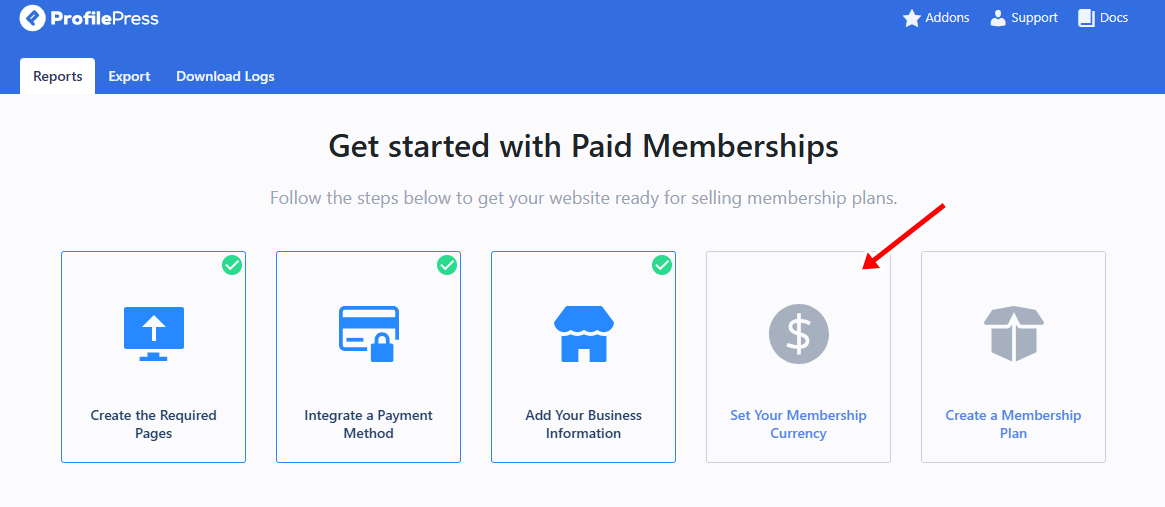
With this step done, the next step is to set the currency for your WordPress subscription website.
Set Your Membership Currency
ProfilePress lets you choose the currency you want to use for customer payments, helping you align your pricing with your business goals and audience.
To configure this, go to ProfilePress > Dashboard and click Set Your Membership Currency.
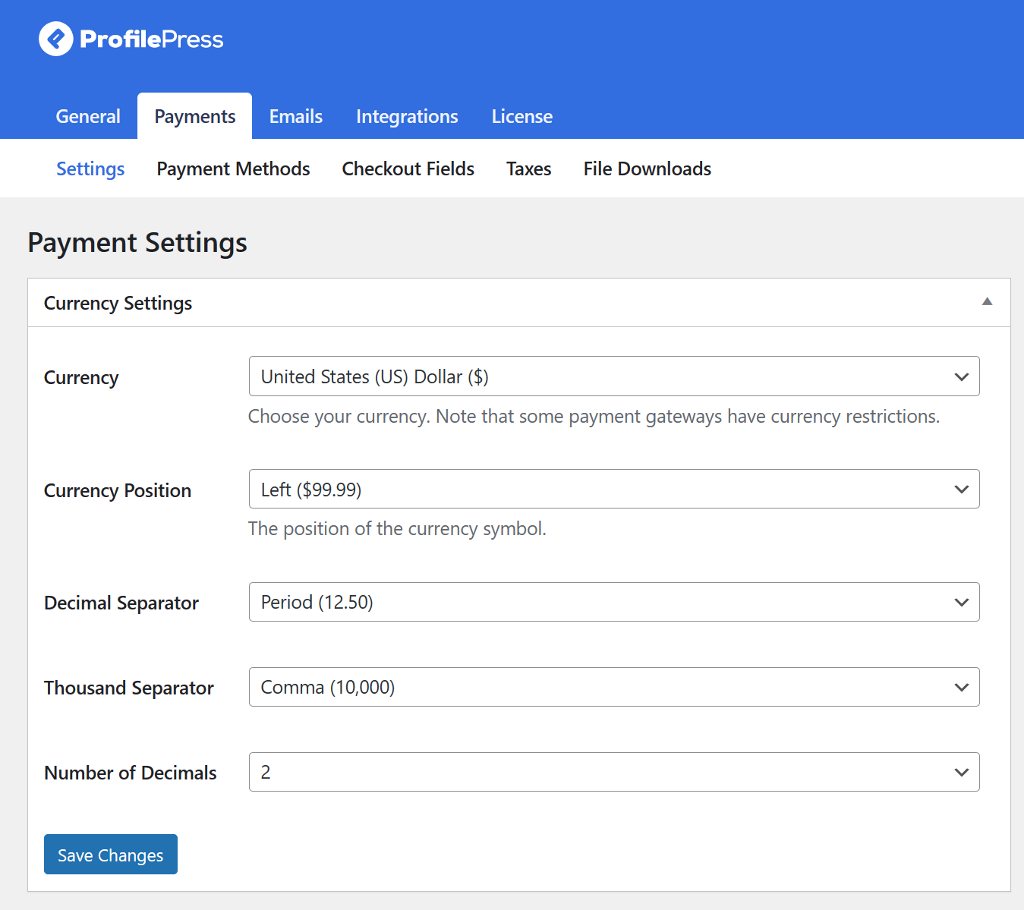
In the window that appears, you’ll find the Currency Settings section.
Here, you can choose your preferred currency, adjust where the currency symbol appears, and configure formatting options such as decimal and thousand separators. You can also set the number of decimal places to ensure your pricing is displayed clearly and accurately.
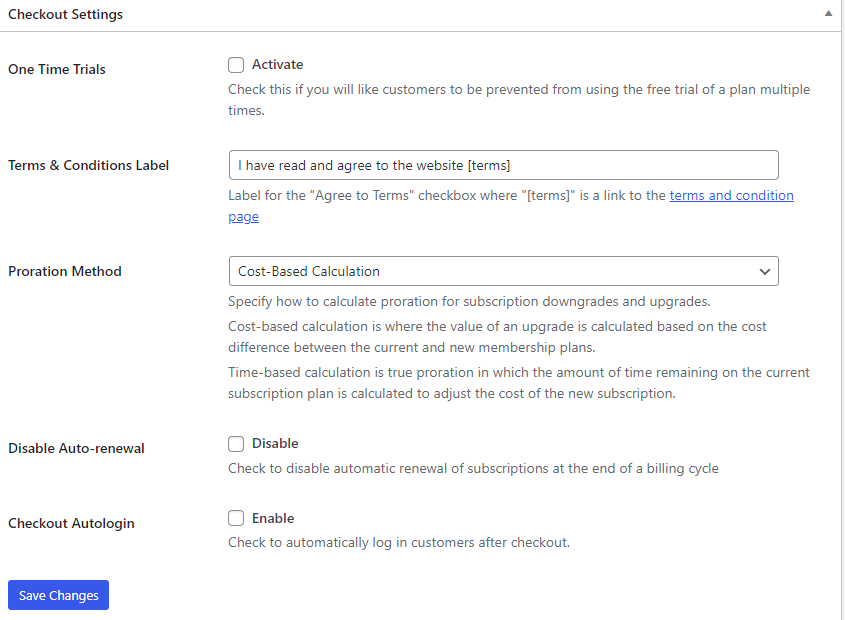
Next, scroll down to the Checkout Settings section. Here, you can enable one-time trials, customize the label for the terms and conditions checkbox, set up proration, disable auto-renewal for subscriptions, and allow users to be automatically logged in after completing their purchase.
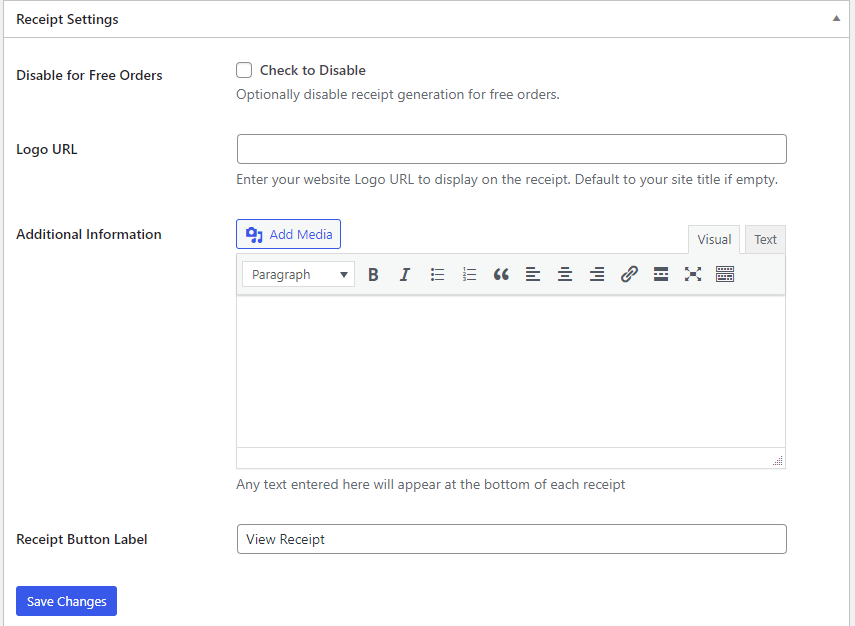
Below the checkout setting is the Receipt Settings section. Here you can disable receipts for free orders, upload a logo URL, add extra details like a thank-you message, and adjust the label for the receipt button.
After adjusting these settings, click Save Changes to apply them.
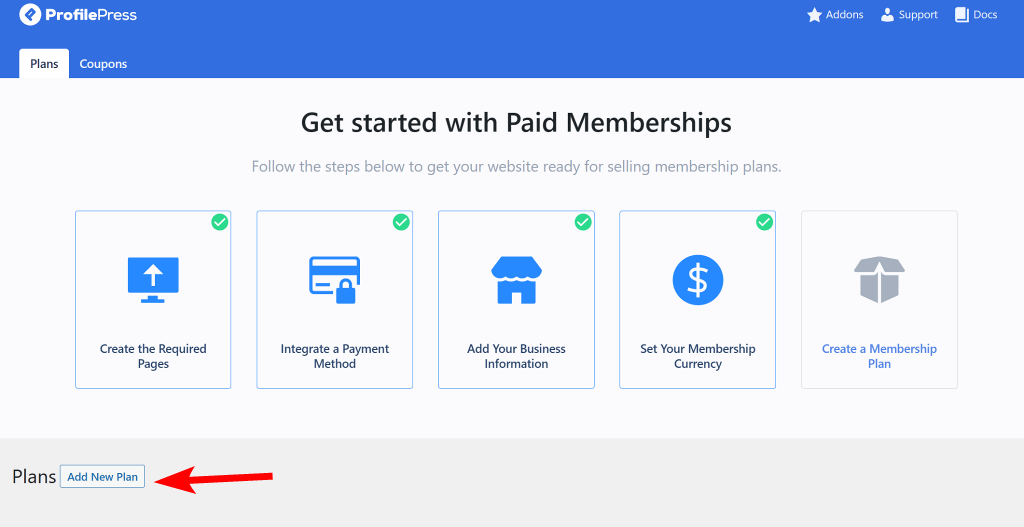
Create a Subscription Plan
To do this, go to ProfilePress > Dashboard and click the Create a Membership Plan button.
Next, click the Add New Plan button at the bottom of the page to get started.
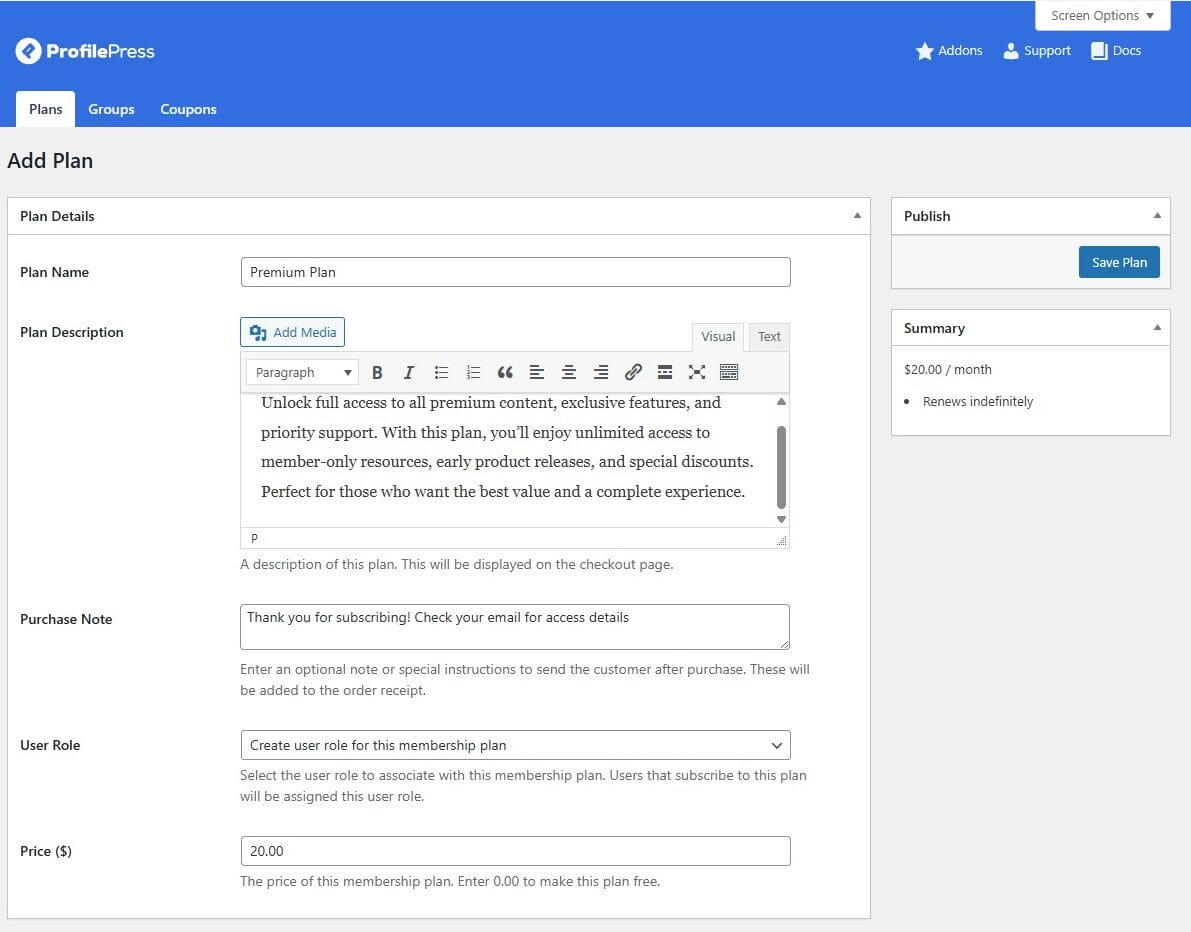
The membership plan setup page is divided into three main sections: Plan Details, Subscription Settings, and Downloads & Integration. Each section plays an important role in configuring your subscription offering.
Let’s go through each section.
Plan Details Section
Start by giving your plan a clear, descriptive name (e.g., “Premium Plan” or “Gold Plan”) and writing a short, easy-to-understand description that highlights what members will get.
You can also add a Purchase Note, which can include a thank-you message or instructions, such as “Thank you for subscribing! Check your email for access details.”
Next, assign a user role to this membership plan. For easier member management, it’s recommended to select “Create a user role for this membership plan.” This automatically creates a unique role for subscribers, making it more straightforward to control access to content and features.
Finally, set the price for your plan.
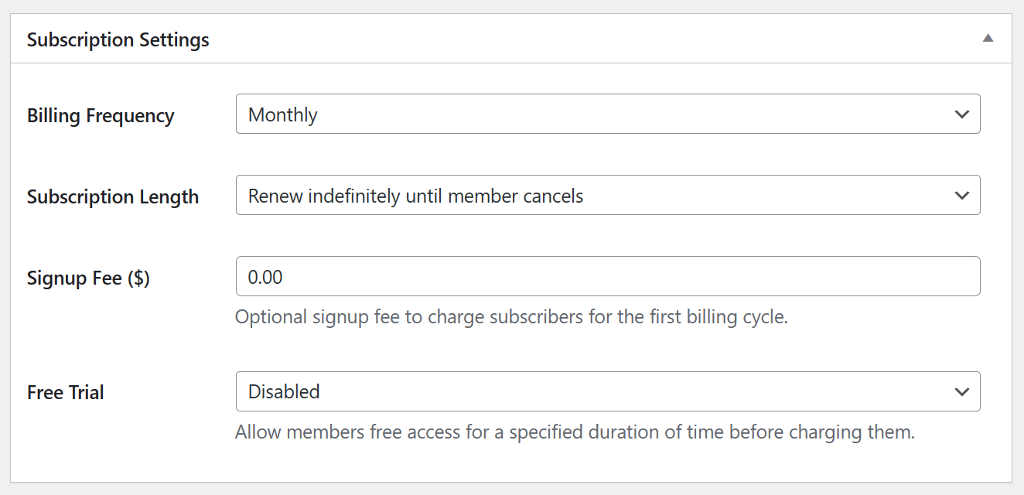
Once you’ve set up the Plan Details section, the next step is configuring your Subscription Settings.
Subscription Settings Section
This section allows you to define how your plan will be billed. You can choose from flexible billing intervals such as daily, weekly, monthly, quarterly, semi-annual, annual, or even a one-time payment.
You can also decide whether subscriptions should run for a fixed number of payments or renew automatically until a member cancels. For most subscription websites, setting a monthly billing cycle with automatic renewal is a great choice, as it creates consistent recurring revenue. If you’d like to include an initial setup or onboarding charge, you can add it under the Sign-up Fee option.
Additionally, you have the option to offer a free trial period, allowing users to experience your premium content or services before committing to payment. If you prefer not to provide a trial, you can leave this option disabled.
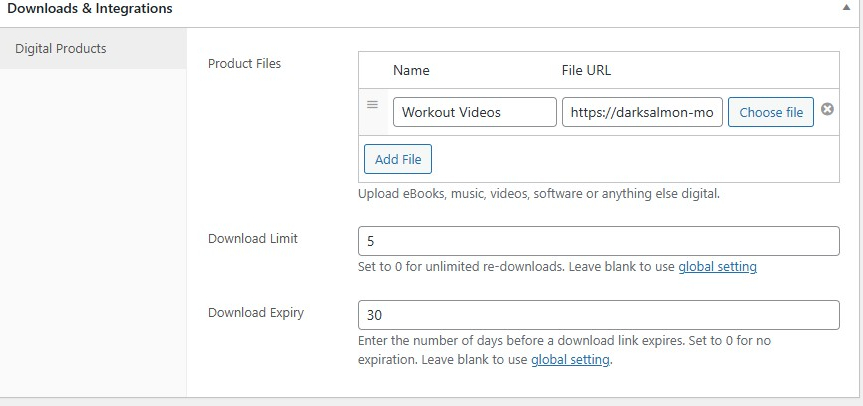
Downloads & Integration Section
This section is ideal if you want to include digital products as part of your subscription plans. It allows you to attach files or resources to a membership plan, giving subscribers instant access as soon as they sign up.
For example, you could upload an eBook, a meal plan, a set of video tutorials, exclusive templates, or even audio lessons. These files become accessible only to paying members, adding real value to their subscription.
The Upload Product Files option lets you upload these digital resources directly to your plan. Subscribers can download them anytime from their account dashboard.
With Download Limit, you can control how many times a file can be downloaded, and with Download Expiration, you can set how long subscribers will have access to a file after purchase.
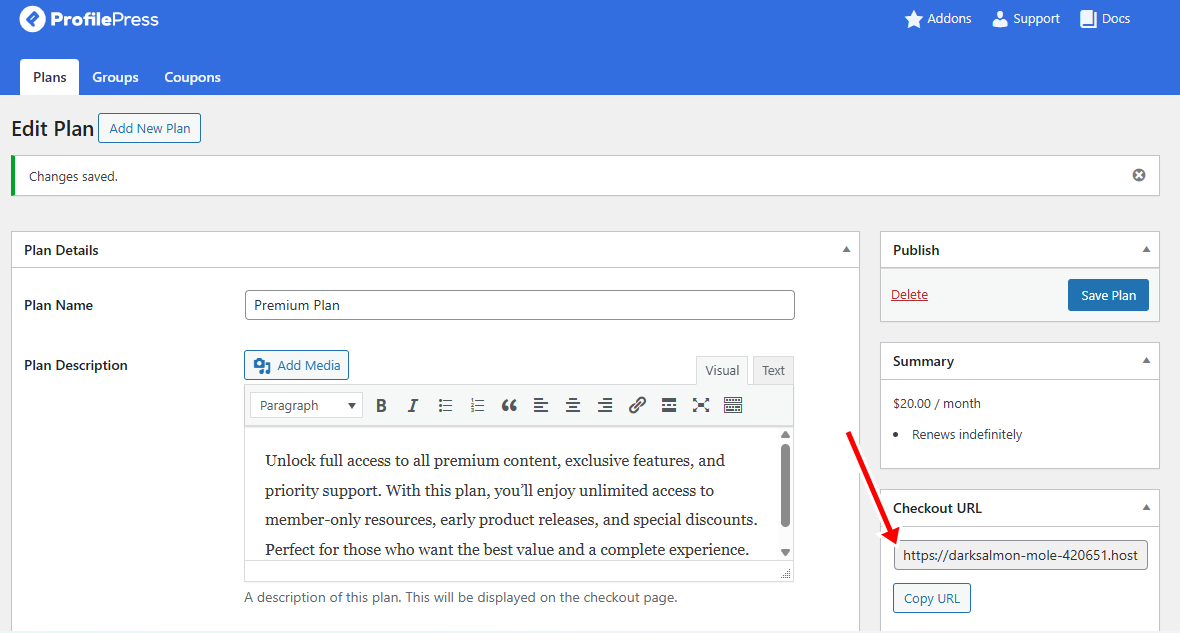
Once you’re satisfied with your setup, click Save Plan to publish your plan.
After publishing, a unique checkout link will be generated. You can place this link anywhere on your site, pricing tables, landing pages, or even blog posts to start accepting new members.
Repeat these steps to create additional plans if you’d like to provide more options.
Create a Pricing Page
With your subscription plans set up, the next step is to design a dedicated pricing page. This page makes it easy for visitors to compare your offerings and choose the plan that best suits their needs.
You can create your pricing page using WordPress’s default Gutenberg editor, or speed things up by working with pre-designed templates from popular page builders like Elementor, Beaver Builder, WPBakery, or Visual Composer.
Below is our pricing page built using Elementor:

Once your pricing page is designed, the next step is to connect each plan’s Subscribe button to the correct subscription plan.
To do this, head to ProfilePress > Membership Plans in your WordPress dashboard, copy the subscription link for each plan, and paste it into the corresponding button on your pricing page. This ensures visitors are taken directly to checkout for their chosen plan.
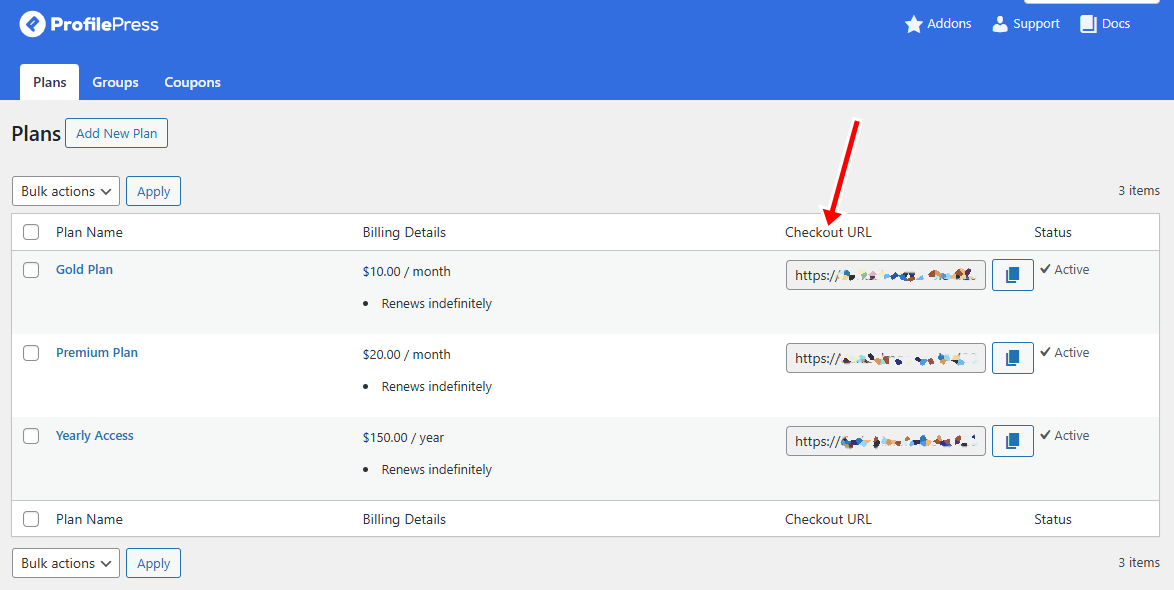
Now, when a visitor clicks on a plan’s Subscribe button, they’ll be taken directly to the checkout page for that specific subscription.
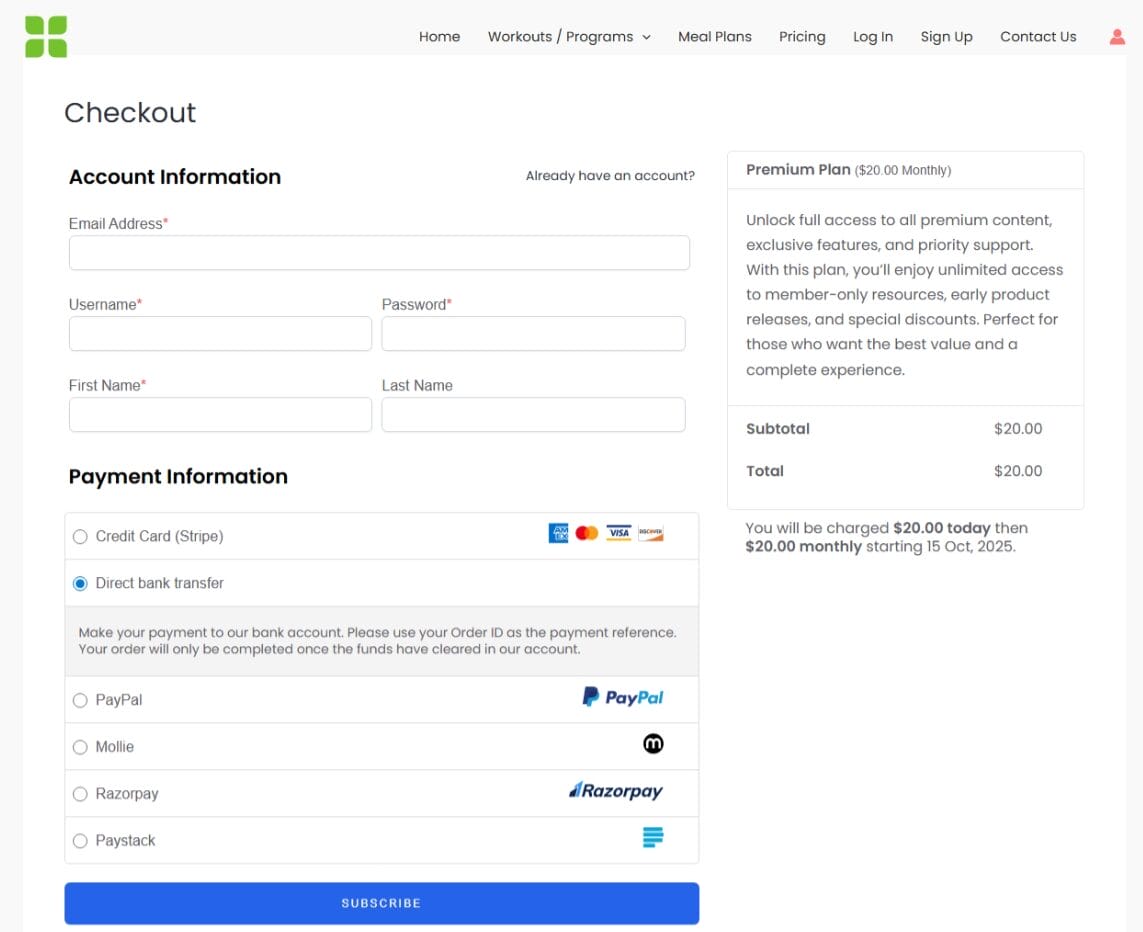
Below is a sample of our checkout page.
With your pricing page ready, the next step is to control who can access your content.
Setting Up Content Access and Metered Paywall
ProfilePress gives you two effective ways to manage access on your WordPress subscription site: full content restriction or a metered paywall.
Full content restriction makes selected content available only to paying members, while a metered paywall allows visitors to preview a limited amount of content before prompting them to subscribe.
In the following sections, we’ll walk you through how to set up both options to create the best experience for your audience.
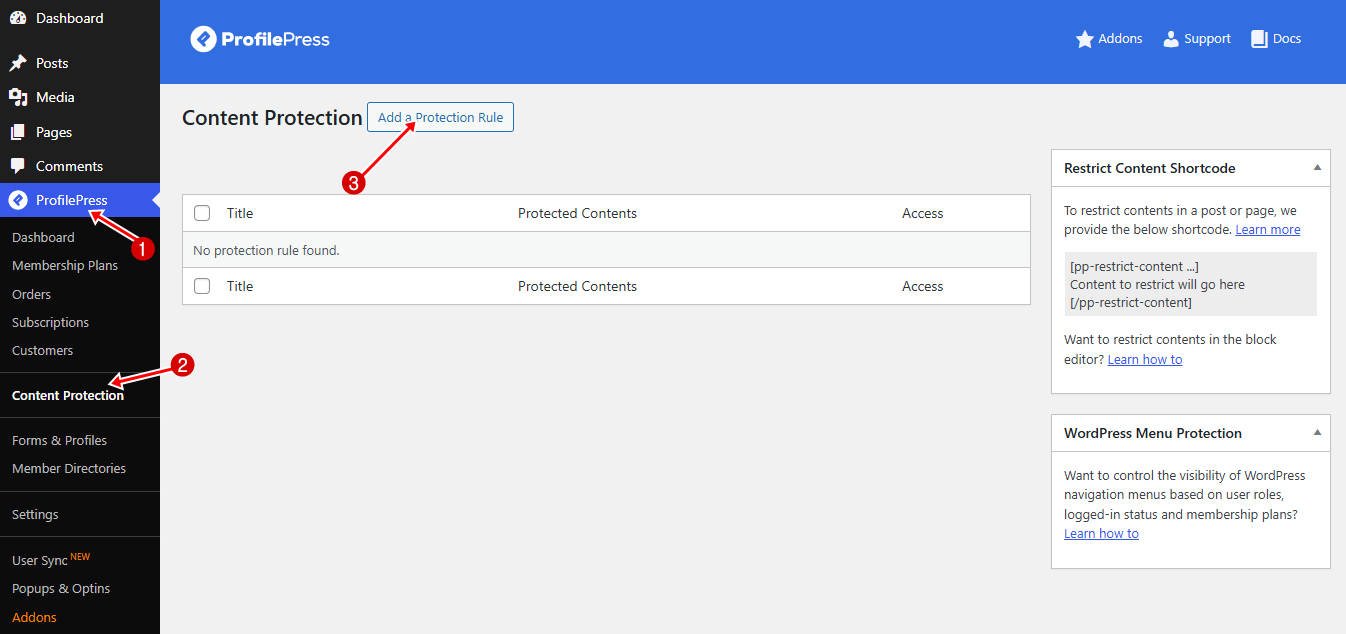
Setting Up a Content Protection Rule
To do this, go to ProfilePress > Content Protection in your WordPress dashboard and click the Add Protection Rule button at the top of the page.
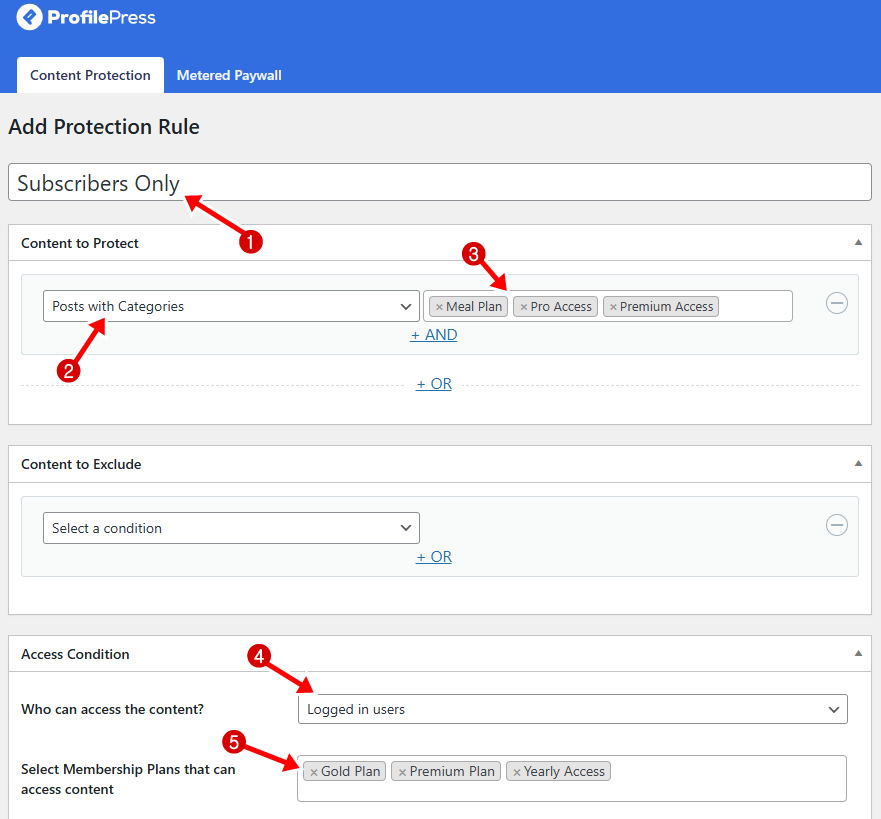
Start by giving your protection rule a clear, descriptive name and selecting the content you want to restrict. You can choose to protect posts or pages based on categories, tags, archives, or formats, or even combine multiple conditions for more precise control.
Once you’ve made your selection, additional options will appear. You can link the protection rule to a specific plan, assign it to a user role, or manually grant access to selected users.
For example, in the screenshot below, we’ve created a rule called “Subscribers Only” to protect all posts within the “Premium Access,” “Pro Access,” and “Meal Plan” categories. We’ve set the access condition to allow only logged-in users and linked it to the subscription plans we created earlier. This setup ensures that only active, logged-in members can view content within those categories.
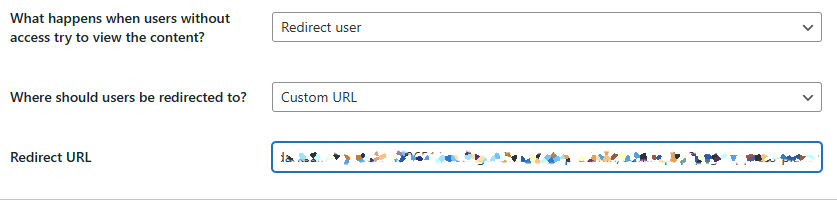
Next, decide how visitors without access will interact with your protected content. ProfilePress gives you two main ways to handle this.
The first option is to redirect visitors to another page, such as your pricing or sign-up page. This creates a clear path for users to upgrade their account and gain access to your premium content.
The second option is to display an access-restricted message directly on the content. For instance, you could show a short excerpt of the article, followed by a note explaining that the full content is available only to subscribers, along with a link or instructions to sign up.
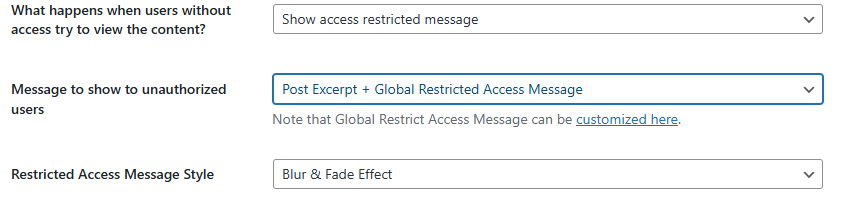
Both approaches are effective, depending on your strategy. Redirecting visitors helps guide them directly toward conversion, while displaying a teaser can spark curiosity and provide a softer nudge to subscribe.
Once you’ve chosen your preferred method, click Save Rule to apply it. From then on, all content covered by this rule will follow your selected settings.
Setting Up a Metered Paywall
Another effective way to manage content access is by using ProfilePress’s Metered Paywall feature. Instead of locking content immediately, this option allows visitors to read a limited number of posts for free before asking them to subscribe. It’s an excellent strategy for showcasing value, building trust, and encouraging sign-ups without overwhelming new visitors.
To enable this feature, go to ProfilePress > Addons, find the Metered Paywall addon, and switch it on.
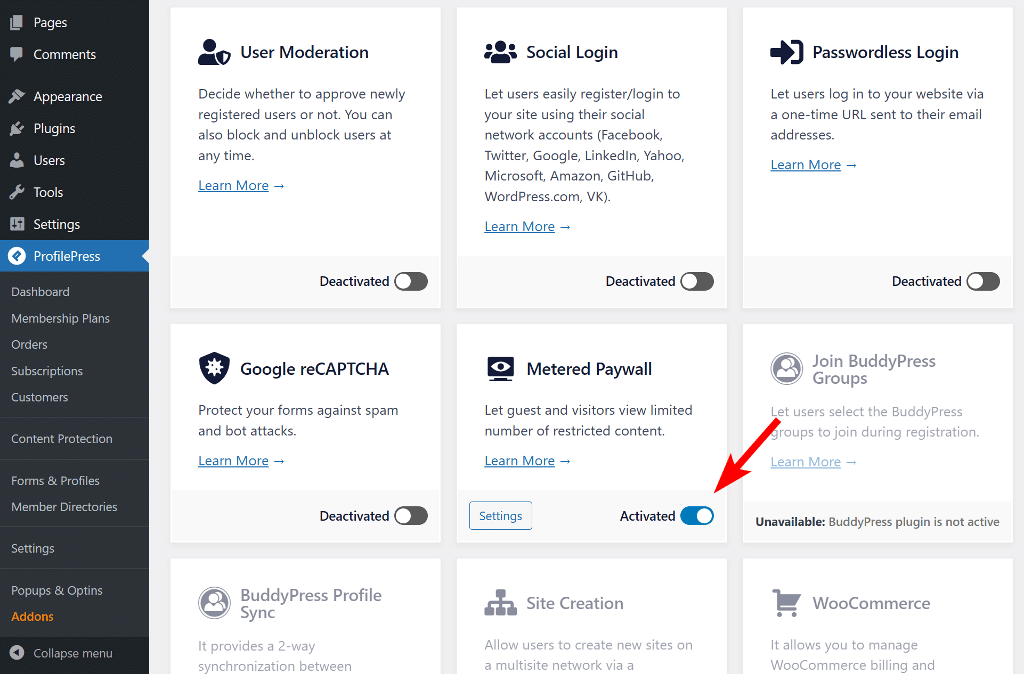
Next, click Settings to open the configuration page. You can also access it by navigating to ProfilePress > Content Protection in your WordPress dashboard and selecting the Metered Paywall tab.
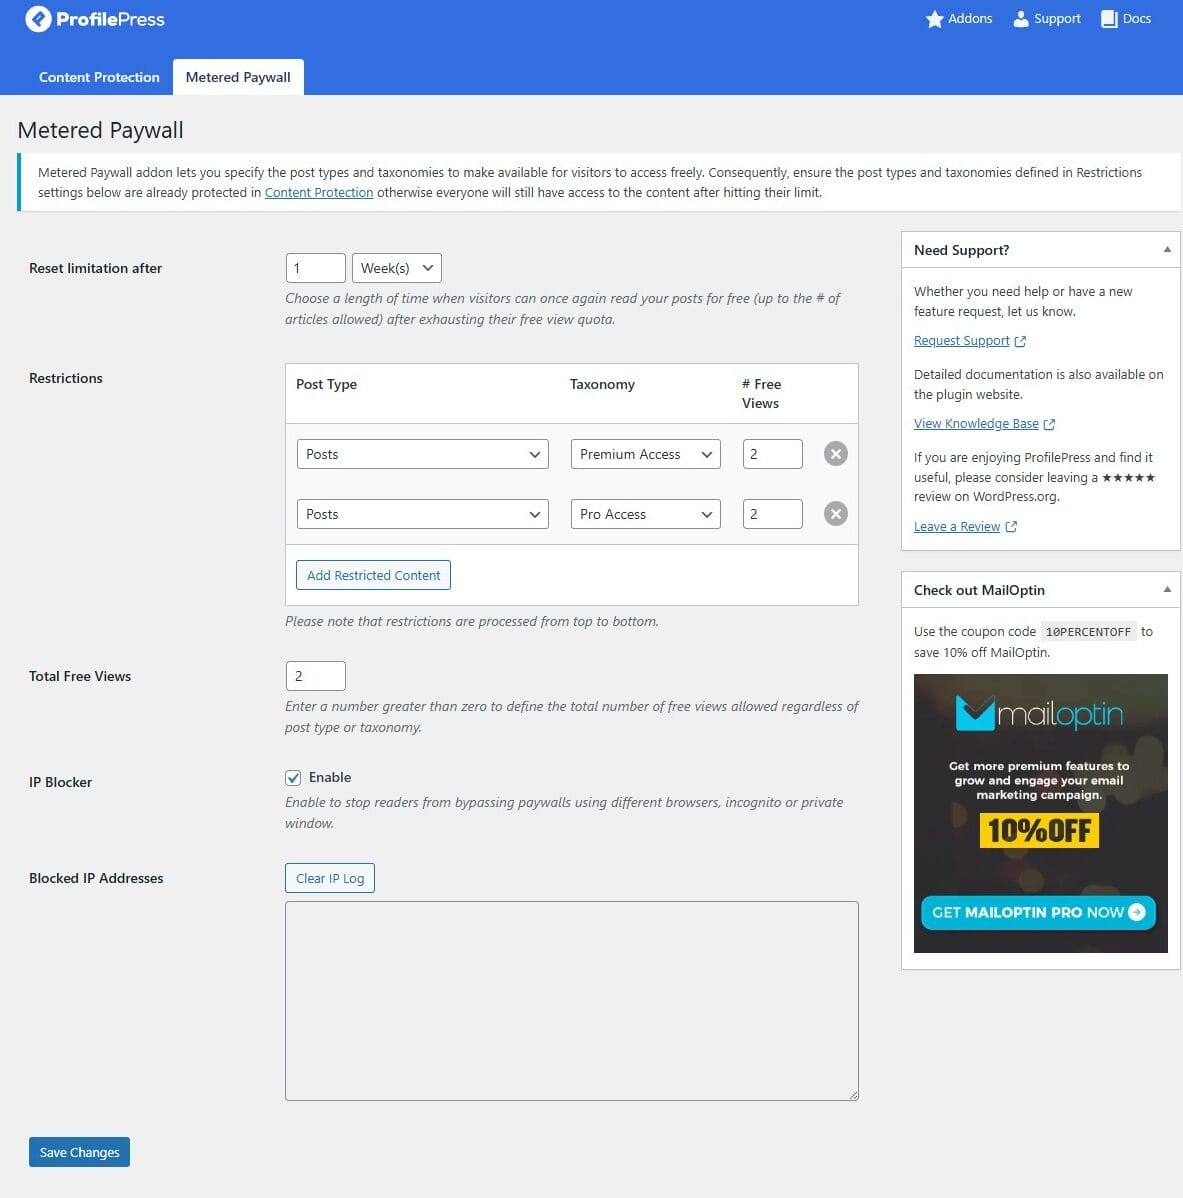
Before configuring your paywall, make sure the post types and categories you want to meter are already protected under your Content Protection rules. If they aren’t, visitors will still be able to view them without restrictions, even after they’ve used up their free views.

Once your protection rules are in place, you can begin setting up your metered paywall.
Start by configuring the Reset Limitation After option, which determines how long users must wait before their free access resets. This can be set to any duration, from a few hours to multiple years.
Under Restriction, choose which post types and taxonomies will be available for free viewing and set the number of free views per visitor. You can also set a Total Free Views limit that applies across all your content.
For added security, enable the IP Blocker to prevent users from bypassing restrictions with private or incognito browsers.
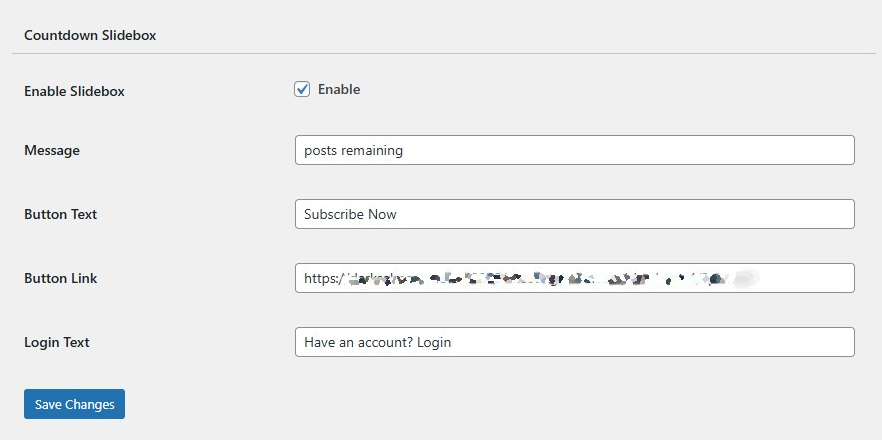
To improve user engagement, consider enabling the Countdown Slide feature. This displays a small pop-up showing visitors how many free articles they have left, along with a button linking directly to your pricing or subscription page. You can even customize the message and button text to create a compelling call-to-action.
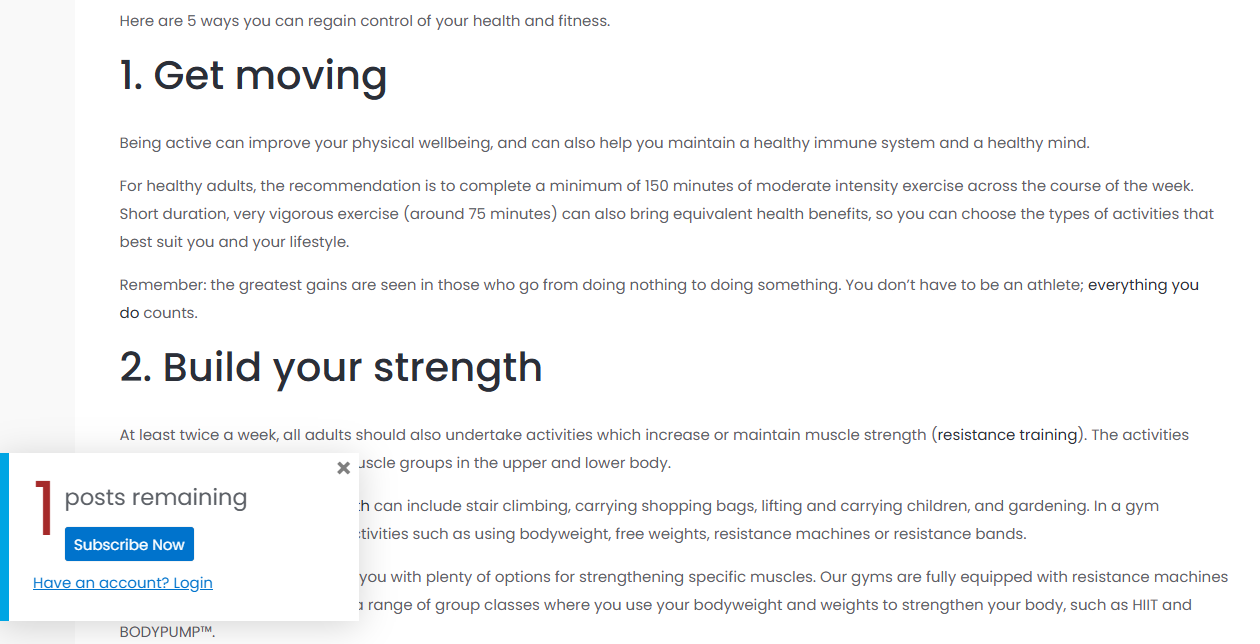
Once you’re satisfied with the setup, click Save Changes to activate the paywall. From then on, visitors will see a notice indicating how many free articles they have left, along with a clear prompt to subscribe or log in.
For example, in the image below, you’ll see a notification informing the reader they have one free article remaining, paired with a “Subscribe Now” button to encourage them to sign up.
Creating Custom WordPress Registration and Login Pages
Now that your content access and paywall settings are in place, the next step is to ensure subscribers have a smooth way to sign up and log in.
When you clicked the Create Pages button during setup, ProfilePress automatically generated default login and registration pages for your site.
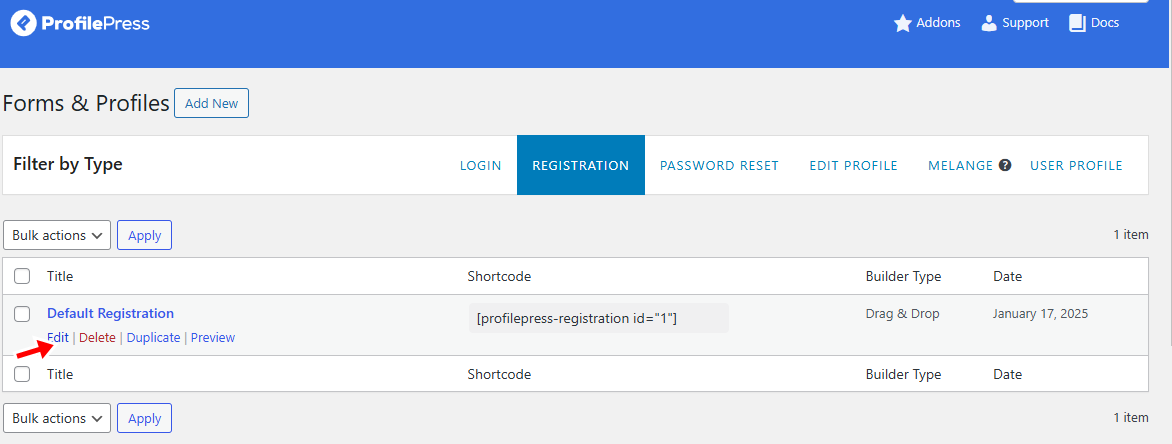
To customize these pages, head to ProfilePress > Forms & Profiles in your WordPress dashboard and click Edit under the Registration form.
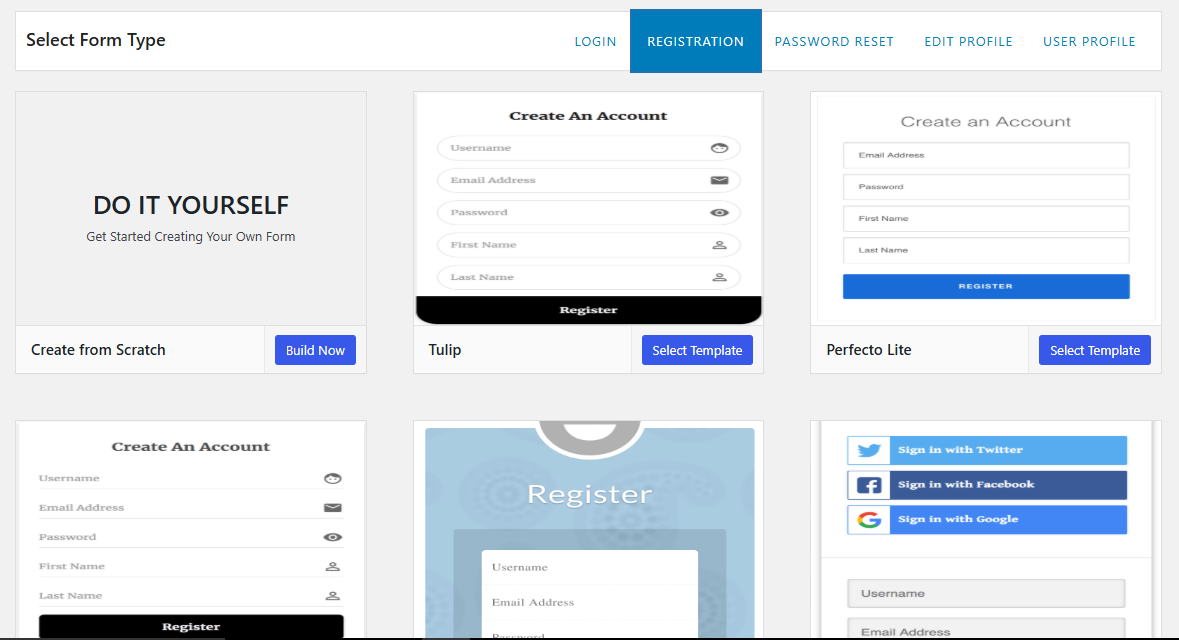
You can also create a brand-new form by selecting Add New and choosing from one of the pre-made templates.
For this guide, we’ll focus on customizing the default forms already created for you during installation.
Customizing Login and Registration Forms
Once you’ve opened the Registration form in the editor, you’ll see a drag-and-drop builder where you can fully customize its layout. The right-hand sidebar lists all available fields.
To adjust the form, drag new fields into the form area or click the gear icon next to an existing field to edit its settings.
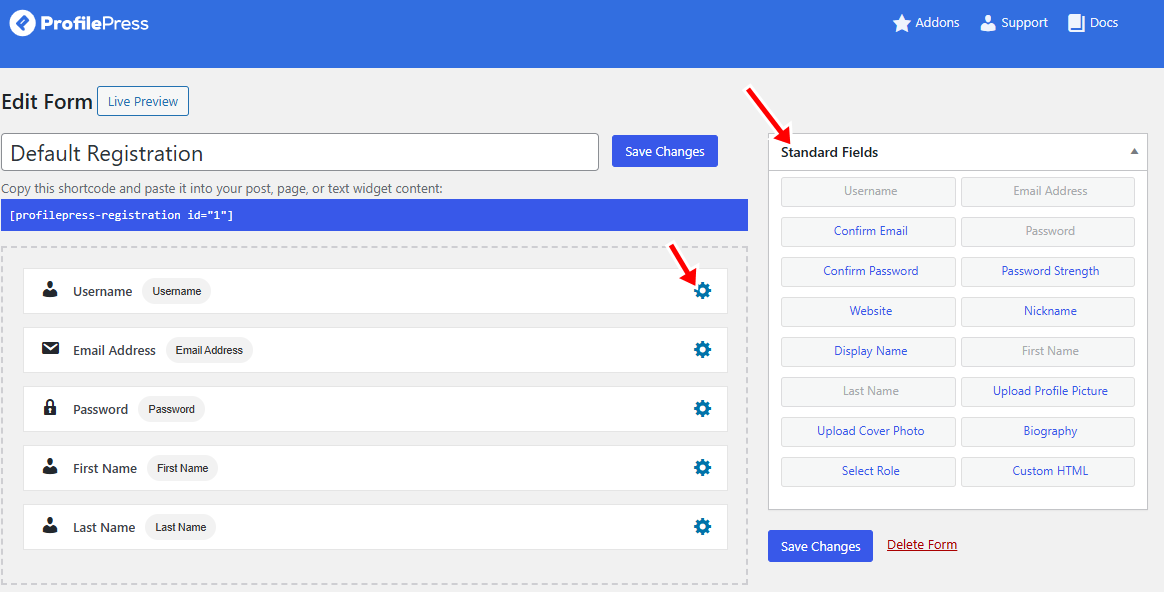
ProfilePress offers two customization tabs for each field: General and Style.
The General tab allows you to add a label, a placeholder, and a brief field description.
The Style tab allows you to adjust field width, choose label placement, add icons, modify description behavior, or apply custom CSS classes for more advanced styling.
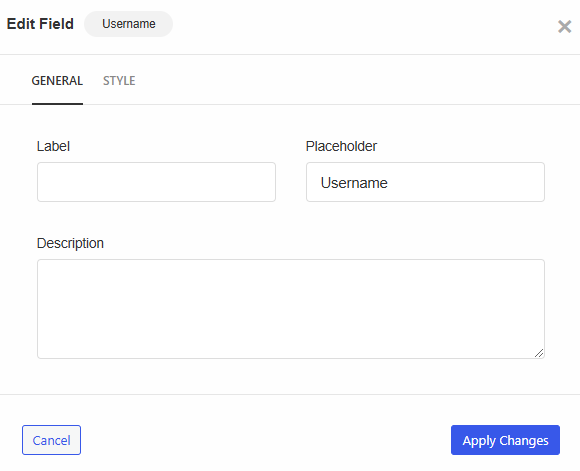
After editing a field, click Apply Changes to save it.
If you want to adjust the overall look of the form, scroll down to the Form Settings area for extra styling options.
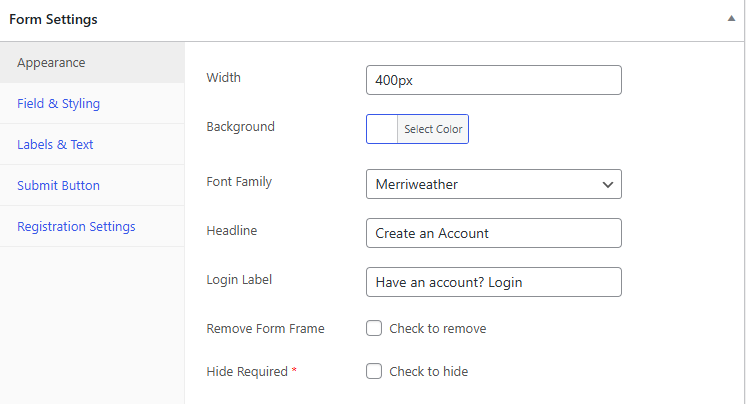
When you’re okay with the design, click Save Changes to update the form.
You can use the same steps to edit the login form so that both pages have a consistent design and feel.
Enabling User Registration and Adding Login/Sign Up Links
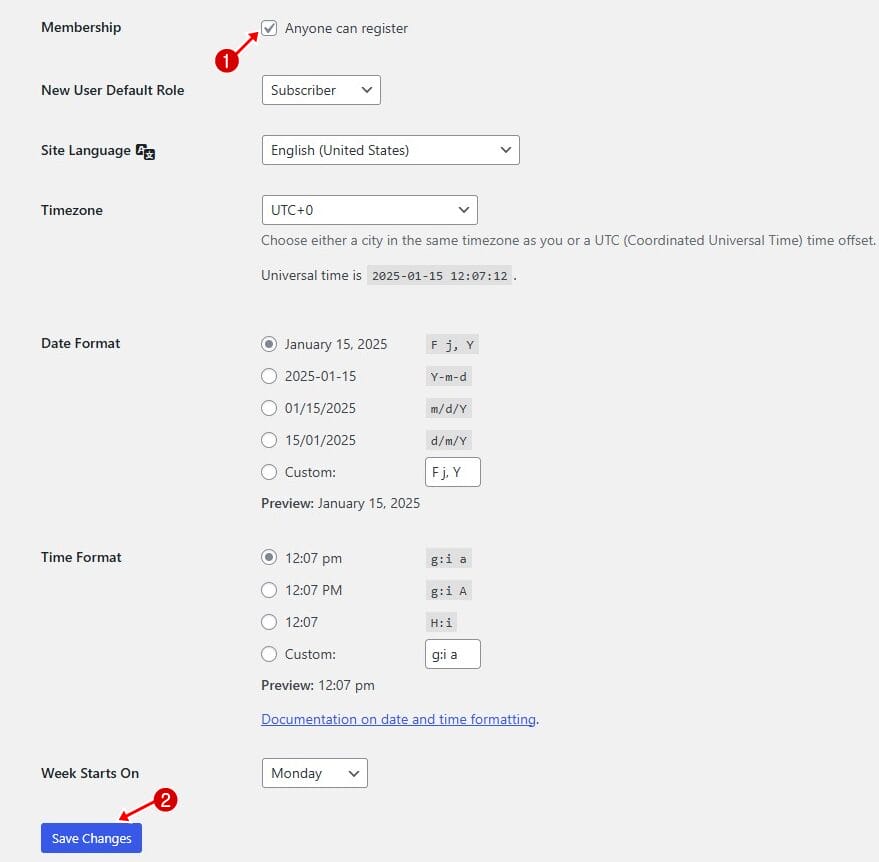
By default, WordPress does not allow new user registrations. To enable it, go to Settings > General and check the box that says “Anyone can register “.
Then click Save Changes.
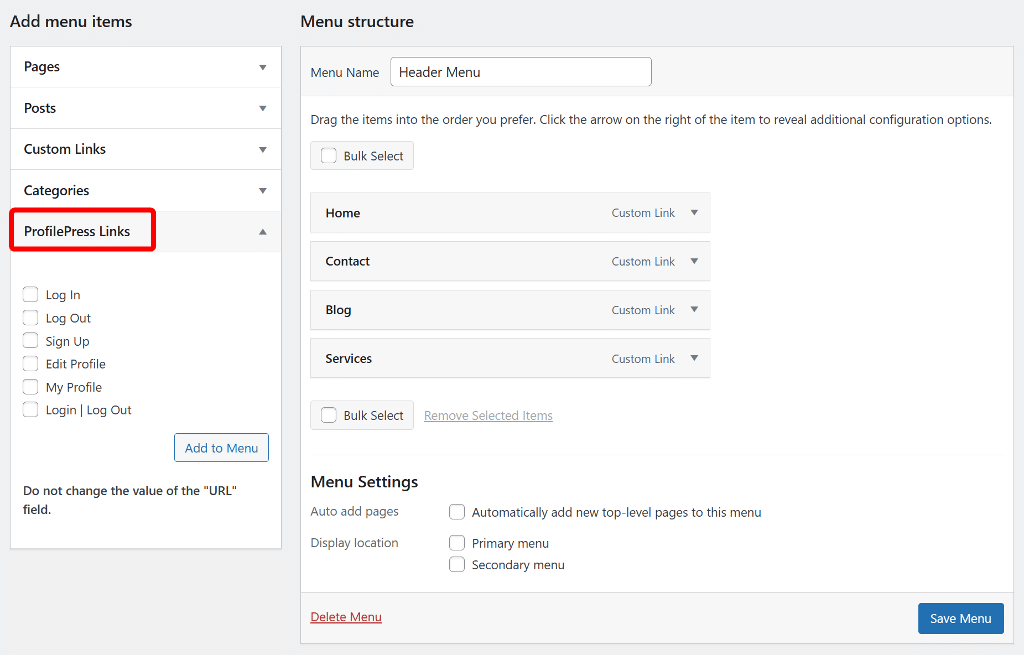
Next, add login and sign-up links to your site’s header so visitors can easily access them.
To do this, go to Appearance > Menus, create or edit a menu, open the ProfilePress Links section, and add the Login and Sign Up links.
Place this menu in your header and click Save Menu.
Finally, visit your site to make sure the login and sign-up links are working correctly.
Next, let’s enhance the user experience by setting up essential account pages such as User Profiles, My Account, and a Member Directory. These pages help subscribers manage their accounts, view other profiles, and interact on your site.
Creating a WordPress User Profile Page
To create a custom profile page where subscribers can view their own profiles (and those of others) directly from the frontend, go to ProfilePress > Forms & Profiles in your WordPress dashboard.
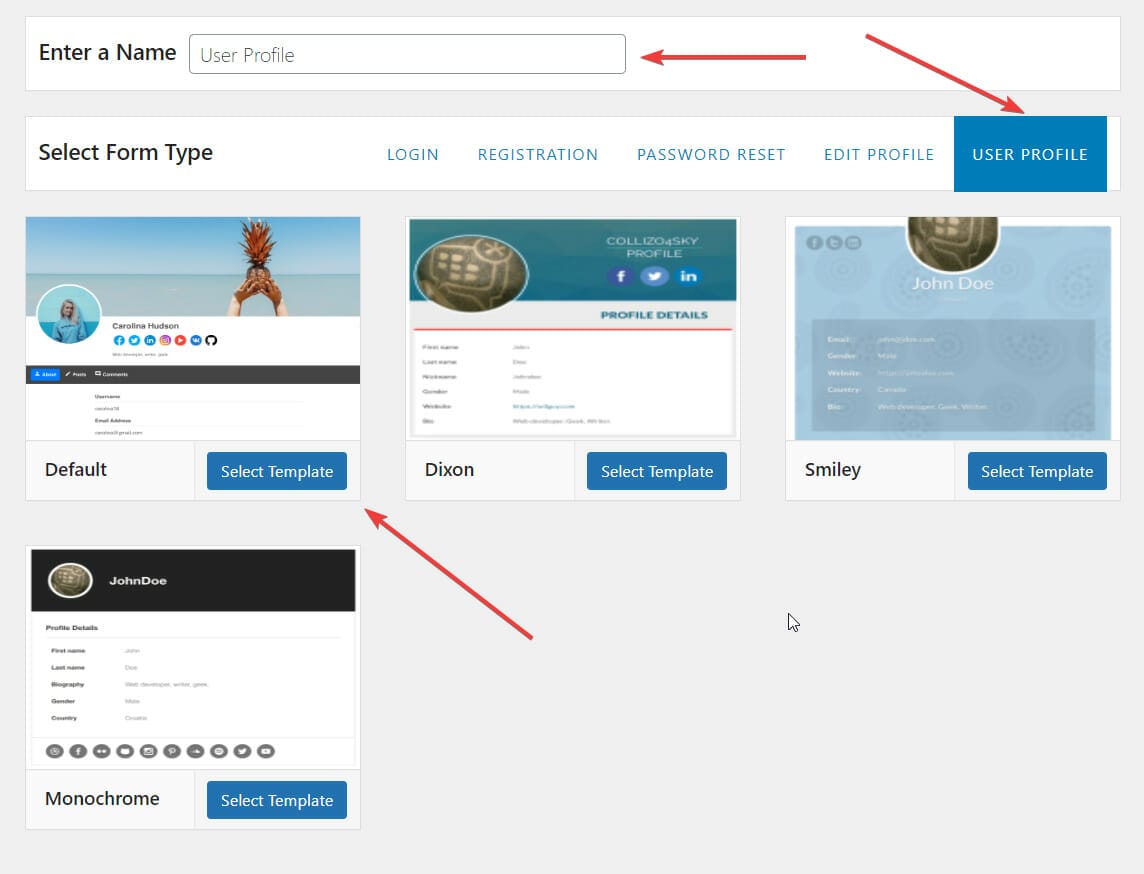
Click Add New, choose User Profile, and select a builder type. For this guide, we’ll use the Drag & Drop Builder.
Give your profile page a title (for example, “User Profiles”) and select a template.
You’ll then be taken to the Edit Frontend Profile screen, where you can design the profile layout.
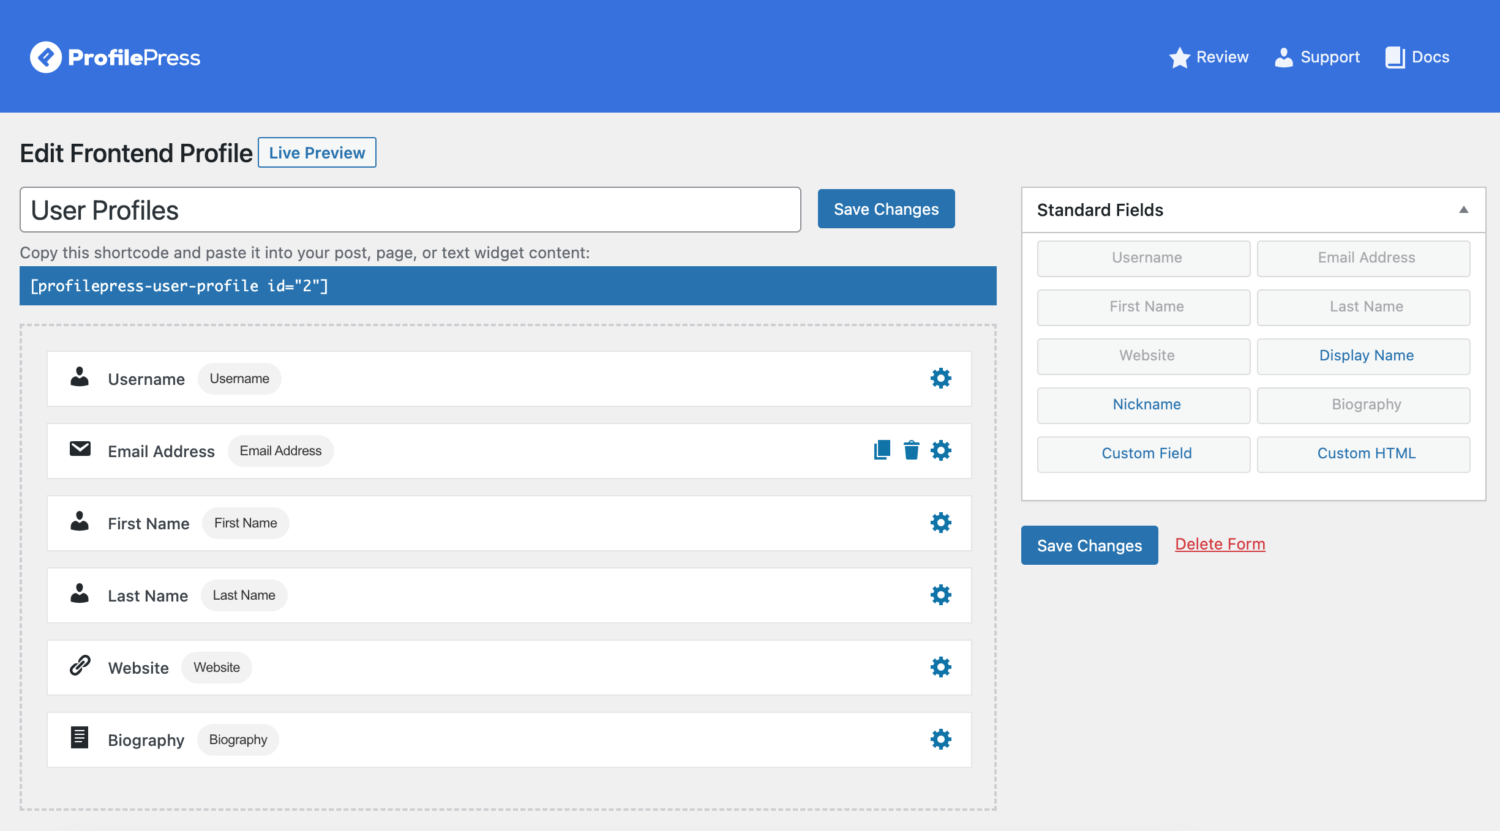
From the right sidebar, drag fields such as name, biography, or any custom field data onto the form. Remove unnecessary fields by hovering over them and clicking the Bin icon.
Once you’re satisfied, click Save Changes.
To display the profile on your website, copy the generated shortcode, then create or edit a WordPress page, paste the shortcode inside, give the page a name, and publish it.
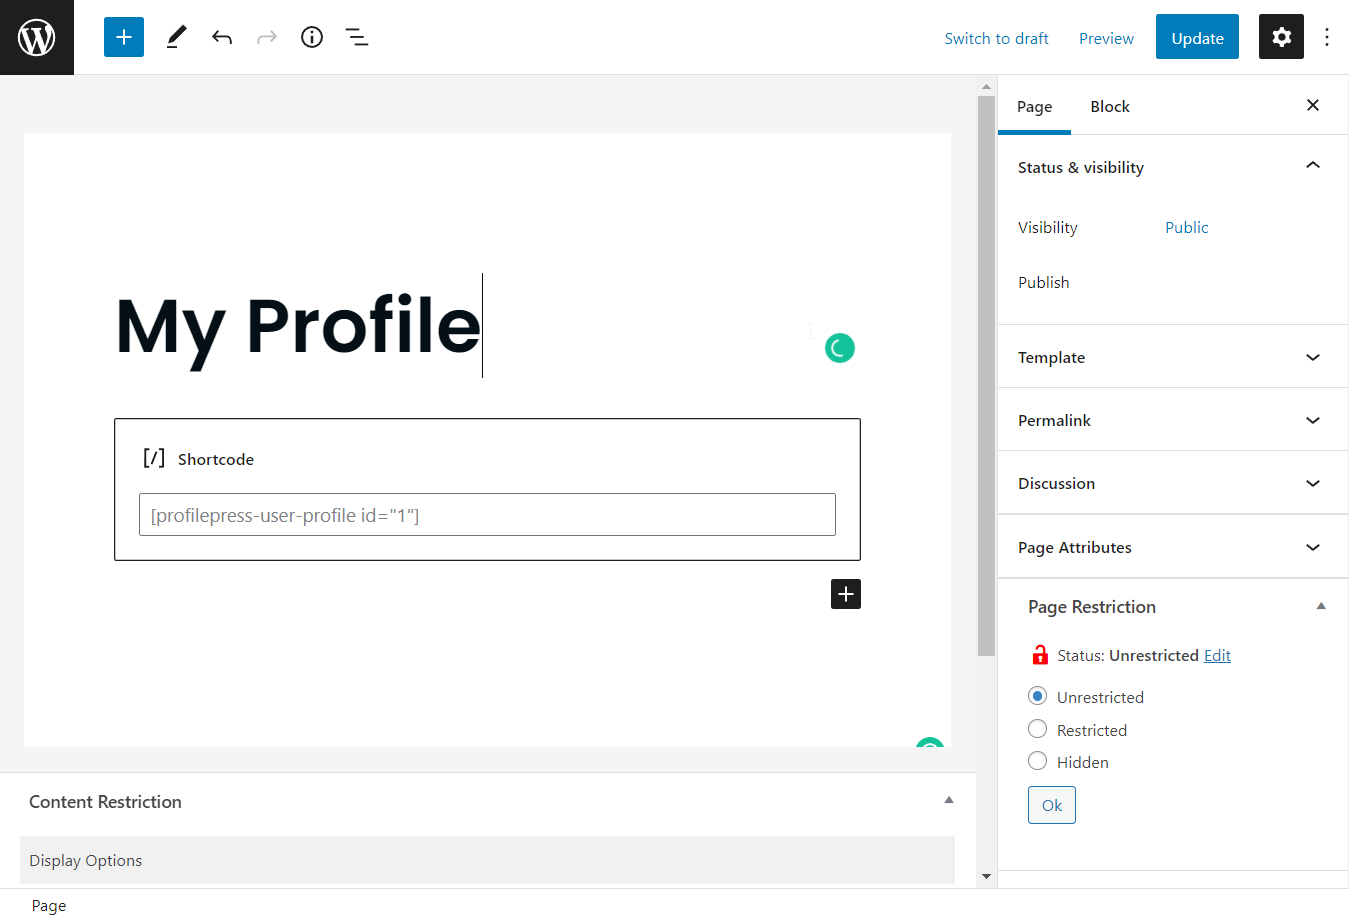
Finally, set this page as the default profile page.
To do this, go to ProfilePress > Settings > Frontend Profile > Page with Profile Shortcode, select the new page you created, and save your changes.
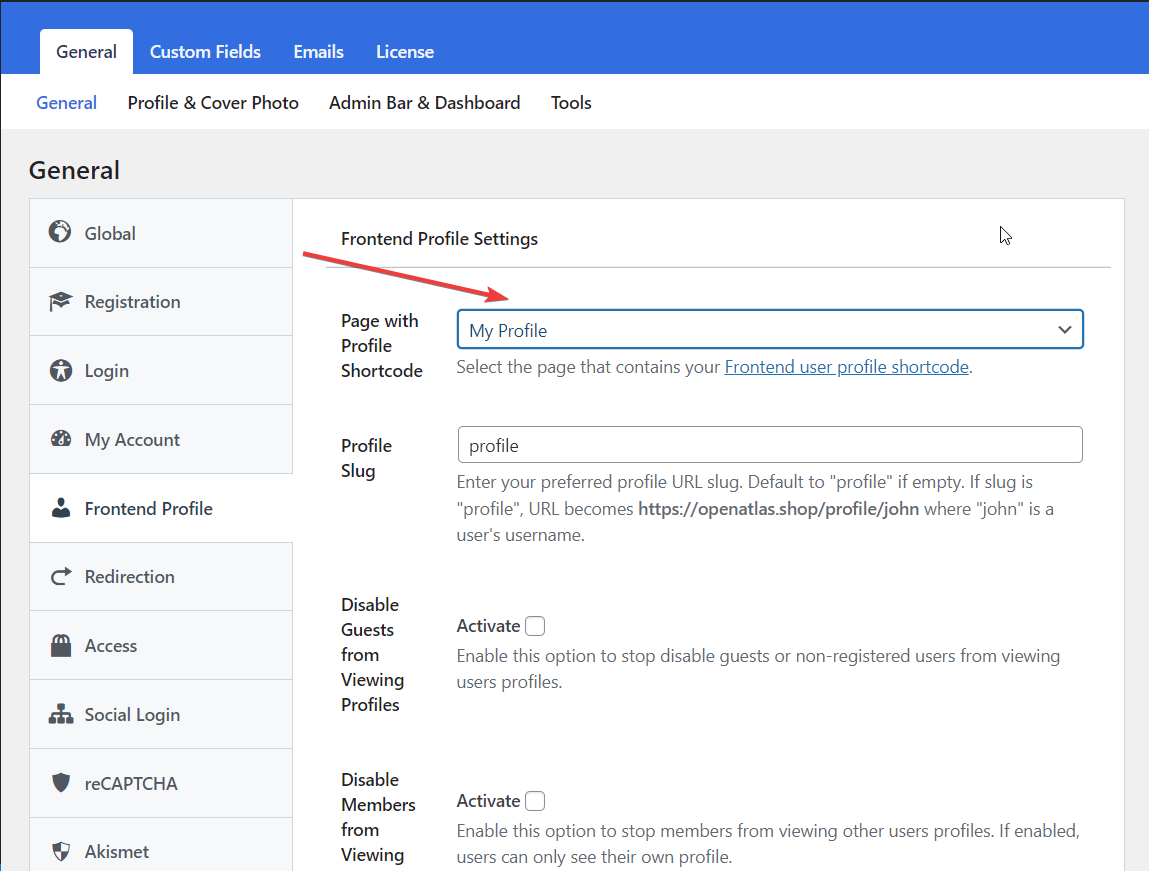
That’s it! Your custom user profile page is now live.
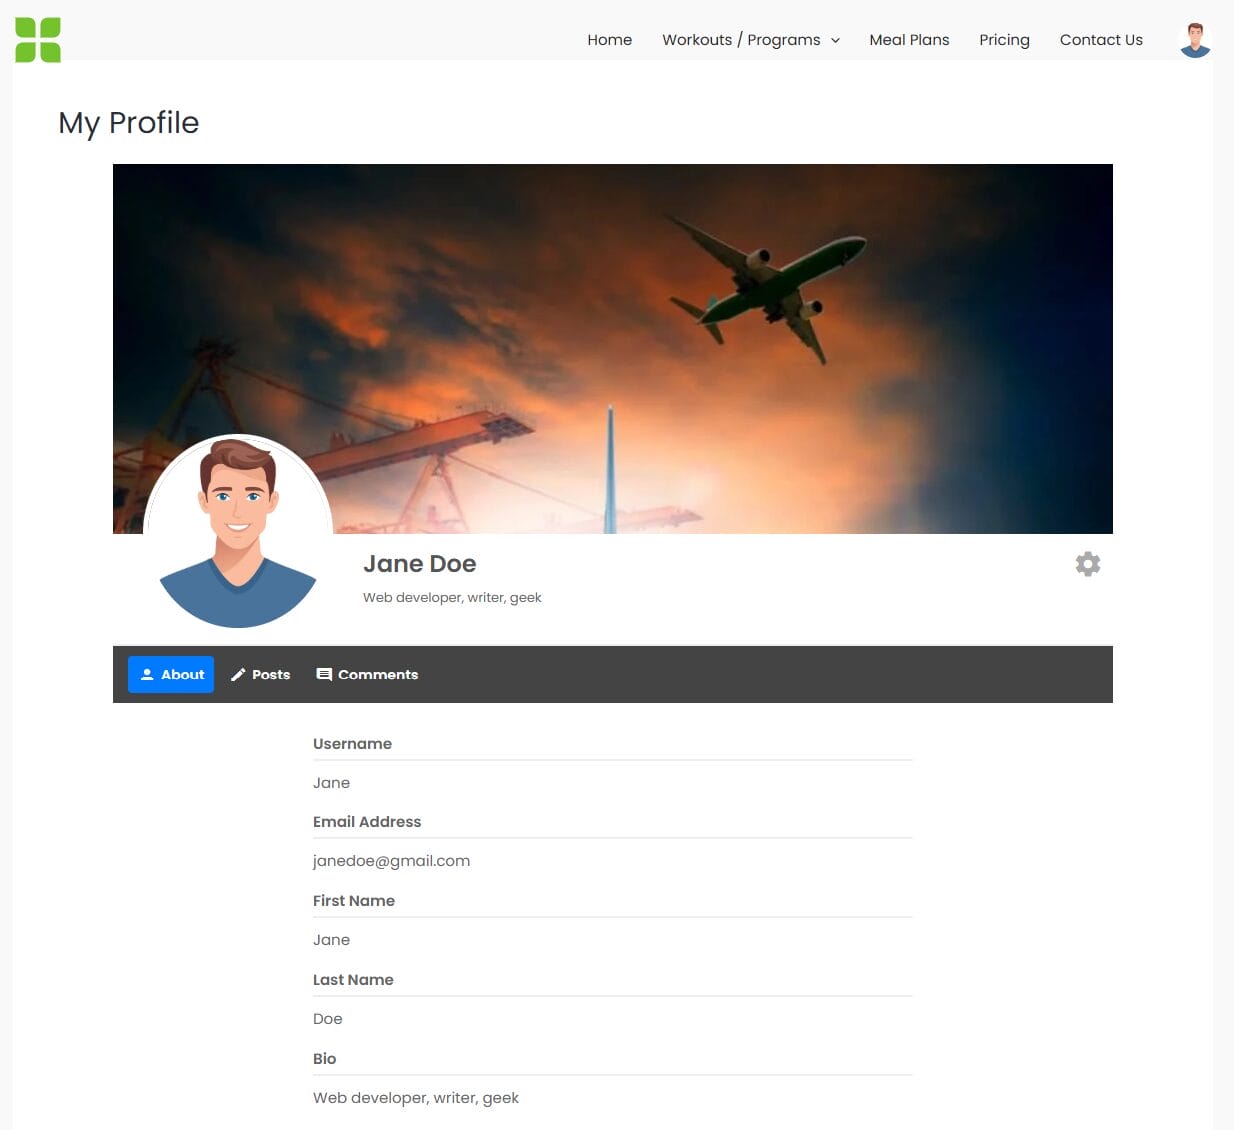
Below is an example of how the user profile appears on our demo site:
My Account Page for Subscribers
ProfilePress provides a My Account page that allows members of your WordPress subscription website to update their personal details, manage subscriptions, change their password, adjust settings, or even delete their account, all from the frontend.

Creating a Member Directory
A Member Directory page helps showcase all registered users, making it easier for subscribers to connect with one another.
To set it up, go to ProfilePress > Member Directories and click Add New.
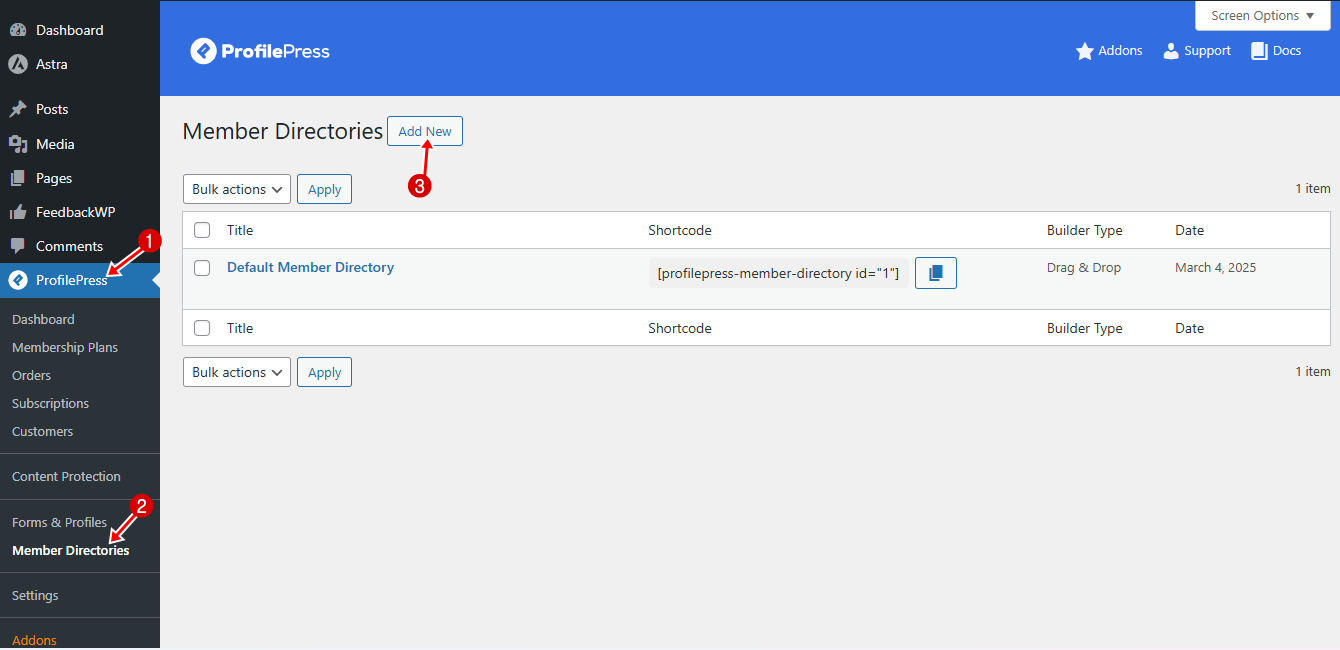
Next, choose the Drag & Drop Builder, give your directory a name, and select a template.
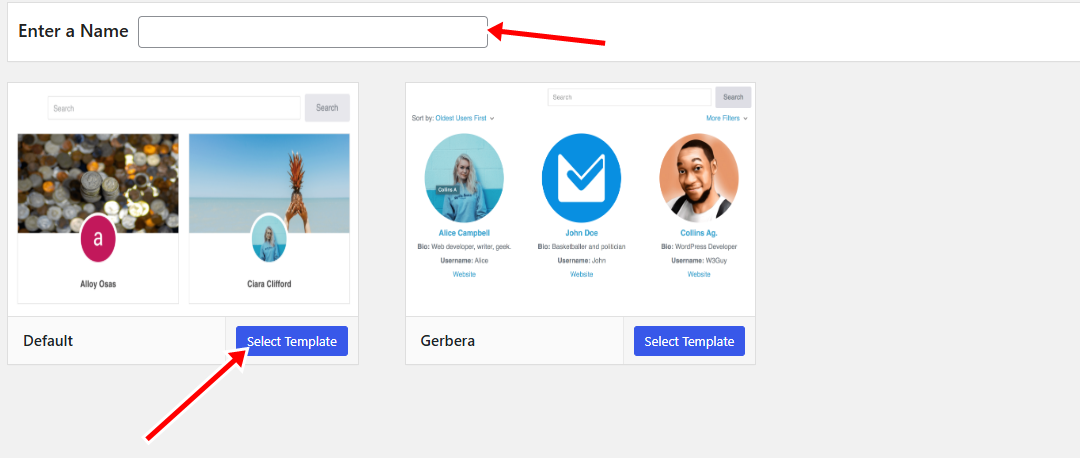
On the directory editor page, choose which profile fields to display and adjust the directory’s settings.

When you’re finished, save your changes. Copy the generated shortcode, paste it into a new WordPress page, and publish it.
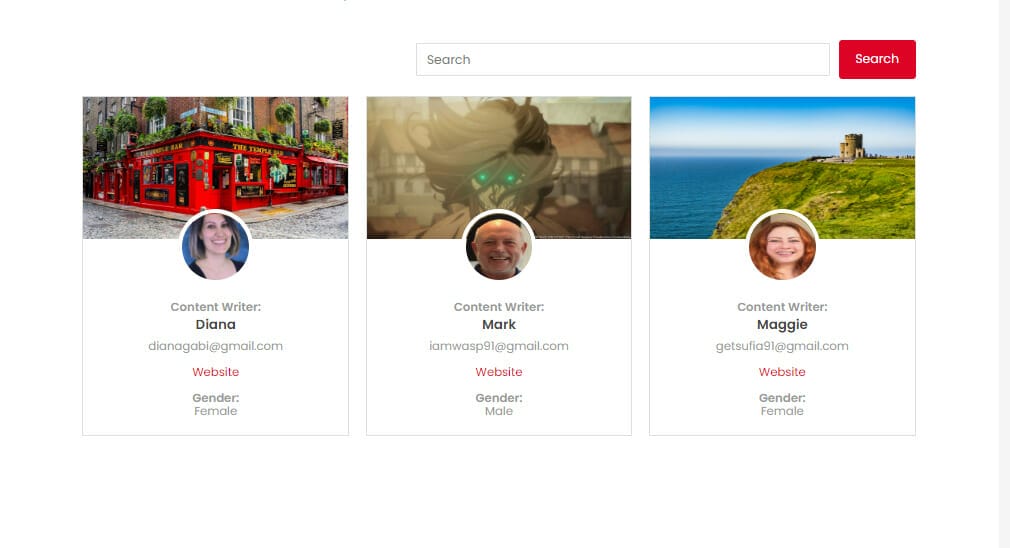
Your member directory will now be live and accessible on your site.
Below is a preview of how the directory looks on the front end of our subscription website.
Advanced Features You Can Add
Once your subscription website is up and running, you can take things further by adding advanced features to improve functionality, boost security, and enhance the user experience.
ProfilePress comes packed with powerful features that make your site more than just a simple subscription platform. These include:
- Invite Codes: Control who can register on your platform by requiring unique codes.
- Social Login: Allow sign-up and login via Facebook, Google, Twitter, or LinkedIn.
- Email Marketing Integrations: Sync subscribers with Mailchimp, MailerLite, and Campaign Monitor so you can segment and market to them.
- Advanced Login Security: Add two-factor authentication (2FA), passwordless login, and limit concurrent logins to stop password sharing.
- Custom Redirects: Redirect users after login or registration based on their role or subscription plan.
- Analytics & Reporting: Track sales, refunds, and subscriptions with detailed reports and export options.
Conclusion
We hope this guide has helped you learn how to create a subscription website using WordPress.
From setting up your payment gateway and creating subscription plans to building custom login pages, user profiles, and member directories, you now have all the information to launch your own subscription site using WordPress.
Now is the perfect time to take action, get ProfilePress today, and unlock the power of recurring revenue for your business.