Do you want to learn how to create a WooCommerce membership website?
Imagine transforming your online store into an exclusive community where loyal customers can access premium products, special discounts, and unique content.
A membership website can revolutionize your ecommerce business, boost customer engagement, and create a steady stream of recurring revenue. But let’s face it, setting up a membership site can seem daunting.
You might be wondering:
- How can I sell memberships on my WooCommerce website?
- How do I restrict access to certain products or content?
- Can I set up exclusive discounts for members?
- How can I create a members-only WooCommerce store?
This is where ProfilePress comes in, an excellent WooCommerce membership plugin for building a feature-rich membership website that integrates seamlessly with WooCommerce.
In this article, we’ll guide you through creating a WooCommerce membership website, from setup to execution, helping you turn your standard online store into a thriving membership-based business.
Benefits of a WooCommerce Membership Website
Here are the key benefits of adding memberships to your WooCommerce online store
Recurring Revenue: A membership website allows you to generate a steady stream of recurring revenue through subscription payments. Whether it’s a monthly, quarterly, or annual membership, this model creates financial predictability for your business.
Customer Loyalty and Retention: By offering exclusive perks like members-only content, discounts, or early access to products, you incentivize customers to stay engaged with your brand. This helps foster long-term customer loyalty and reduces churn.
Increased Customer Lifetime Value (CLV): A membership model encourages repeat purchases and ongoing engagement, increasing the customer’s lifetime value. Members spend more over time than one-time buyers, especially with exclusive deals and premium content.
Community Building: Membership websites foster a sense of belonging. By creating an exclusive space where members can interact, share experiences, and receive special content, you build a community around your brand that encourages word-of-mouth marketing.
Creating a WooCommerce Membership Website
To create a WooCommerce membership website, begin by ensuring that WooCommerce is installed, activated, and running smoothly on your website.
Once WooCommerce is set up, the next step is to install and activate the ProfilePress membership plugin. Head to the ProfilePress website to purchase a plan that fits your requirements.
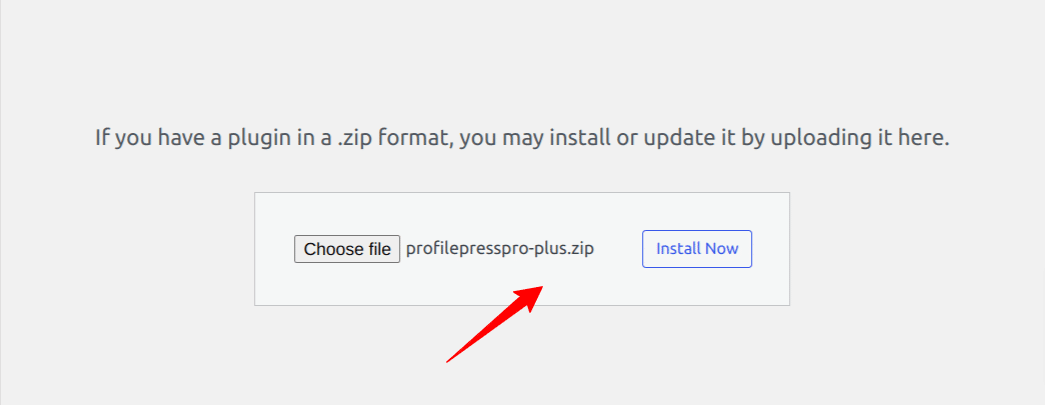
Log in to your WordPress dashboard and go to the Plugins section. Click on Add New, followed by Upload Plugin, and choose the plugin ZIP file.
Next, click on Install Now.
Wait a few seconds for the installation to finish. Once the plugin is installed, click Activate Plugin to enable it on your site.
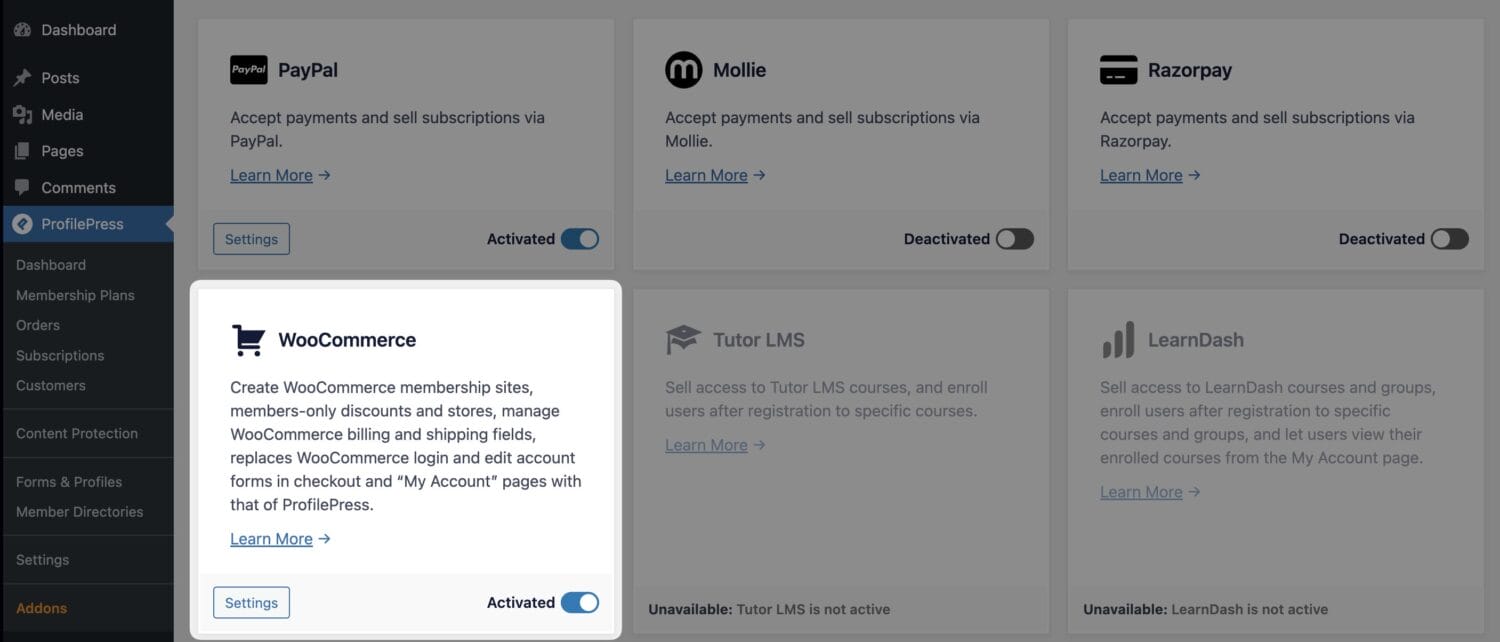
The next step is to activate the WooCommerce addon in ProfilePress. To do this, navigate to ProfilePress > Addons and toggle the switch to enable it.
Now that the WooCommerce addon is activated, the next step is to create a WooCommerce product that your customers must purchase to subscribe to a specific membership plan. You’ll also need to create a corresponding ProfilePress membership plan for this product.
For example, if we want to offer an ‘Elite Membership’ plan on your WooCommerce membership website, we need to create a product in WooCommerce for the membership and a corresponding membership plan in ProfilePress so that when users purchase this product, they are automatically subscribed to the membership plan.
Creating Products for Selling WooCommerce Memberships
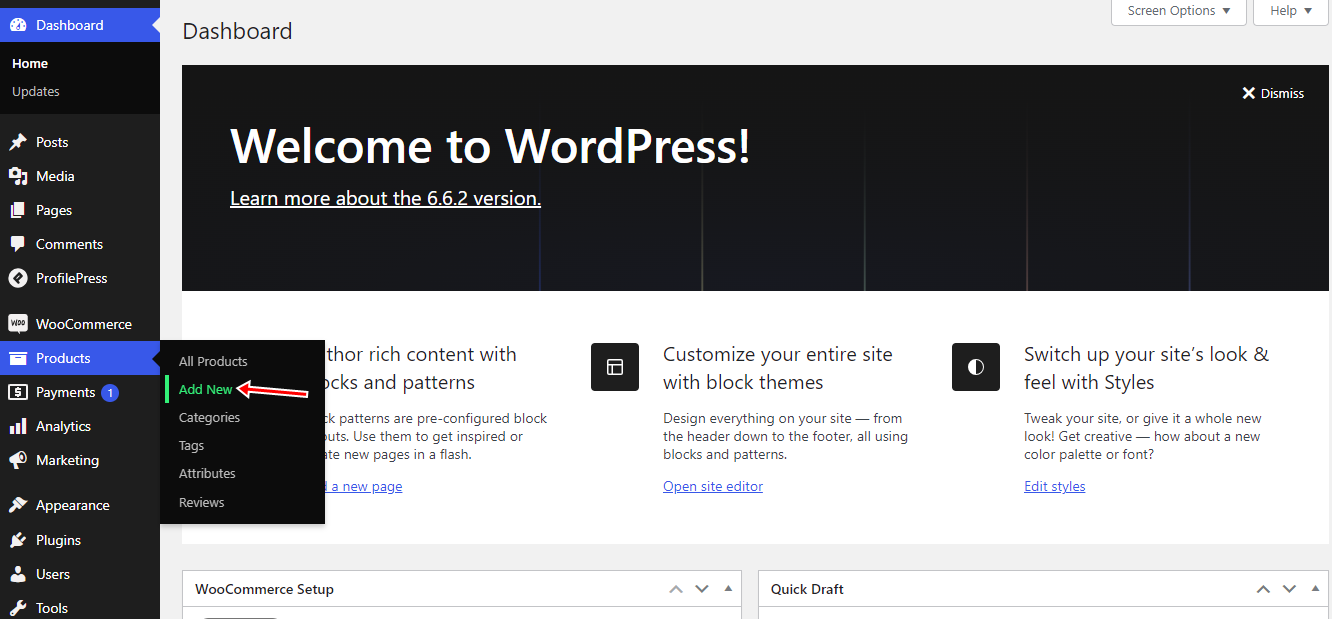
To create a WooCommerce product for our Elite Membership offering, login to your WordPress website dashboard and go to Products >> Add New
Enter a title for the product, add a price, and set the product visibility to hidden.
When you set a product to “hidden status”, it means that the product will not appear on your site unless a visitor follows a direct link to that product or you insert it into an article or pricing page.
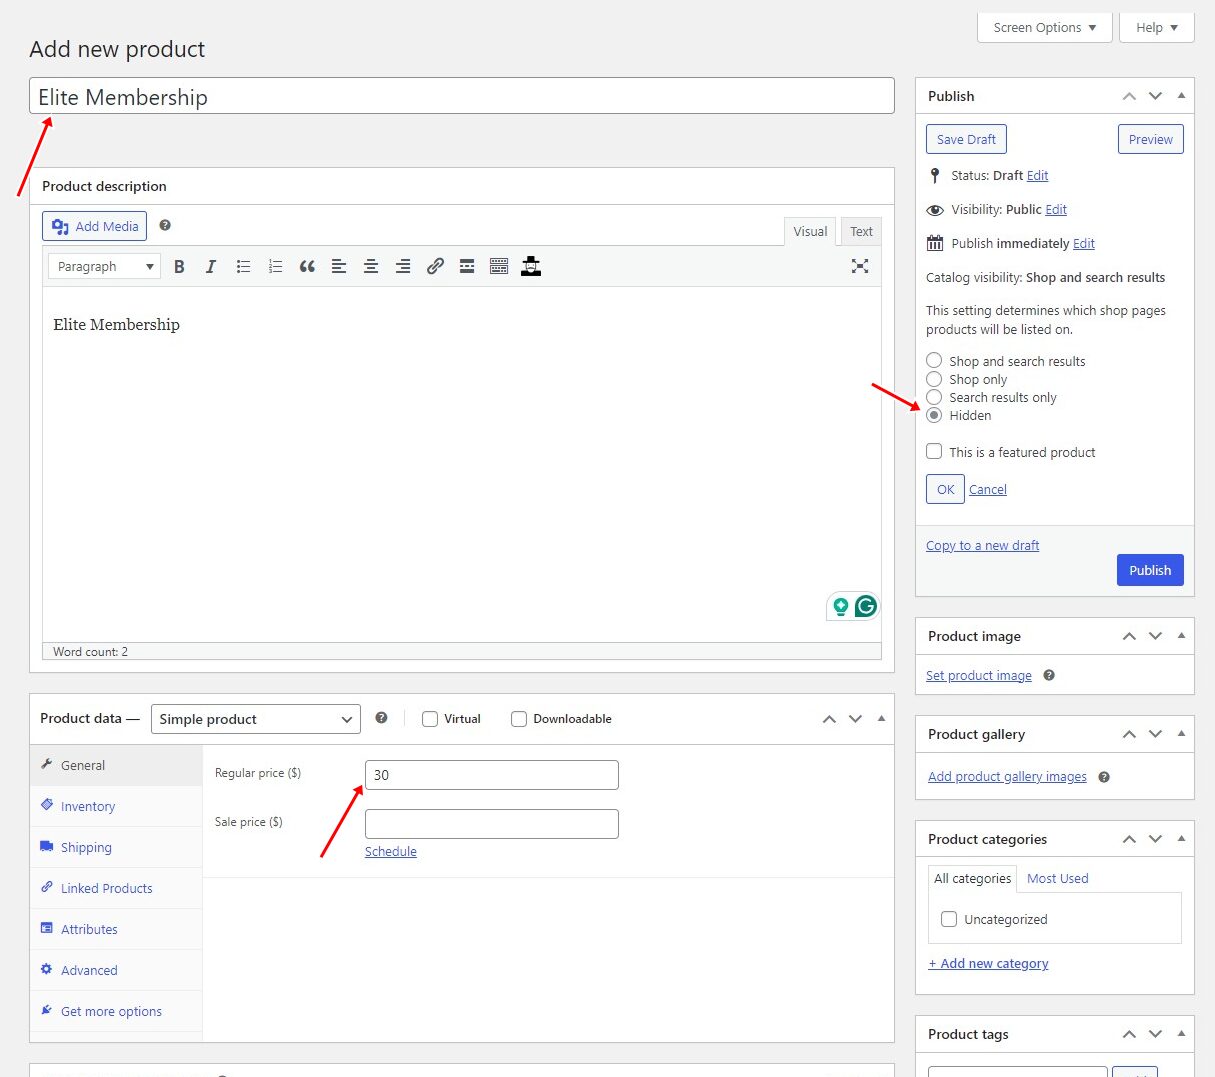
Once you’re finished, publish the product.
Next, we’ll create the membership plan to which your WooCommmerce membership site users will subscribe.
Creating a Membership Plan in ProfilePress
To set up a membership plan that can be purchased through the WooCommerce product you just created, go to ProfilePress >> Membership Plans and click on Add New.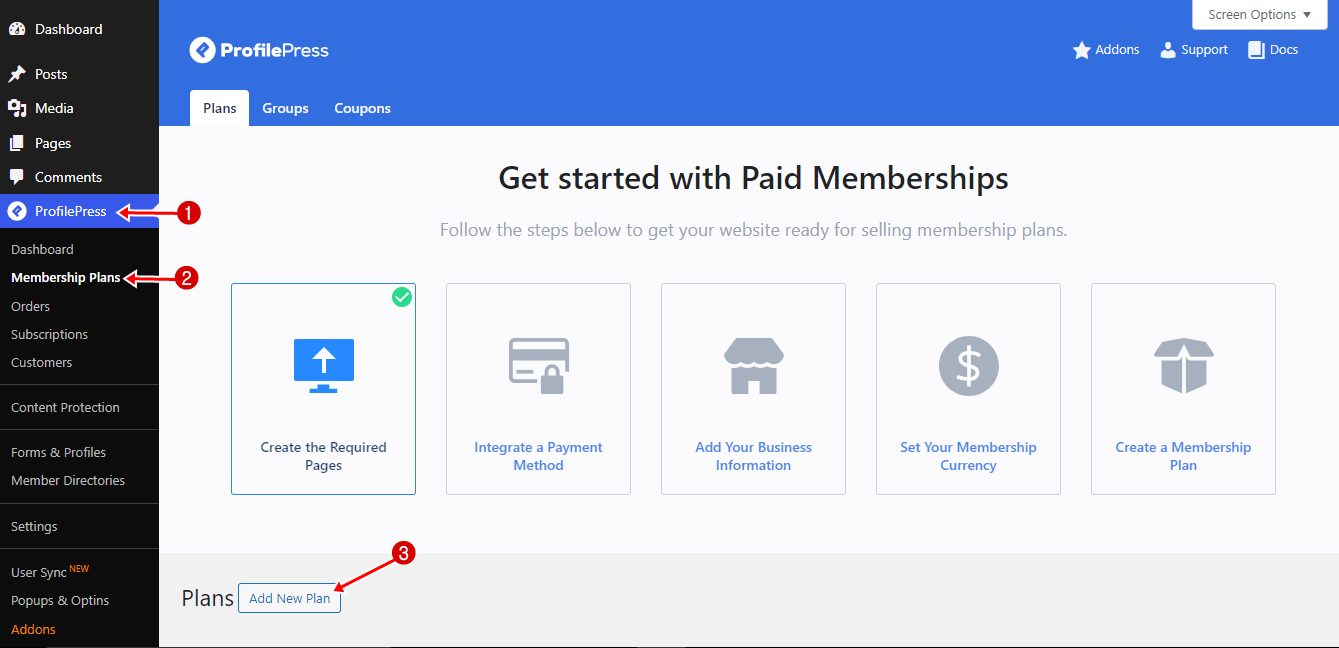
Enter a name for the membership plan and set the price to match the WooCommerce product price. Select ‘One-time purchase’ for the billing frequency, as this product is not a subscription.
We’ll cover how to sell recurring memberships later.
Next, scroll down to ‘Downloads & Integration‘ open the WooCommerce tab, and select the ‘Elite Membership’ product you created earlier. This ensures that customers who purchase this WooCommerce product are automatically subscribed to the membership plan in ProfilePress.
Finally, click the ‘Save Plan’ button to complete the process.
How the WooCommerce and ProfilePress Integration Works
The integration between WooCommerce and ProfilePress is straightforward. You’ll need to create a landing page, sales page, or pricing page on your website, where you’ll link to the WooCommerce membership product.
When a customer chooses to purchase a membership plan, they will click the link, which will direct them to the WooCommerce product page for the membership. From there, they can add the product to their cart and complete the checkout process just like any other WooCommerce product.

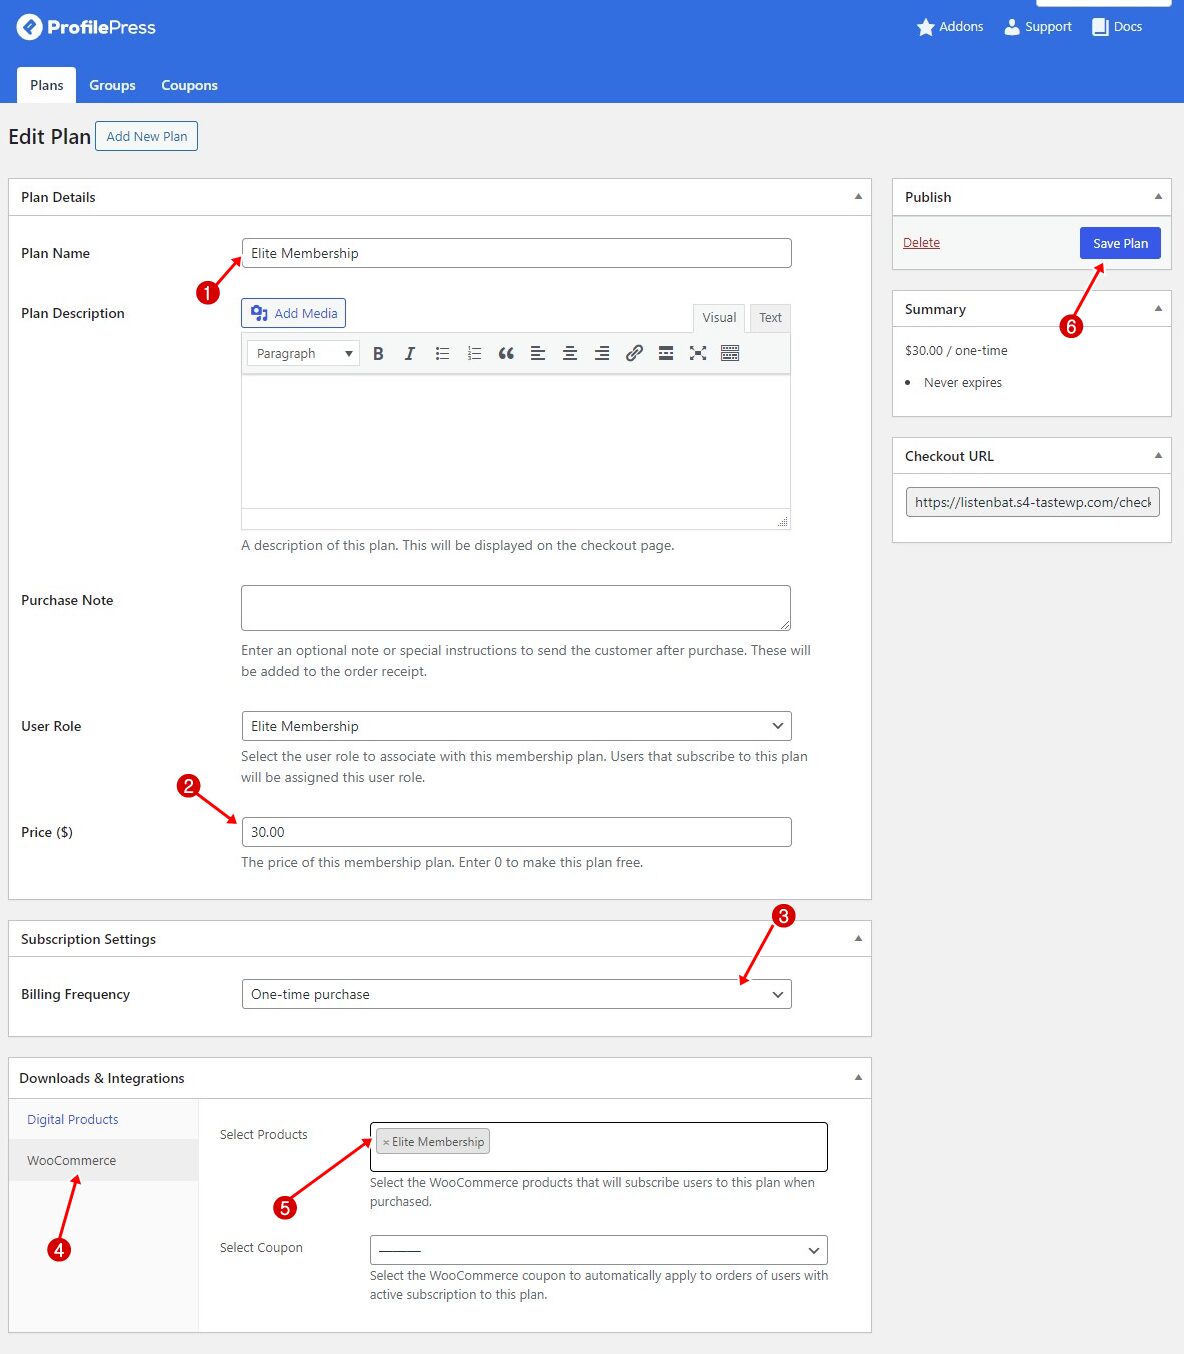
After the payment is processed, WooCommerce automatically completes the order, and the customer is immediately enrolled in the corresponding membership plan in ProfilePress.
It’s important to note that if an order is canceled or refunded, the customer’s membership in ProfilePress will automatically expire. This ensures that only active, paying members retain access.
Selling Recurring Memberships with WooCommerce and ProfilePress
WooCommerce provides a subscription extension that allows customers to subscribe to your products or services on a recurring basis, whether weekly, monthly, or annually.
When combined with ProfilePress, this extension enables you to sell recurring memberships seamlessly through your WooCommerce-powered online store. This setup offers your customers ongoing access to exclusive content, products, or services while ensuring a steady stream of income for your business.
Let’s go through an example of setting up a Gold Membership plan with a recurring monthly fee of $10 for our WooCommerce membership website.
To start, ensure that the WooCommerce Subscriptions extension is activated on your website.
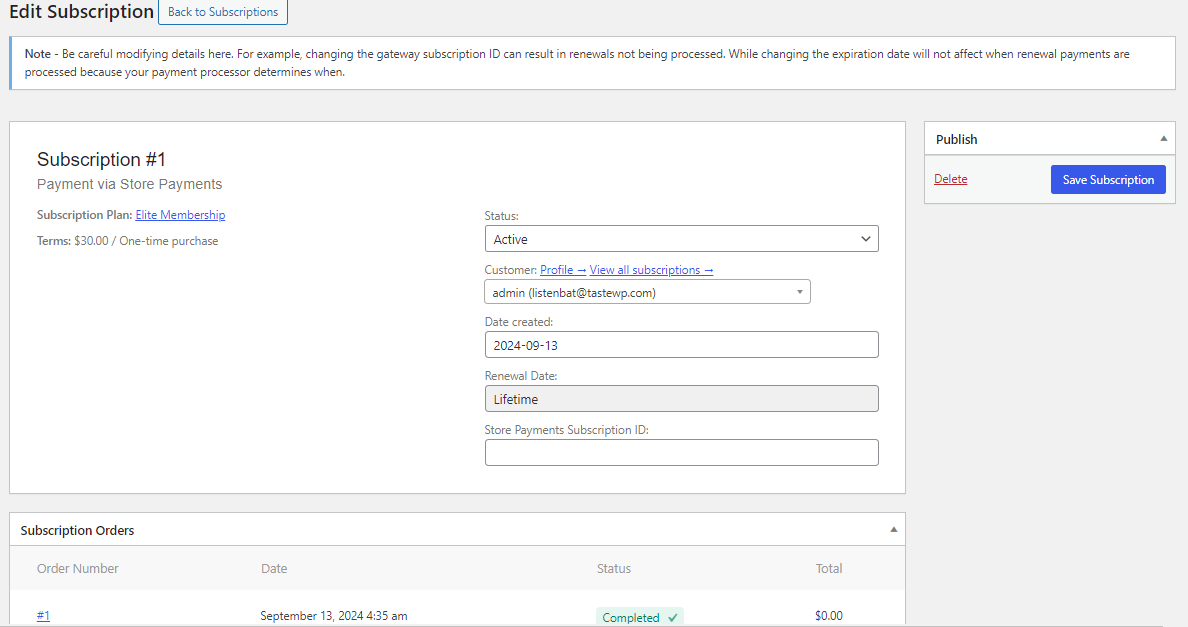
Next, navigate to WooCommerce >> Product >> Add New.
Enter a name for your membership.
In the Product Data section, select “Simple Subscription” as the product type to indicate that this is a subscription-based product.
Next, configure the subscription details: set the price to $10 and choose the billing interval as monthly. You can also decide if you want to include a sign-up fee for an initial payment and whether to offer a free trial period, such as 7 or 30 days, to attract more sign-ups.
Then, set the catalog visibility to hidden to prevent the product from appearing on the Shop and Search Results pages.
Once you’ve completed these settings, go ahead and publish the product.
Linking the Subscription Product to the ProfilePress Membership Plan
With your subscription product set up, the next step is to link it to a membership plan in ProfilePress. This ensures that customers are automatically enrolled in the membership program when they subscribe.
To link the product, navigate to ProfilePress > Membership Plans > Add New.
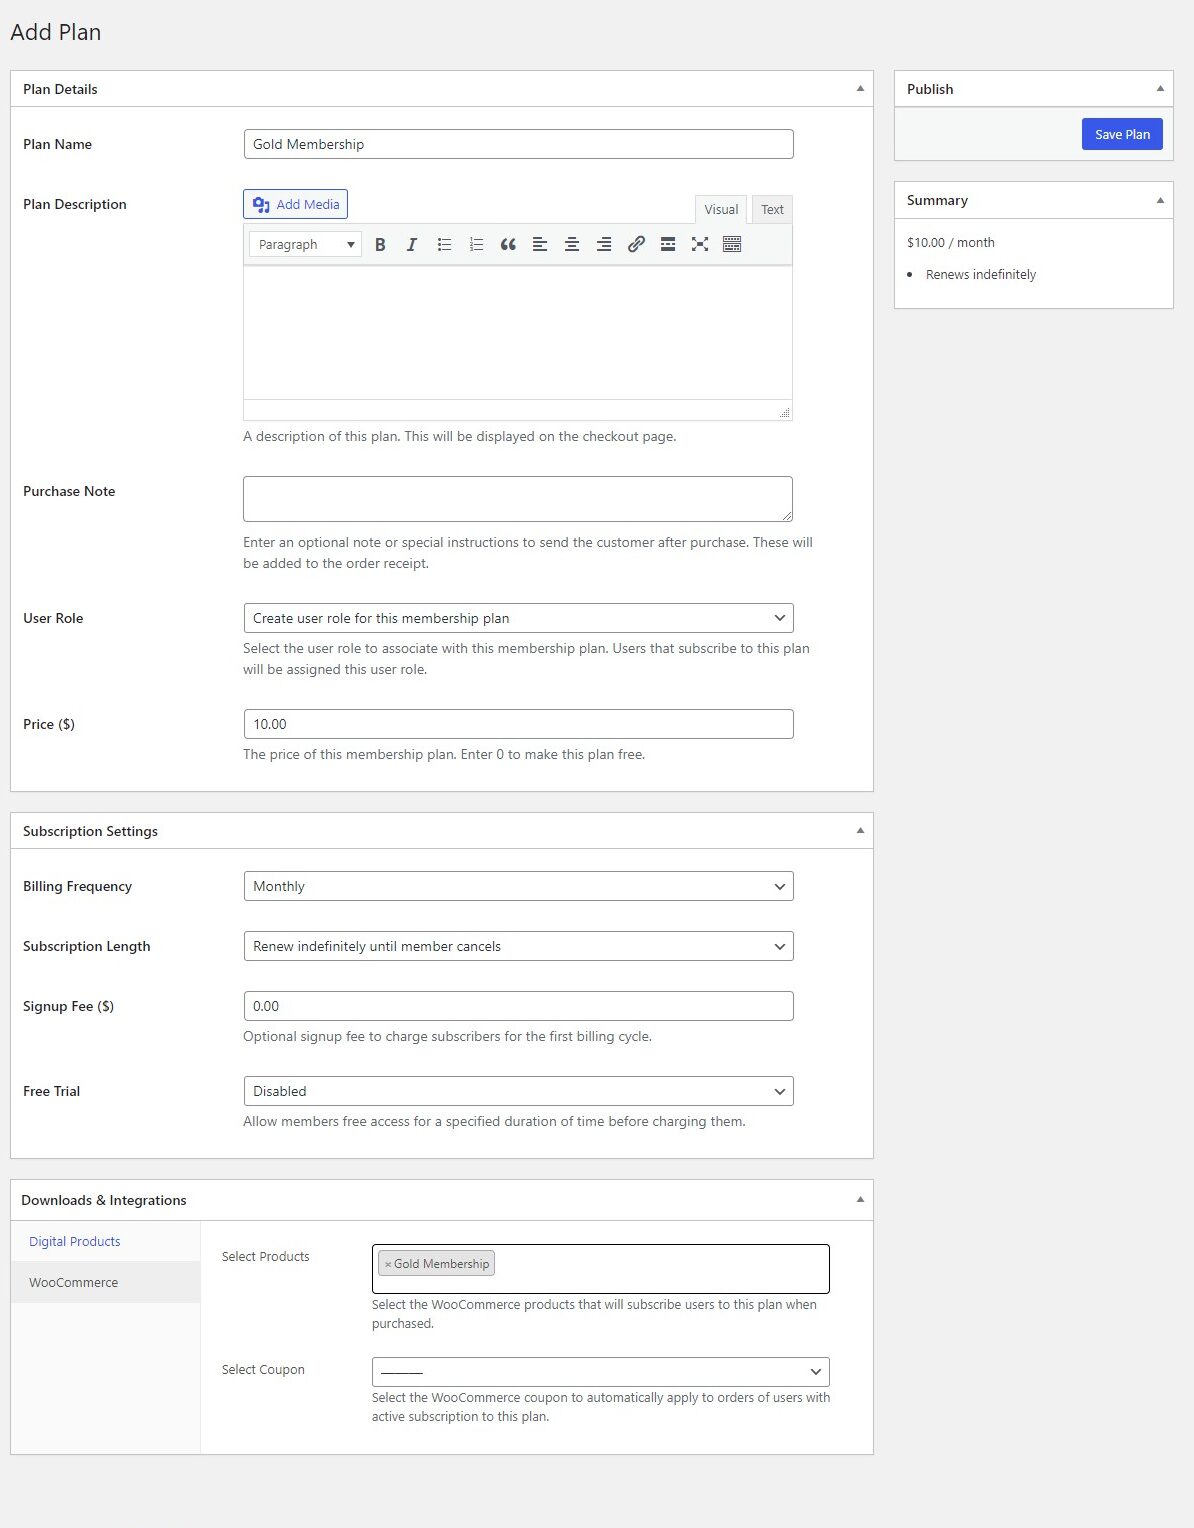
Enter a title and price for the membership plan, and set the Billing Frequency to Monthly to align with the WooCommerce subscription product you created earlier.
Next, scroll down to the Downloads & Integration section. In the WooCommerce tab, select the Gold Membership product. This ensures that customers are automatically enrolled in the corresponding membership plan when purchasing the product.
Once you’ve made these selections, save the plan.
Now, customers who subscribe to Gold Membership will simply follow the WooCommerce product link, add the product to their cart, and complete the purchase on the checkout page.

When a user buys the Gold Membership product through WooCommerce, they will be automatically signed up for the matching membership plan in ProfilePress. If the WooCommerce subscription for the Gold Membership is canceled, their ProfilePress membership will also be canceled. Similarly, if the WooCommerce subscription expires, the corresponding ProfilePress membership will also expire.
Setting Up a WooCommerce Members-Only Discount
Offering members-only discounts is a great way to enhance your subscribers’ experience on your WooCommerce membership website. These exclusive coupons allow active members to enjoy special discounts when making purchases on your WooCommerce store.
With ProfilePress, you can easily set up members-only discount codes that are automatically applied at checkout when members purchase products.
To get started, first create a discount in WooCommerce.
Do this by navigating to your WordPress dashboard >> Marketing, selecting Coupons, and clicking Add New.
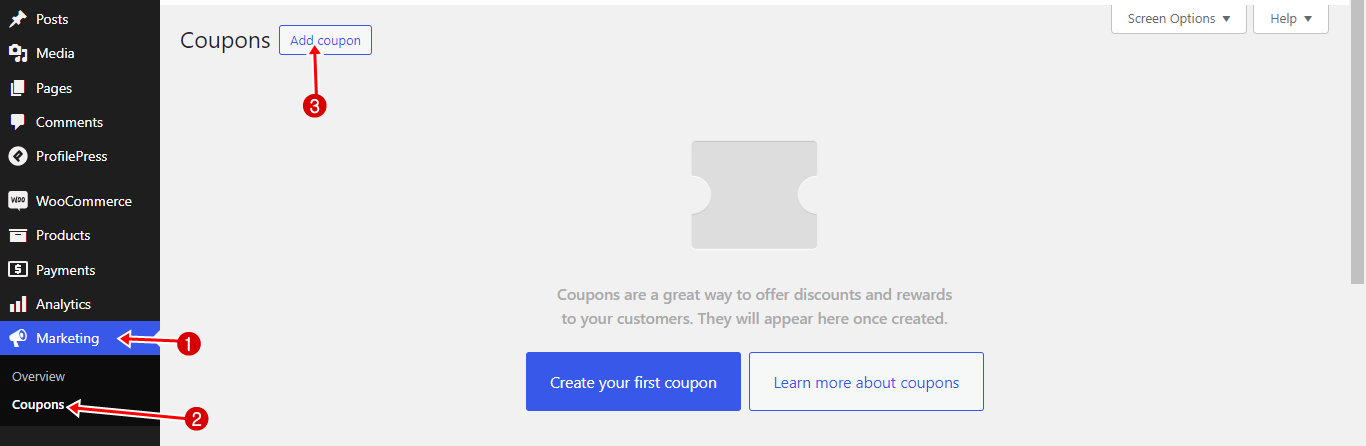
Enter or generate a code for the coupon, along with a description and configuration of the coupon benefits. The screenshot below offers a 30% discount. YB6P3CRZ
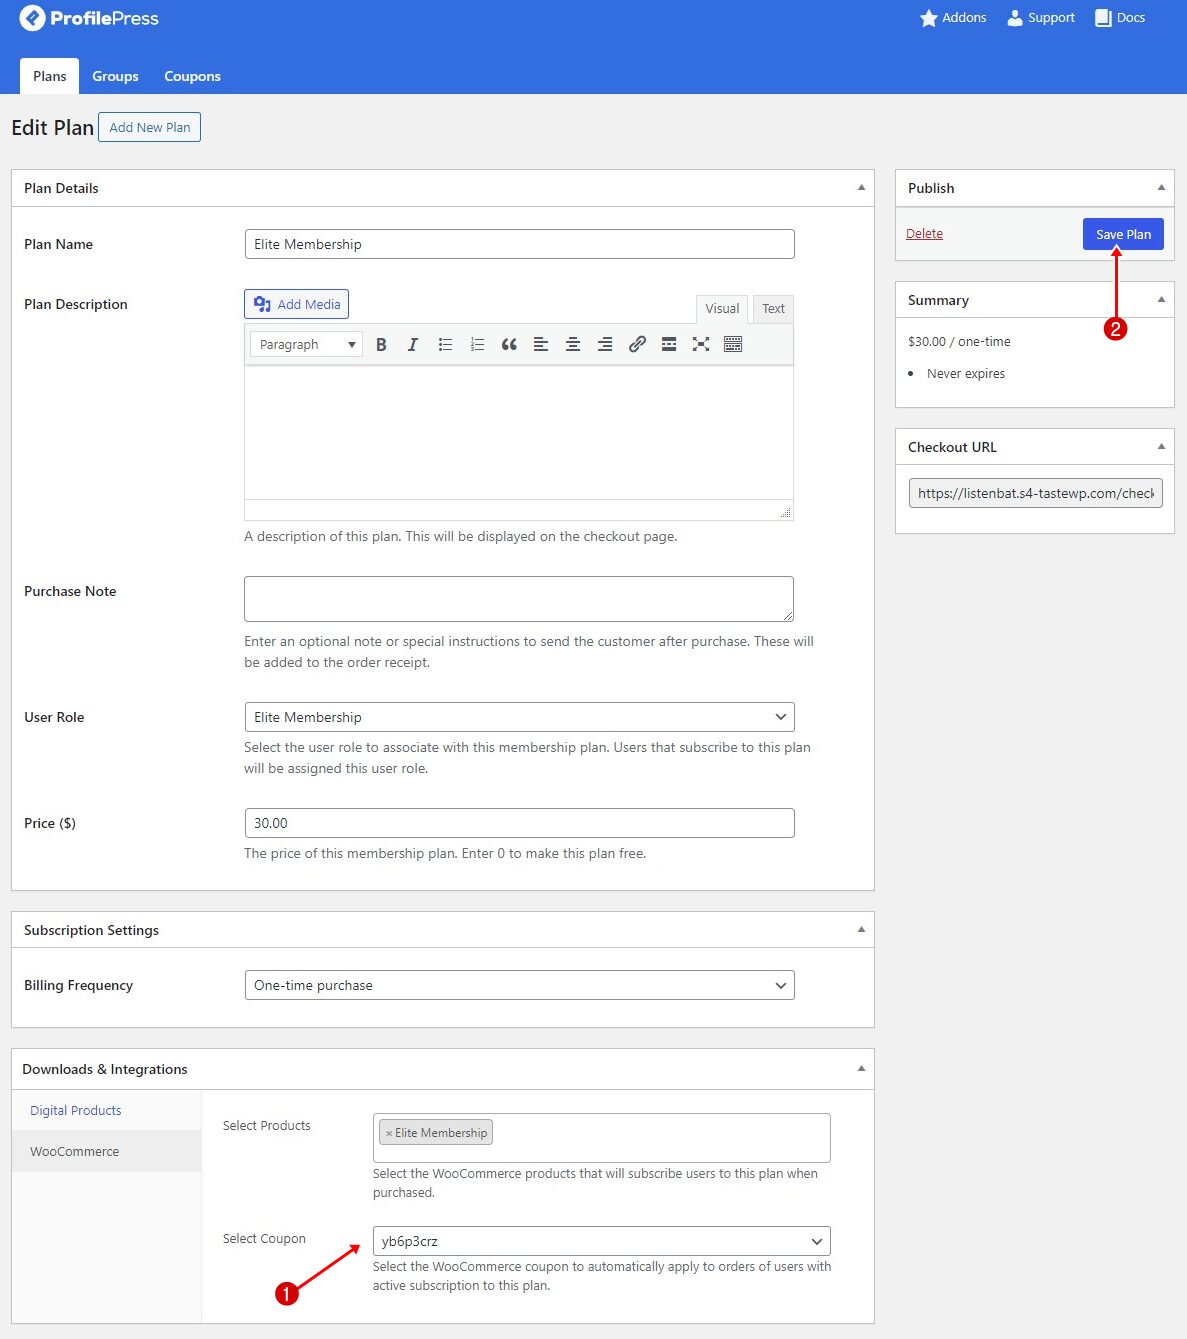
Once you’ve created the coupon, you’ll need to link it to a membership plan in ProfilePress to automatically apply the discount to users with active subscriptions during checkout in WooCommerce.
To do this, go to ProfilePress > Membership Plans and click on the title of the plan you want to edit. In the Downloads & Integrations section, select the coupon code you just created, then save your changes.
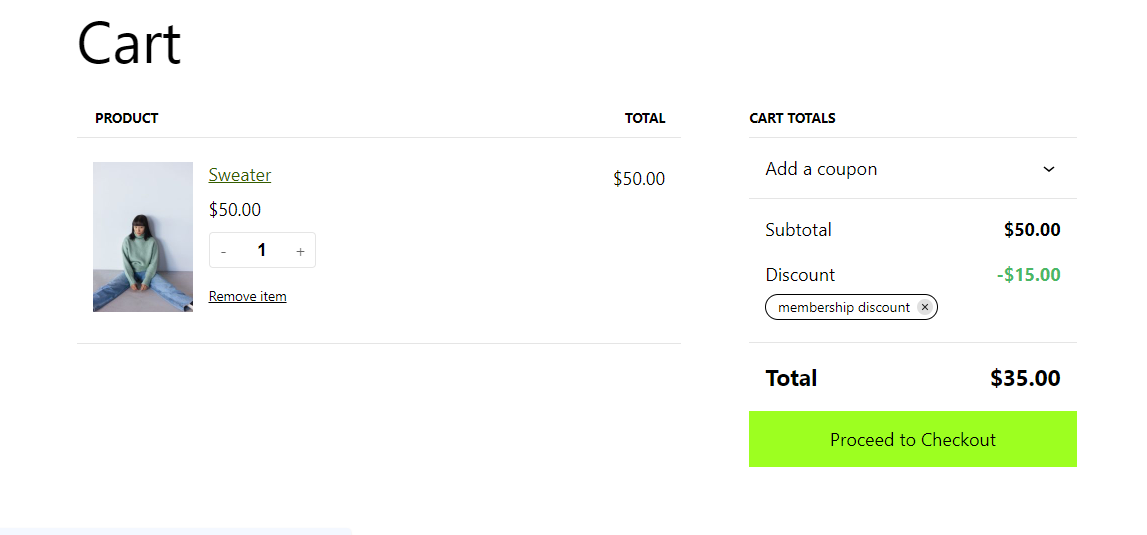
The screenshot below shows the coupon code automatically applied to a user’s cart for those with an active subscription to the Elite membership plan on your WooCommerce membership website.
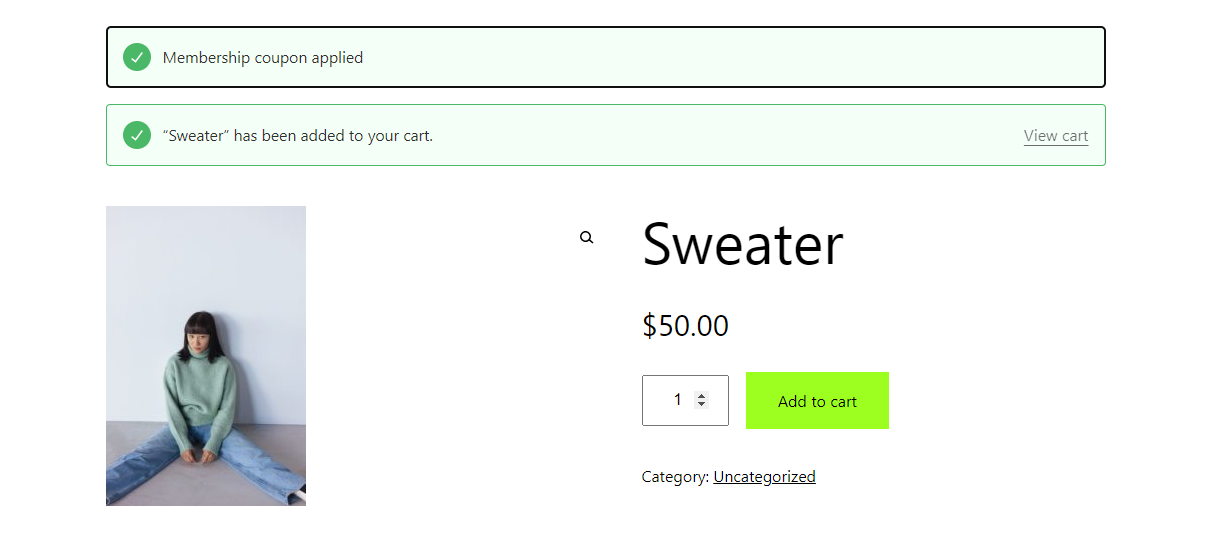
Once you click ‘View Cart,’ you will see the discount amount subtracted from the total price.
Offering Free Shipping to Members
Rewarding loyal customers with free shipping is also an excellent way to enhance their experience. Research shows that free shipping can significantly boost conversions, as many customers abandon their carts when faced with unexpected shipping fees. By offering this perk exclusively to members, you can increase customer satisfaction, reduce cart abandonment, and strengthen long-term relationships.
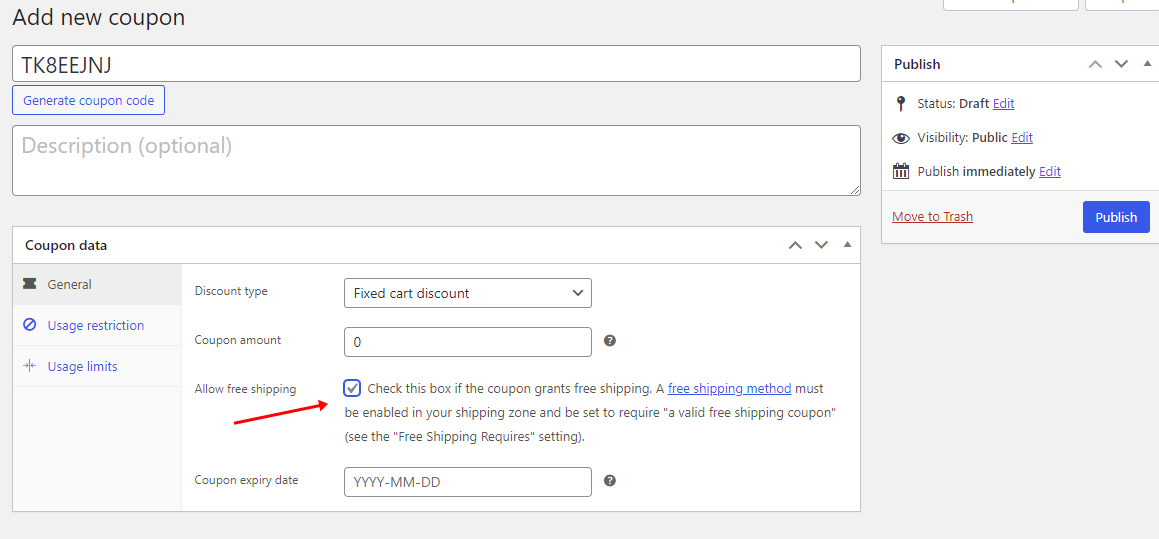
To set this up on your WooCommerce membership website, create a coupon code that provides free shipping to your members. Do this by navigating to WooCommerce > Marketing > Coupons and click Add New.
In the coupon settings, enable the free shipping option.
Once the coupon is created, link it to your membership plan in ProfilePress.
Navigate to ProfilePress > Membership Plans and select the plan for which you want to apply the newly created free shipping coupon.
This ensures that only members with active subscriptions will benefit from the free shipping offer.
Creating Members-Only WooCommerce Stores
ProfilePress also allows you to create private WooCommerce stores, transforming your shop into a members-only purchasing club. This feature enables you to offer exclusive products to members, keeping them hidden from non-members.
Using the ProfilePress content protection feature, you can restrict product visibility so only members can view and purchase specific items.
For instance, if you want to limit access to all products in your WooCommerce store, simply go to ProfilePress >> Content Protection and add a new protection rule.
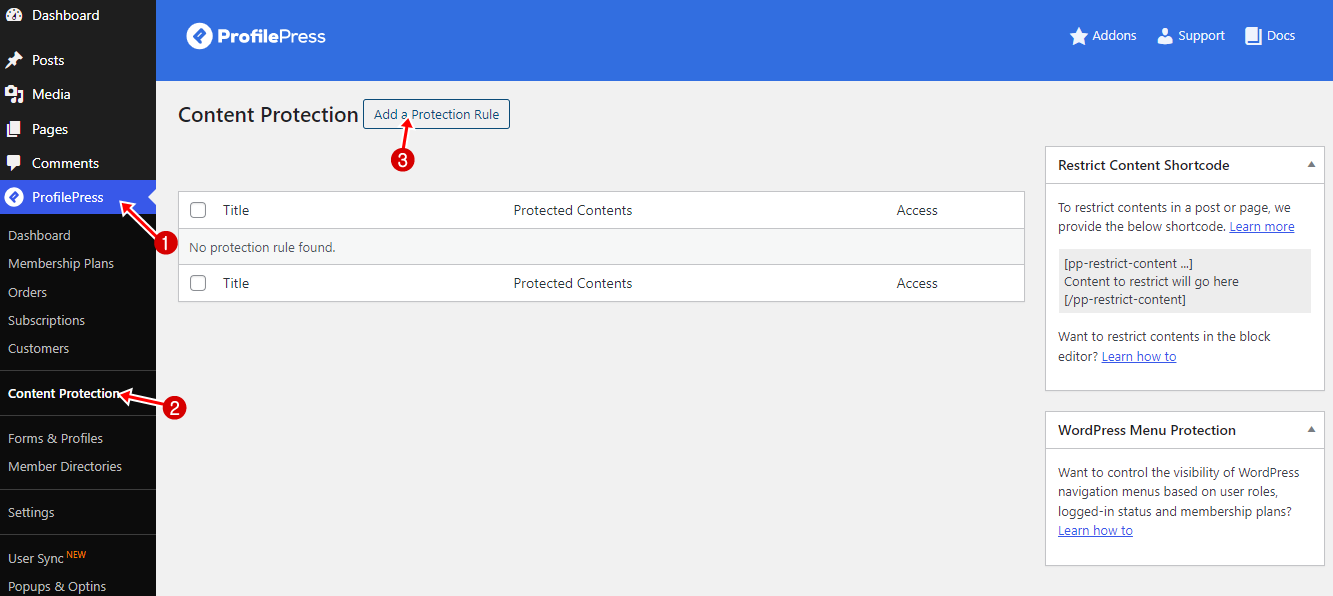
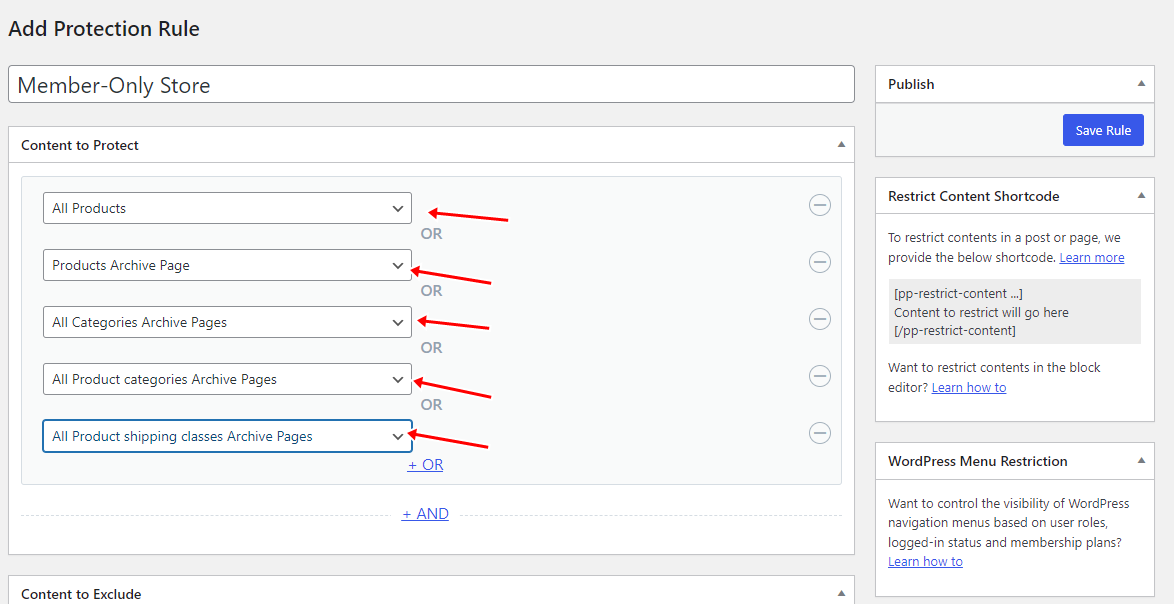
Enter a name for this rule, and in the “Content to protect” section, click the dropdown menu and select All Products.
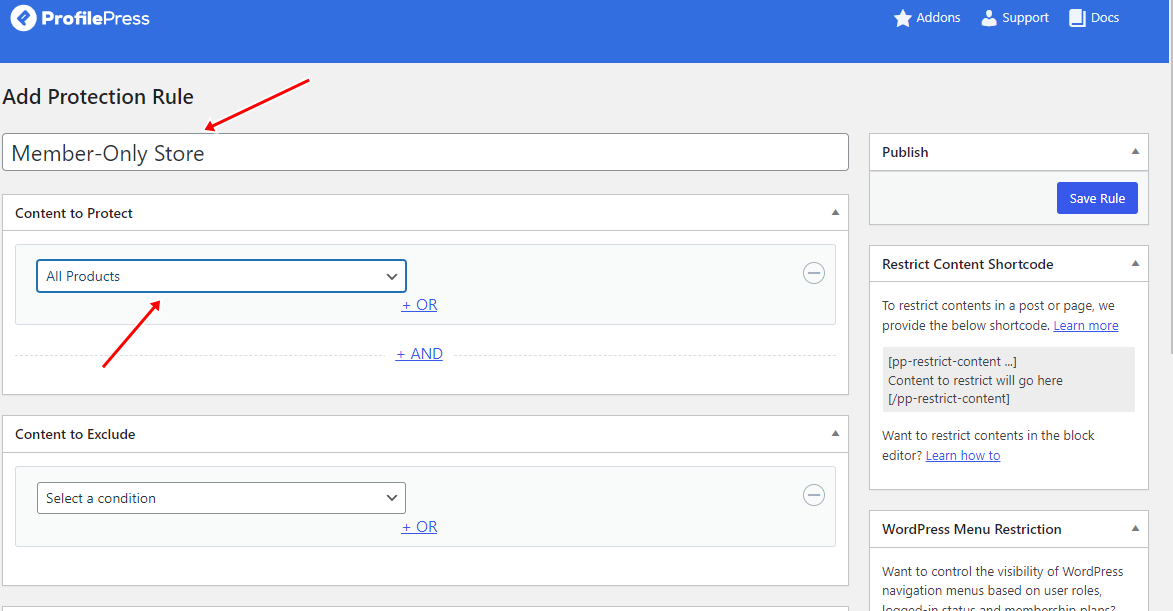
Click the ‘OR’ option to add additional WooCommerce product pages. A new dropdown menu will appear; click on it and choose all product archive pages.
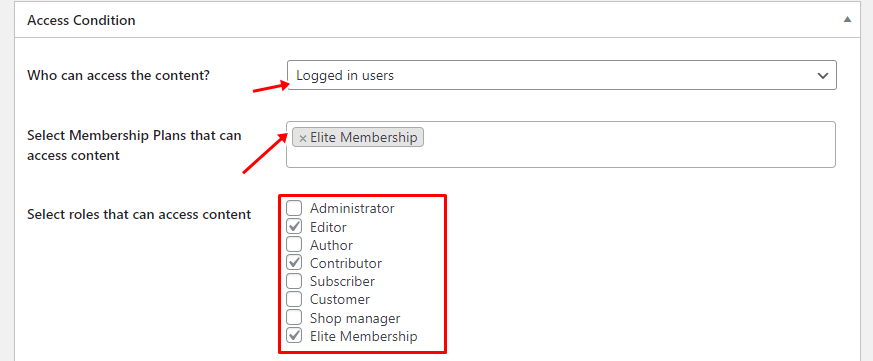
Go to the “Access Condition” section to specify which users can view your WooCommerce store and product pages.
In the dropdown menu, choose “Logged in users,” then specify the membership plans and/or user roles that will be granted access to your store.
To redirect non-members to the login page, configure the remaining settings, as shown in the screenshot below.
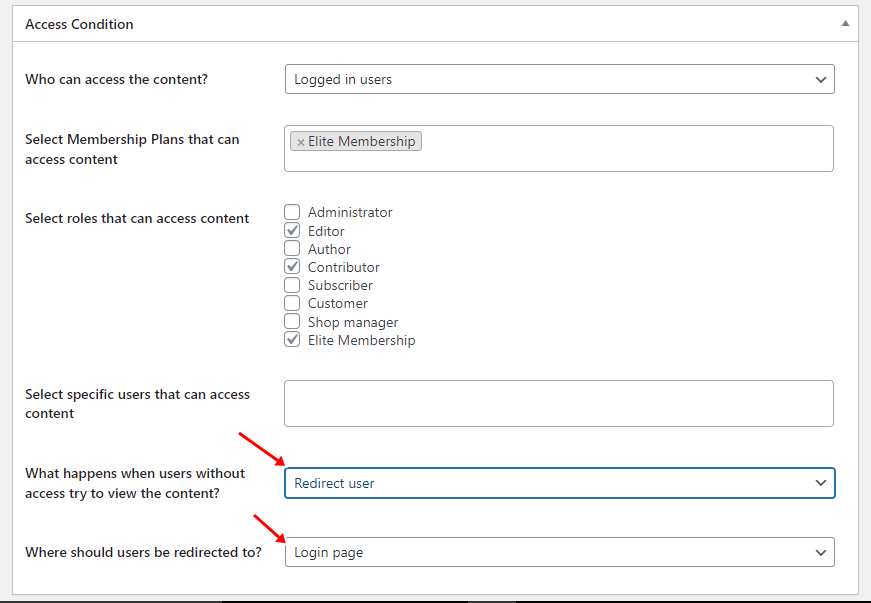
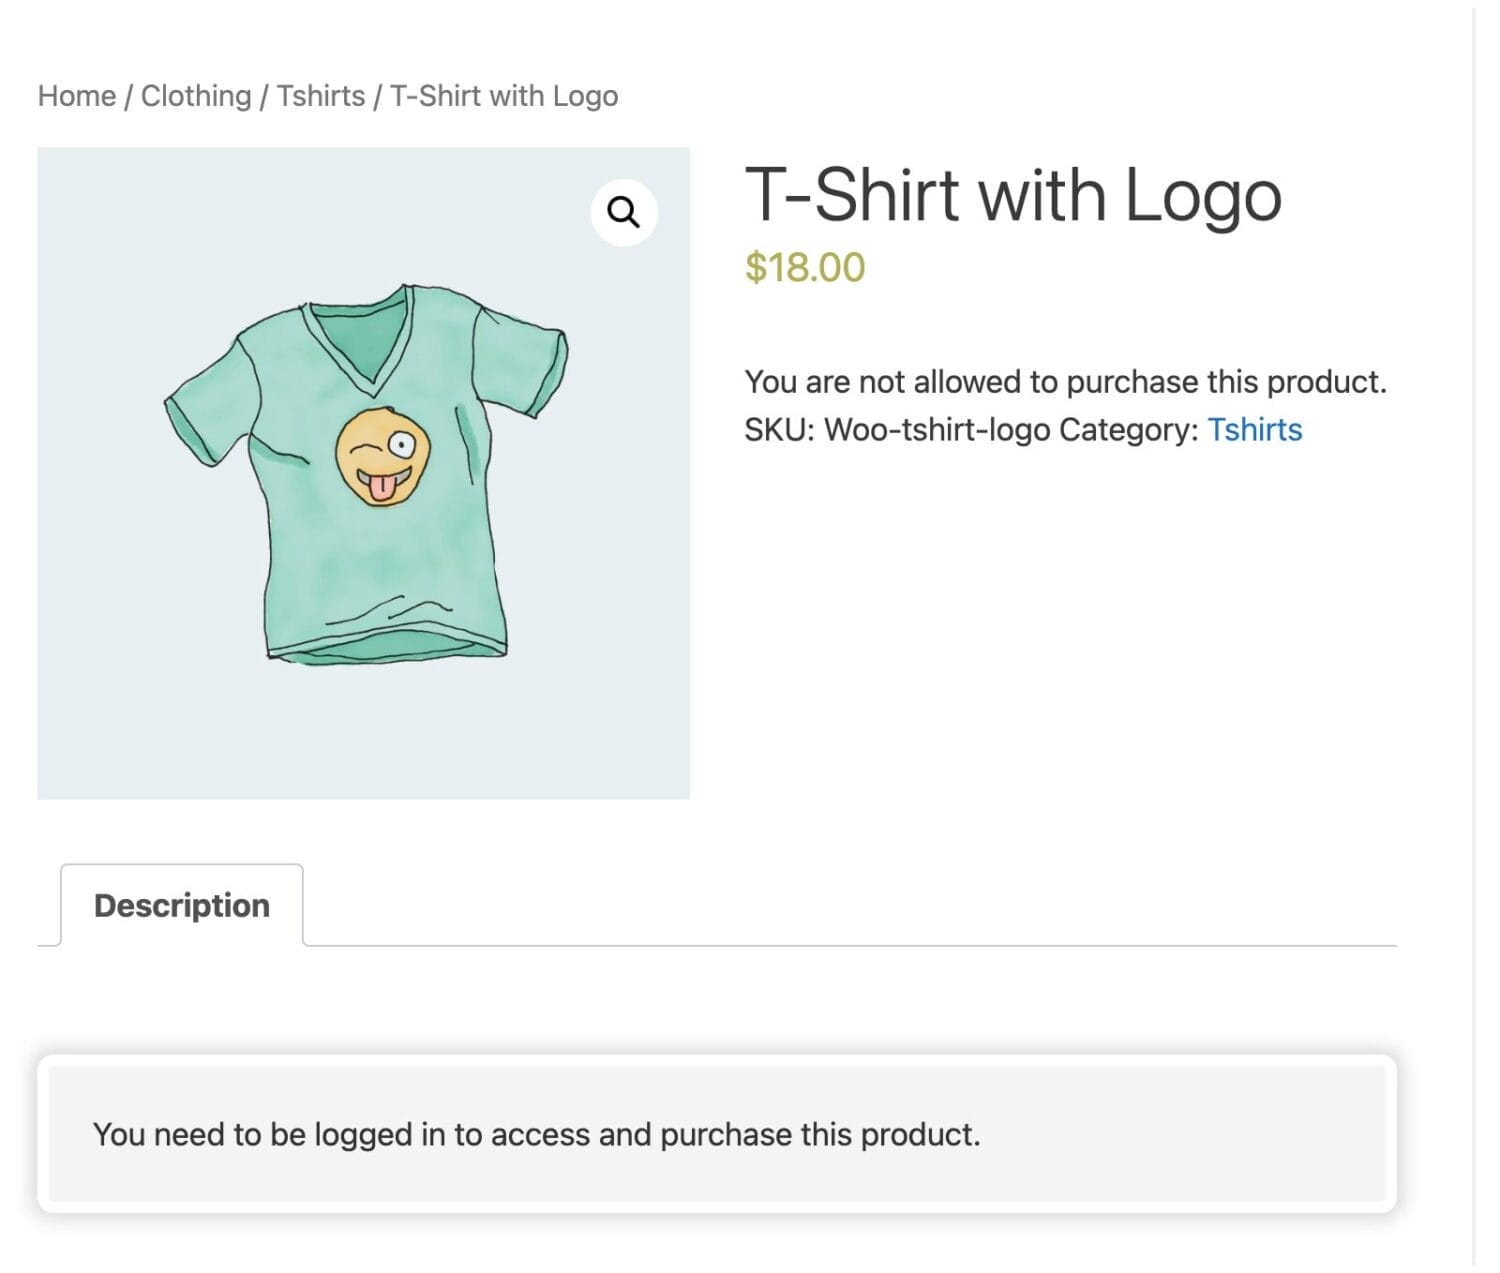
Alternatively, instead of “Redirect user”, you can choose “Show access restricted message” as the action when users without access try to view the content.
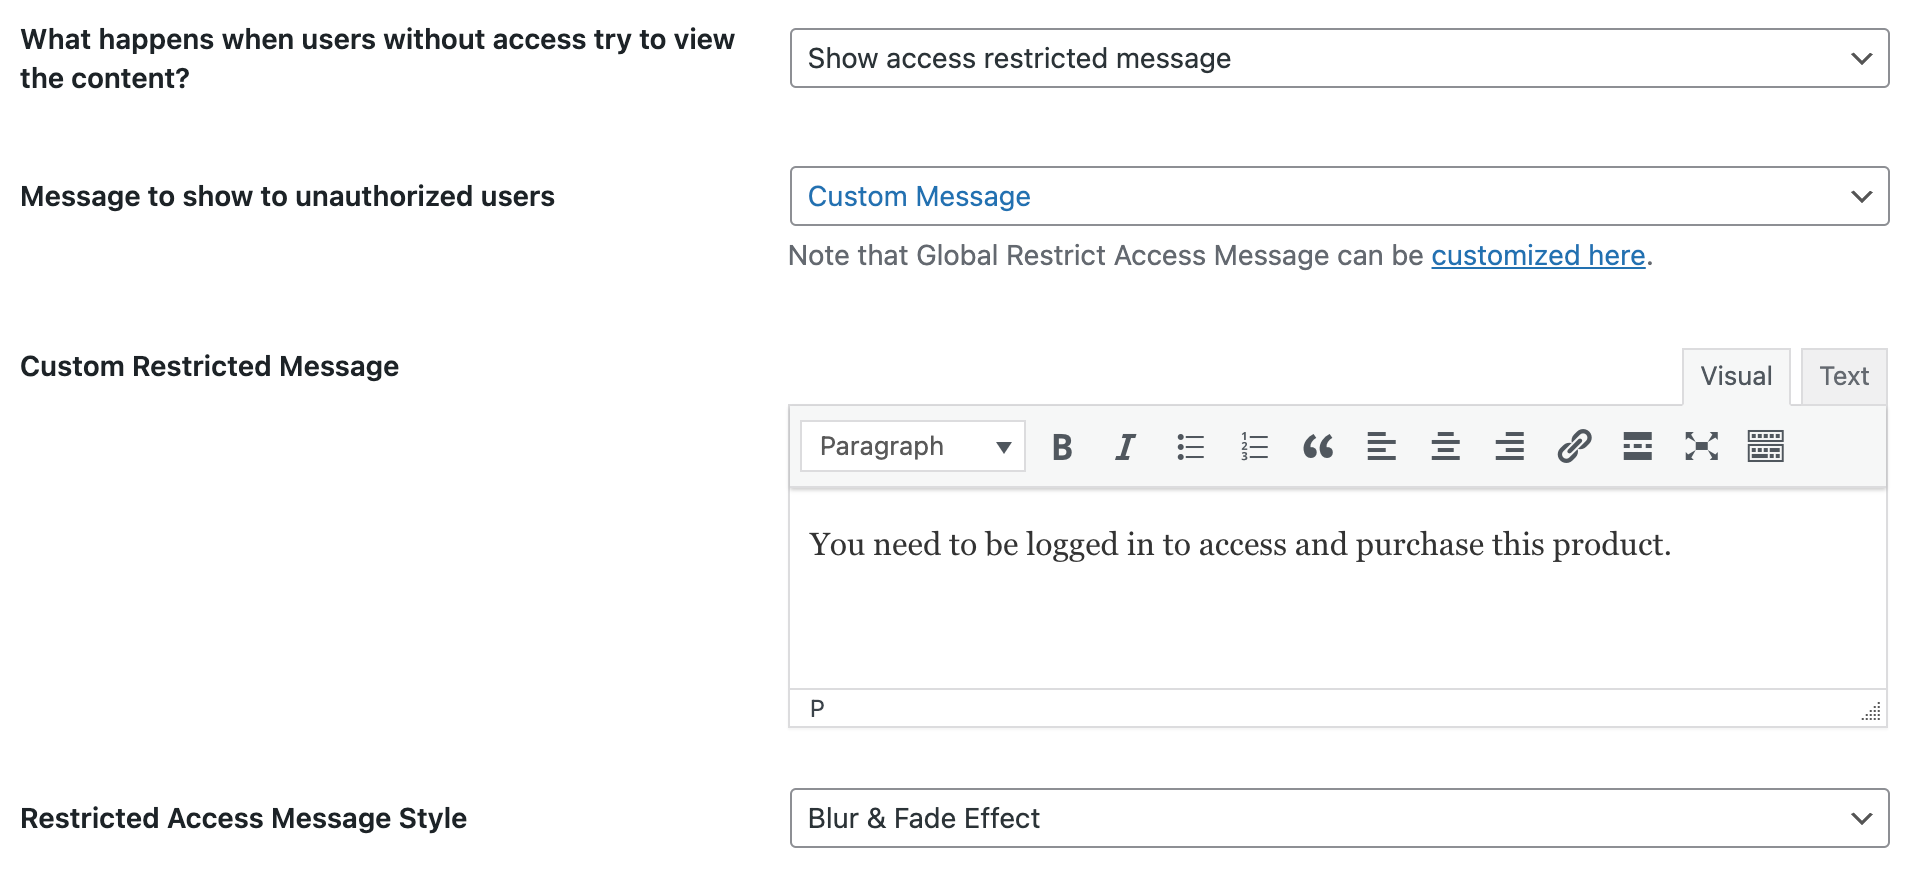
When users visit a restricted or protected WooCommerce product page, they will see a message you have set up. Also, the “Add to Cart” button for the product is hidden or removed, with an error message informing them that they can’t purchase the product.
Note: You can also restrict access to other types of content on your website, including posts, pages, and custom post types.
Setting Up Member Area for WooCommerce Memberships
An essential aspect of a membership system is account management, allowing subscribers to oversee their account and subscription details.
ProfilePress offers an excellent Member Area (My Account) feature that enables WooCommerce membership subscribers to update their profiles, change passwords, manage subscriptions, and more.
Since we are building a WooCommerce membership website, it’s important for users to also view their orders, memberships, and subscriptions (if the WooCommerce Subscriptions plugin is enabled) from the My Account page.
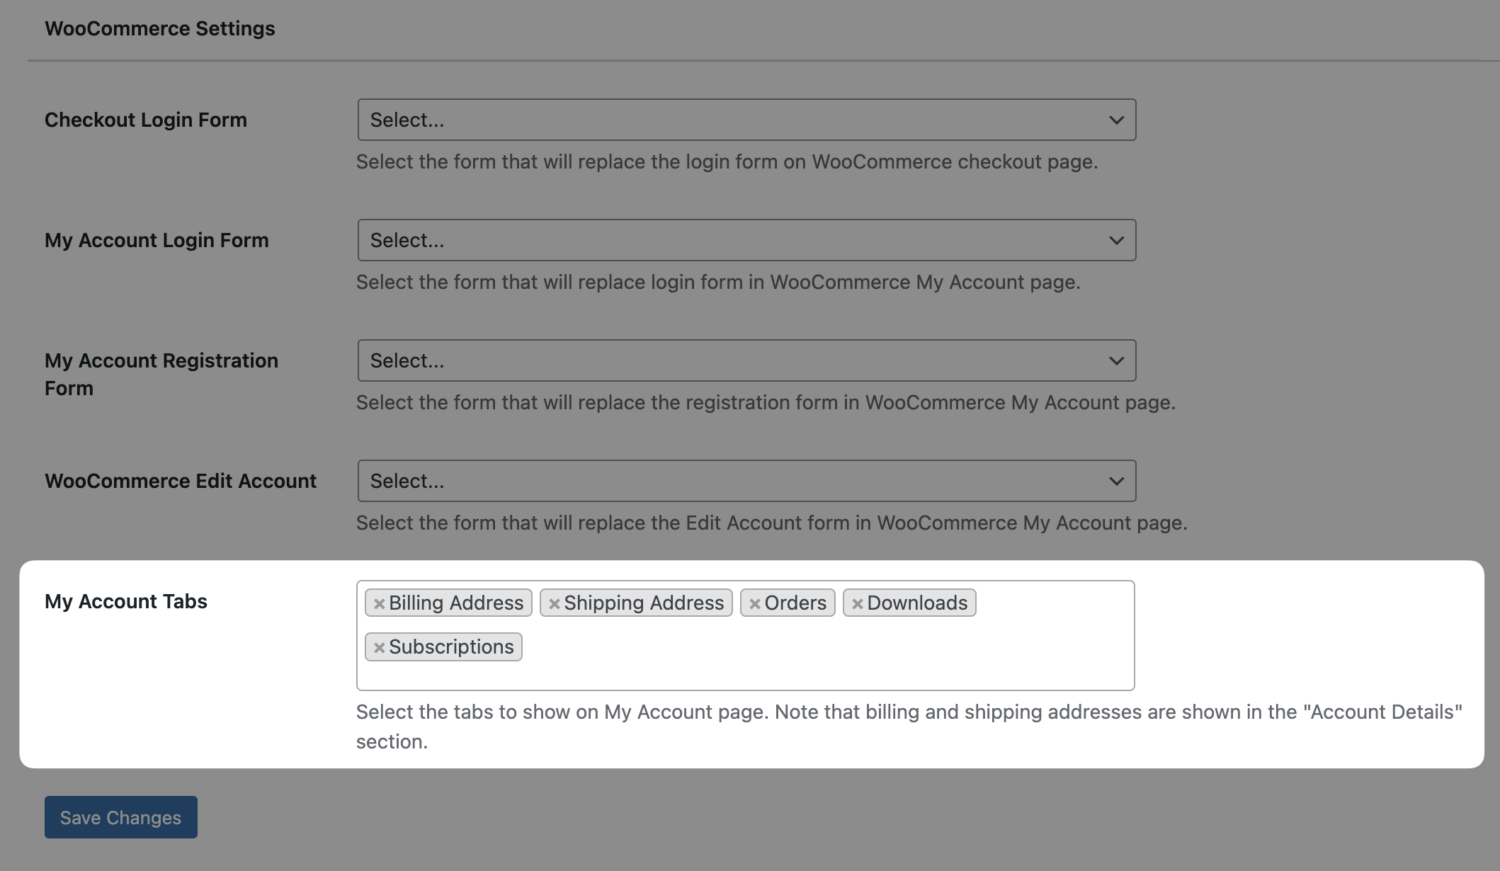
To add WooCommerce tabs to the My Account page provided by ProfilePress, navigate to ProfilePress >> Settings >> WooCommerce >> My Account Tabs and select the desired tabs.
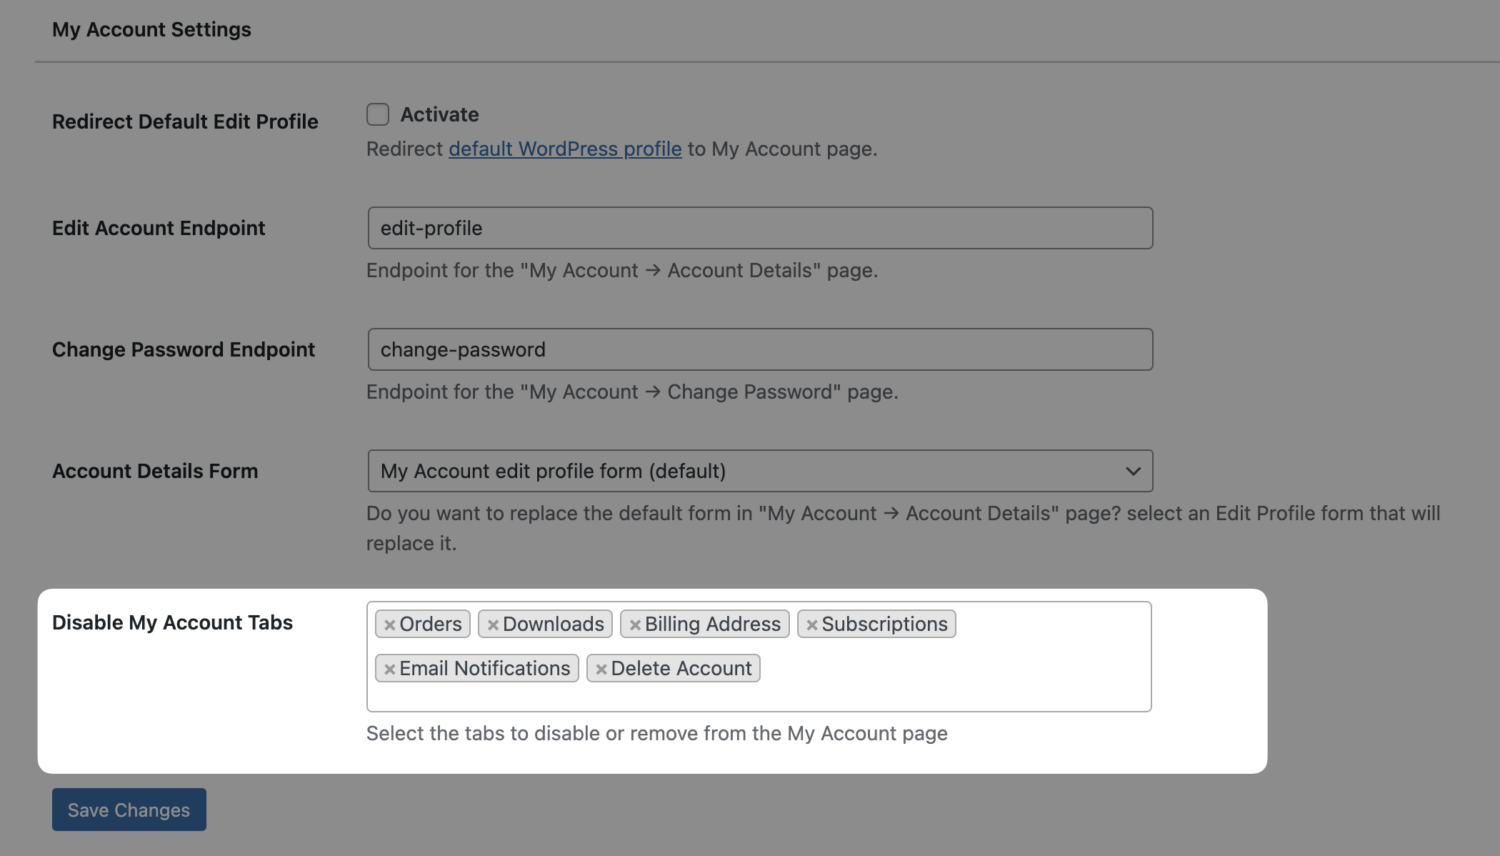
Since WooCommerce handles payments, the Orders and other ProfilePress tabs on the My Account page are unnecessary. To remove these tabs, go to ProfilePress > Settings > My Account and select Disable My Account Tabs.
Click “Save Changes” to finalize the setup.
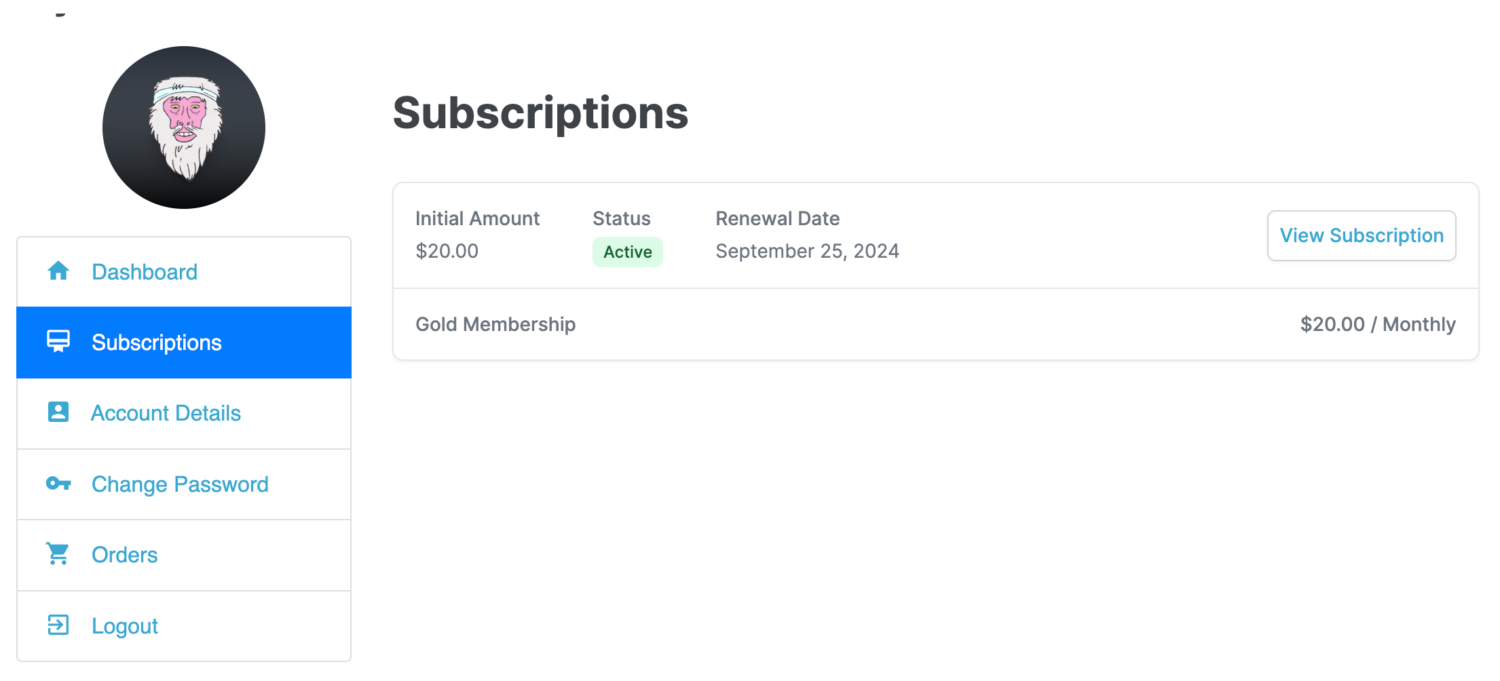
Once this is done, members visiting their My Account page will see a dashboard with menu tabs for viewing their plan subscriptions, WooCommerce orders, and more, as shown in the image below.
Bonus: Consider setting up a system that automatically subscribes your WooCommerce customers to your email marketing list.
Setup Your WooCommerce Membership Website Today!
Creating a WooCommerce membership website with the ProfilePress plugin can be a game-changer for your e-commerce business.
You can transform your online store into a thriving membership-based community by offering exclusive perks, generating recurring revenue, and fostering customer loyalty.
With the step-by-step guide provided in the article, you can now create your own WooCommerce membership website and unlock its full potential.
Get the ProfilePress membership plugin today, embrace the power of memberships, and take your e-commerce business to new heights.