
Do you want to know whether Sender.net is the right email marketing platform for your WordPress website?
Choosing an email marketing platform is an important decision. You need a solution that helps you grow your email list, engage your audience, automate repetitive tasks, and fit seamlessly into your existing WordPress website.
Sender.net is an email marketing platform for creating and sending email campaigns, automating customer communication, managing subscribers, and tracking campaign performance. When combined with WordPress plugins like FuseWP, you can also automate subscriber management by syncing users, customers, leads, and form submissions directly to your Sender.net mailing lists.
In this guide, we’ll walk you through everything you need to know about Sender.net, including its features, pricing, and the reasons many businesses choose it for email marketing.
What Is Sender.net?

Sender is an email marketing and automation platform that helps businesses create, send, and automate email campaigns. It includes a drag-and-drop email builder, email templates, signup forms, popups, landing pages, automation workflows, audience segmentation, transactional emails, SMS marketing, reporting, and integrations.
For WordPress website owners, Sender.net can be used in many ways. You can send weekly newsletters, welcome new subscribers, announce new blog posts, promote WooCommerce products, recover abandoned carts, onboard students, send renewal reminders, and create segmented campaigns for different audiences.
SenderFeatures
1. Drag-and-Drop Email Builder: Sender includes a drag-and-drop email builder that allows you to design campaigns without coding. You can add text, images, buttons, sections, product blocks, and layout elements visually. This is useful for users who want to create newsletters, sales emails, announcements, and follow-up emails without having to design from scratch.
2. Email Automation: Automation is one of Sender.net’s biggest advantages. It allows you to send emails based on triggers, timing, conditions, and subscriber behavior. Sender automations include:
- Welcome email series for new subscribers.
- Product education emails after a purchase.
- Abandoned cart reminders for WooCommerce stores.
- Re-engagement emails for inactive subscribers.
- Course progress follow-ups.
- Membership renewal reminders.
- Lead nurturing emails after form submissions.
When connected with WordPress through FuseWP, automation becomes more accurate because Sender receives user activity from the website. Instead of sending the same sequence to everyone, you can create workflows based on tags, list segments, purchases, memberships, form submissions, and profile changes.
3. Segmentation: Segmentation means dividing subscribers into smaller groups based on their data, interests, behavior, or stage in the customer journey. This is important because not every subscriber needs the same message.
For example, a new subscriber may need a welcome email, a repeat customer may respond better to a loyalty offer, a student who has completed a course may need a next-course recommendation, while a member whose subscription is about to expire may need a renewal reminder. Sender.net supports segmentation, allowing you to send more relevant and targeted email campaigns.
4. Signup Forms and Popups: Sender.net includes built-in signup forms and popups that let you collect email addresses from website visitors and automatically add them to your Sender account. These built-in forms are suitable for basic lead generation and simple websites.
However, if you want more control over how and where your opt-in forms appear on your WordPress site, MailOptin is a better choice. It is a WordPress lead generation plugin that offers a wider range of opt-in campaign types, including popups, sidebar and widget forms, in-post forms, Notification bars, and slide-in.
You can connect any forms created in MailOptin to your Sender.net account, so new leads and subscribers are automatically added as they sign up. This gives you more flexibility to grow your email list while creating opt-in forms that match your website’s design and marketing goals.
5. Landing Pages: Sender includes landing page functionality in its Free Forever plan, with additional features available on paid plans. Landing pages are standalone web pages designed to focus visitors on a single goal without the distractions of a full website. This makes them ideal for improving conversions and capturing leads.
You can use Sender.net landing pages to promote free downloads, collect webinar registrations, build course waitlists, announce product launches, grow your newsletter, or manage event registrations. By directing visitors to a dedicated page with a clear call to action, you can increase signups and generate more leads for your business.
6. Transactional Emails: Sender.net supports transactional emails. Unlike newsletters, transactional emails are triggered by user actions, such as account creation, password resets, order confirmations, invoice deliveries, or system notifications.
7. SMS Marketing: Sender.net also supports SMS marketing on its paid plans, giving businesses another way to reach subscribers with time-sensitive updates. SMS messages have much higher open rates than emails, making them ideal for appointment reminders, event updates, flash sale announcements, limited-time promotions, order notifications, and membership renewal reminders.
8. Reporting and Analytics: Sender includes reporting and analytics features, and the Professional plan adds advanced reports such as ecommerce sales reports, performance by group, and performance by inbox provider.
Reports help you understand what is working. You can track open rates, clicks, conversions, list growth, unsubscribes, and campaign performance. For ecommerce users, sales reporting is especially valuable because it connects email activity to revenue.
Sender.net Pricing
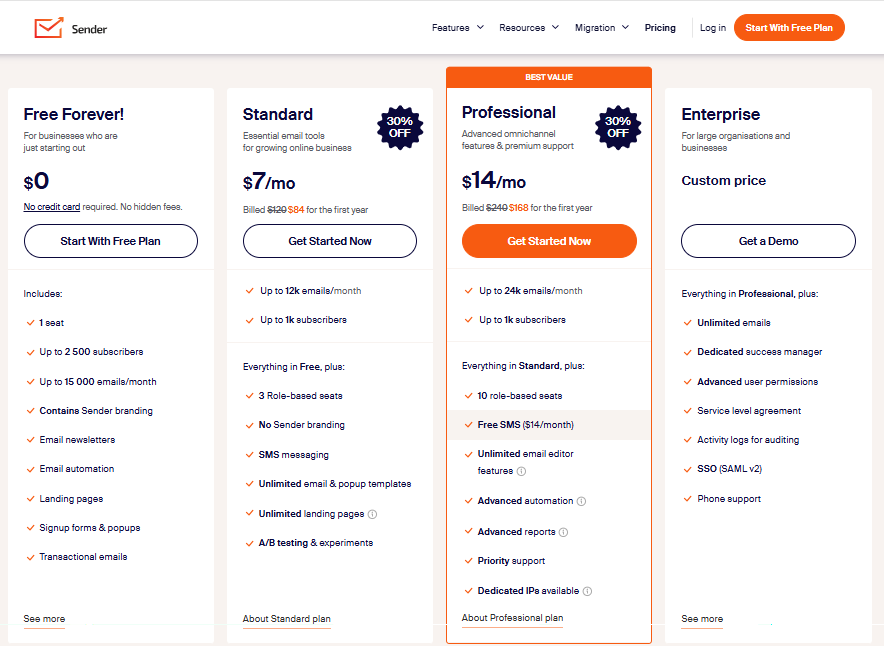
Sender pricing is attractive for small businesses because the free plan is generous. The Free Forever plan costs $0 and includes one seat, up to 2,500 subscribers, up to 15,000 emails per month, email newsletters, email automation, landing pages, signup forms, popups, and transactional emails. It also includes Sender branding.
The Standard plan starts at $7 per month and removes Sender.net branding. It also includes three role-based user seats, SMS marketing, unlimited email and popup templates, unlimited landing pages, custom landing page domains, and A/B testing.
The Professional plan starts at $14 per month. It includes 10 role-based seats, free SMS, advanced email editor features, advanced automation, advanced reports, priority support, and dedicated IPs, available on plans with 20,000 subscribers and above.
Enterprise pricing is custom and includes unlimited emails, a dedicated success manager, advanced user permissions, service level agreement, activity logs, SSO, phone support, and priority support.
Why Choose Sender.net for Email Marketing
By now, it is clear that Sender.net is an excellent email marketing platform designed to help individuals, small businesses, creators, and growing brands manage subscribers, send campaigns, automate emails, and track results.
Below are reasons to choose Sender.net for email marketing.
1. Affordable Pricing: Sender.net offers a generous Free Forever plan, making it an excellent option for startups, small businesses, nonprofits, and creators who want to start email marketing without a significant financial investment. As your business grows, you can upgrade to a paid plan to unlock additional features, including SMS marketing, A/B testing, custom landing page domains, and more advanced collaboration options.
2. Easy to Use: The platform is designed with simplicity in mind. Its dashboard is clean and easy to navigate, allowing you to create campaigns, manage subscribers, build automations, and monitor performance without a steep learning curve. Even users with little or no email marketing experience can get started quickly.
3. Powerful Email Automation: Manually sending emails to every subscriber is not practical as your audience grows. Sender.net lets you automate many marketing tasks, including welcome emails, onboarding sequences, abandoned cart reminders, follow-up campaigns, birthday emails, and customer re-engagement campaigns. These automated workflows help you stay connected with subscribers while saving time.
4. Audience Segmentation: Not every subscriber has the same interests or needs. Sender.net allows you to segment your audience based on subscriber data and behavior. This makes it easier to send targeted campaigns that are more relevant to each group, resulting in higher open rates, click-through rates, and conversions.
5. Multiple Lead Generation Options: Growing your email list is essential for successful email marketing. Sender.net provides built-in signup forms, popups, and landing pages to help you collect new subscribers.
6. SMS Marketing: Email is an effective communication channel, but there are times when an SMS message is more appropriate. Sender.net allows businesses on eligible paid plans to send text messages for appointment reminders, flash sales, order updates, event notifications, and other time-sensitive communications.
7. Detailed Reporting and Analytics: Understanding how your campaigns perform helps you improve future results. Sender.net provides reports on email opens, clicks, unsubscribes, bounce rates, and other engagement metrics. These insights allow you to identify what works well and make informed decisions to improve your email marketing strategy over time.
8. Integrates Well with WordPress: If your website runs on WordPress, Sender.net becomes even more useful when integrated with plugins such as FuseWP and MailOptin.
With FuseWP, you can automatically sync WordPress users, WooCommerce customers, membership registrations, and form submissions with your Sender.net account. This eliminates manual data entry and helps keep your subscriber lists up to date.
With MailOptin, you can create attractive opt-in forms, popups, notification bars, slide-ins, and other lead generation campaigns that automatically send new subscribers to Sender.net.
Using these plugins together allows you to collect leads, automate subscriber management, and build your email list directly from your WordPress website.
How to Connect a WordPress Site With Sender.net Using FuseWP
Now that you understand what Sender.net offers and why it is a great choice for email marketing, the next step is connecting it to your WordPress website.
In this section, you will learn how to connect your WordPress site to Sender.net using FuseWP.
FuseWP is a WordPress integration plugin that connects your website with email marketing platforms, marketing automation services, and CRM systems. It automatically syncs WordPress users, customers, members, students, donors, and form submissions to your preferred email marketing platform.
It also keeps subscriber information up to date by syncing profile changes, email address updates, and account deletions, ensuring your email lists remain accurate and organized.
Beyond basic user synchronization, FuseWP integrates with many popular WordPress plugins, including WooCommerce, MemberPress, LearnDash, Tutor LMS, ProfilePress, WPForms, Gravity Forms, Contact Form 7, and many others.
It also supports advanced capabilities such as custom field mapping, double opt-in control, and audience segmentation based on user roles, membership status, purchases, subscriptions, course enrollments, and other events.
Why Use FuseWP With Sender.net?
FuseWP makes it easy to connect your WordPress website to Sender.net and automate subscriber synchronization.
Here are some of the benefits of using FuseWP with Sender.net.
1. Automatically Sync WordPress Users: Whenever someone registers on your WordPress website, FuseWP can automatically add them to your selected Sender.net mailing list. It can also sync profile updates, email address changes, and account deletions, helping you maintain accurate subscriber data.
2. Connect Popular WordPress Plugins: FuseWP integrates with many of the plugins WordPress users rely on every day. Whether you collect customers through WooCommerce, members through MemberPress or ProfilePress, students through LearnDash or Tutor LMS, or leads through WPForms, Gravity Forms, or Contact Form 7, FuseWP can automatically send that data to Sender.net.
3. Keep Subscriber Lists Up to Date: Subscriber information changes over time. Users update their email addresses, memberships expire, customers complete purchases, and students enroll in new courses.
FuseWP automatically synchronizes many of these changes with Sender.net, helping ensure your email lists reflect the latest information. This makes it easier to send relevant campaigns to the right audience.
4. Works Alongside Sender.net Automation: Once subscriber data reaches Sender.net, you can take advantage of its automation features to send welcome emails, onboarding sequences, promotional campaigns, renewal reminders, abandoned cart emails, and other automated messages.
Since FuseWP automatically keeps your subscriber lists up to date, your Sender automations always have the latest customer and user information to work with.
Now that you understand the benefits of connecting your WordPress site to Sender.net using FuseWP, follow the three steps below to set up the integration.
Step 1: Install and Activate FuseWP
To begin, purchase a FuseWP license from the pricing page. After completing your purchase, you’ll receive an email containing your plugin download link and license key.
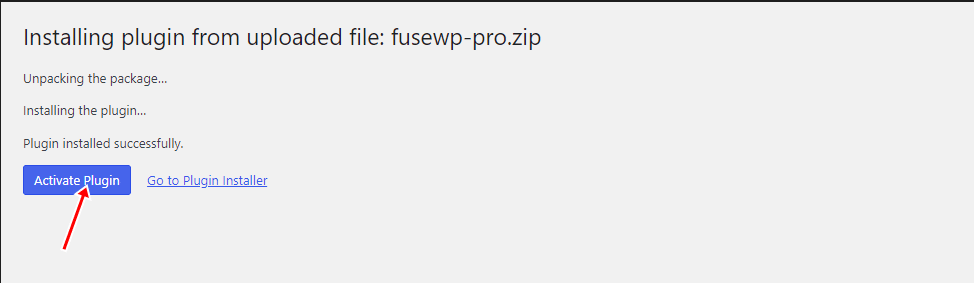
Next, log in to your WordPress dashboard and go to Plugins > Add New >Upload Plugin to upload the plugin.
Step 2: Get Your Sender.net API Token
Before FuseWP can connect to your Sender.net account, you’ll need to generate an API token. This token allows FuseWP to communicate with Sender.net and securely sync subscriber data.
To generate your API token, log in to your Sender.net account and navigate to Account Settings > API Access Tokens from the left-hand menu.
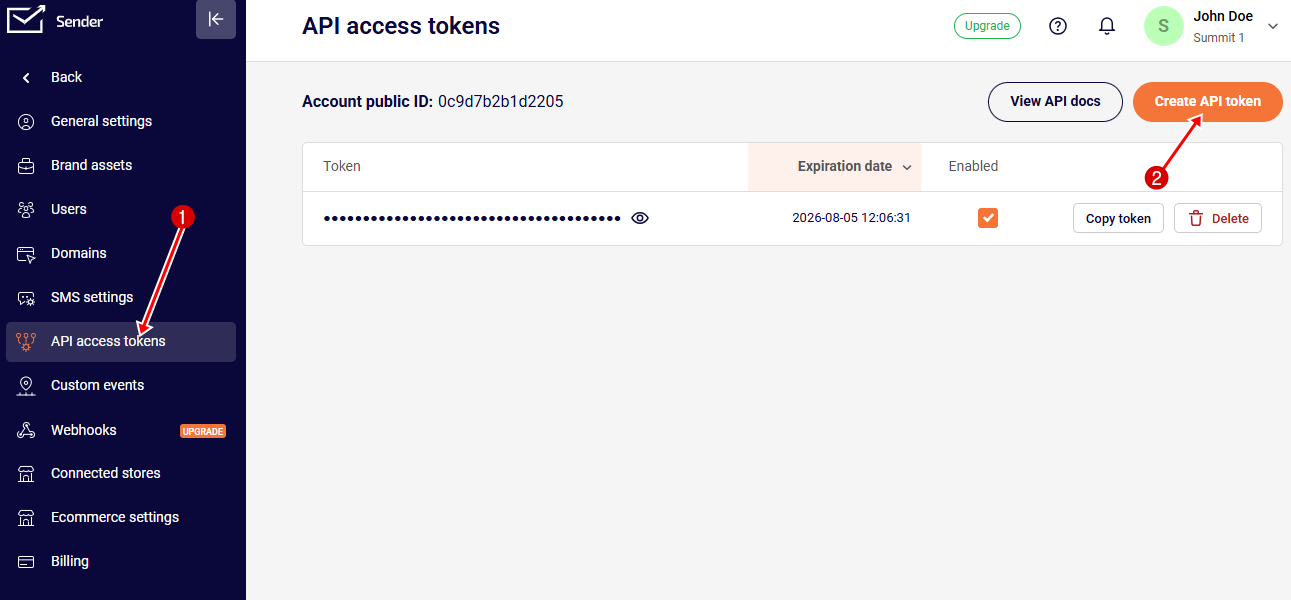
Click Create API Token, choose how long you want the token to remain valid, and then generate the token.
Once the token has been created, copy it and return to your WordPress dashboard.
Step 3: Connect FuseWP to Sender.net
To do this, navigate to FuseWP > Settings in your WordPress dashboard. Locate the Sender integration and click the Configure button.
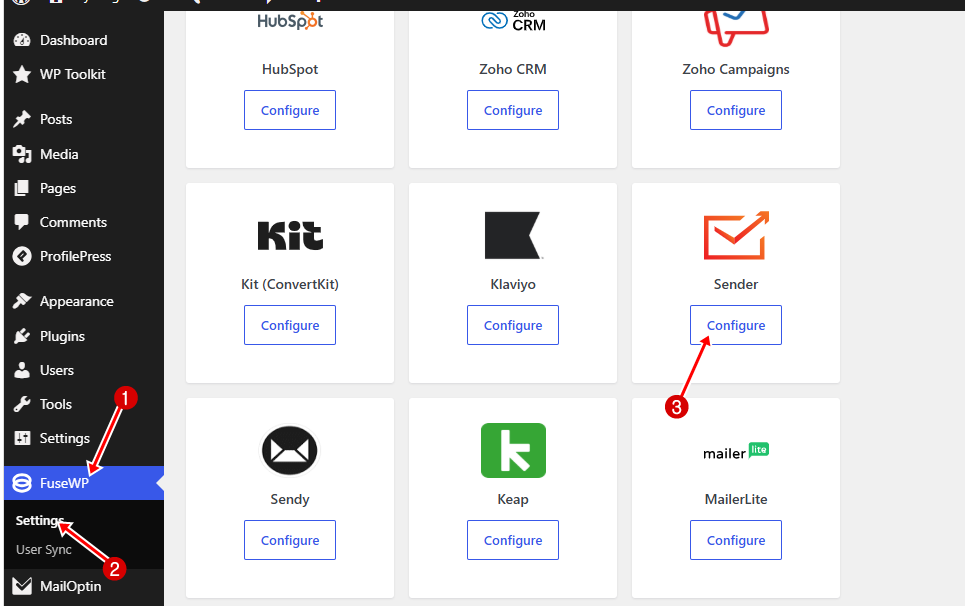
This opens the Sender.net configuration window, where you’ll be asked to enter your Sender.net API Token.
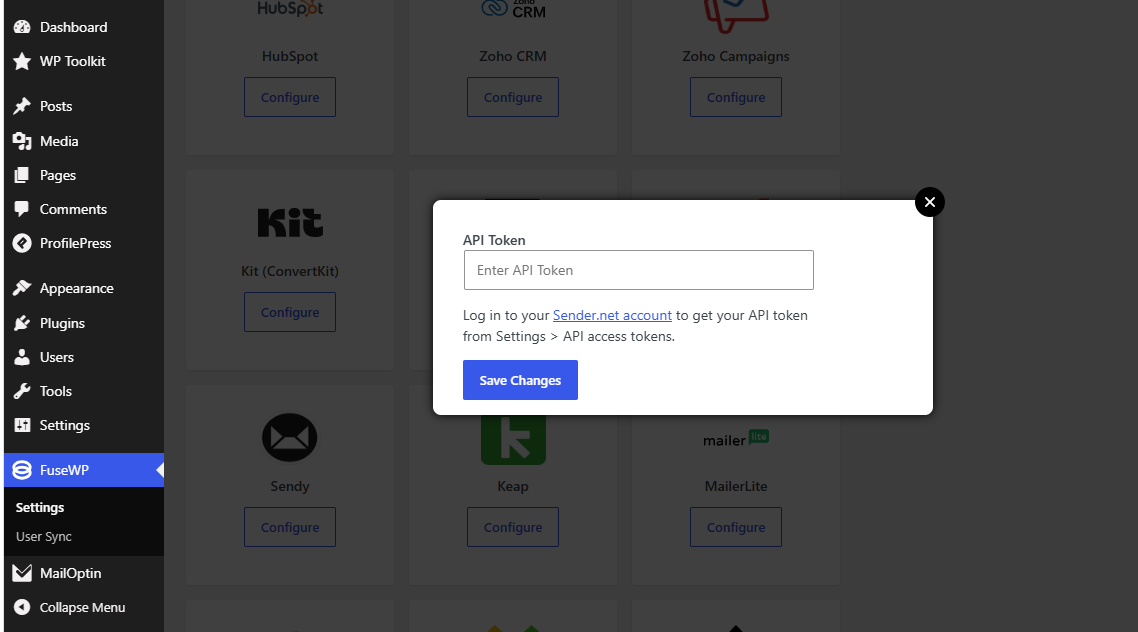
Once you’ve added the API token, save your changes to complete the connection between FuseWP and your Sender.net account.
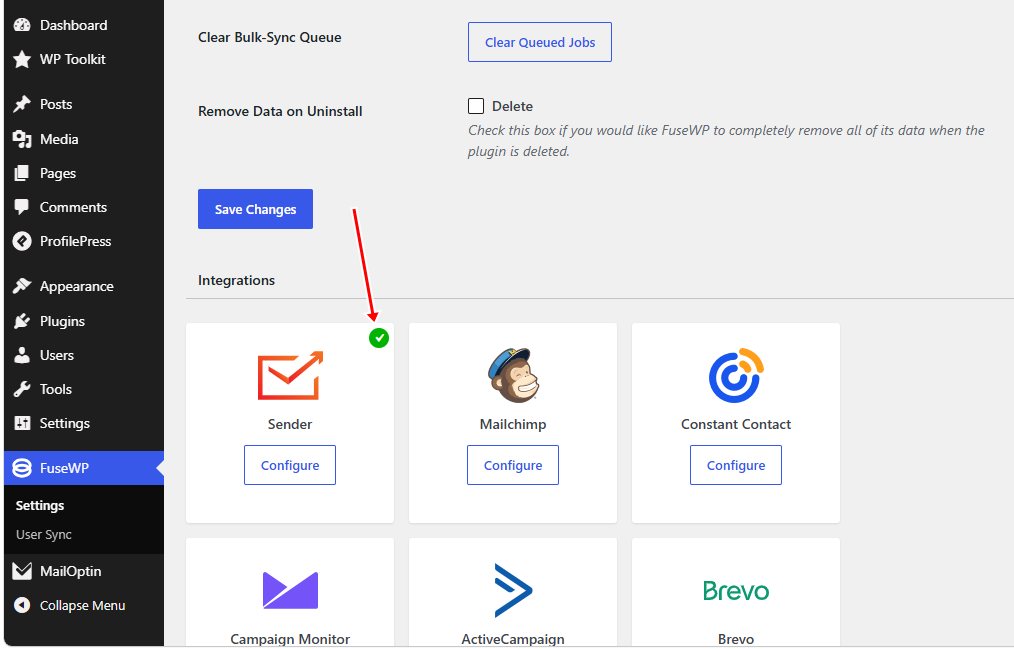
Having completed the integration, FuseWP can now automatically sync WordPress users, customers, members, students, donors, and form submissions to your Sender.net account, helping you keep your subscriber lists up to date without manual imports.
Who Should Use the Sender.net + FuseWP Integration?
This integration is ideal for a wide range of WordPress-powered businesses and creators. Here’s who stands to benefit the most:
1. E-Commerce Store Owners: If you run an online store with WooCommerce, Easy Digital Downloads, ProfilePress, or any other e-commerce platform, this integration is a game-changer. Every new customer is automatically added to your Sender list, enabling you to send personalized order follow-ups, product recommendations, and abandoned cart recovery emails without ever touching a CSV file.
2. Course Creators and LMS Operators: For those running online courses with LearnDash, LifterLMS, Tutor LMS, or similar platforms, FuseWP ensures that every enrolled student becomes part of your email list. You can segment students by course, progress, or completion status, then nurture them with targeted content, upsell advanced courses, or re-engage lapsed learners.
3. Membership Site Owners: Managing a membership site with MemberPress, Paid Memberships Pro, or Restrict Content Pro? FuseWP syncs your members directly to Sender.net, allowing you to send renewal reminders, exclusive member-only content, and tier-specific offers. You can even segment members by membership level for highly personalized communication.
4. Bloggers and Content Creators: For bloggers, growing an email list is essential. FuseWP automatically captures subscribers from your registration forms and newsletter signups and adds them to your Sender list.
5. Nonprofits and Fundraisers: Organizations using GiveWP for donations can sync donors to Sender.net, enabling targeted thank-you campaigns, impact updates, and recurring donation appeals all automated based on donor behavior.
6. Form-Heavy Businesses: If your site relies heavily on forms for leads, inquiries, event registrations, or job applications, FuseWP integrates with every major form builder, including WPForms, Gravity Forms, Contact Form 7, Everest Forms, and Ninja Forms. Every form submission becomes a potential email subscriber and is seamlessly added to your Sender list.
7. Community and Affiliate Marketers: Running a community with FluentCommunity or managing affiliates with AffiliateWP or SliceWP? FuseWP ensures community members and affiliates are always connected to your email marketing so that you can share updates, promotions, and affiliate communications with ease.
How to Connect a WordPress Site With Sender.net Using MailOptin
MailOptin is an excellent WordPress lead-generation and email-automation plugin that helps website owners grow their email lists and engage visitors. It allows you to create a variety of opt-in campaigns that capture leads and save them to popular email marketing platforms, including Sender.net.
It also supports automatically emailing your Sender email subscribers whenever you publish a new post in WordPress. It also supports sending daily, weekly, and monthly roundups of published articles, making it easier to keep subscribers engaged with your latest content.
Why Use MailOptin With Sender.net?
While Sender.net includes built-in signup forms, MailOptin offers greater flexibility and more advanced lead-generation features for WordPress websites.
By integrating MailOptin with Sender.net, you can:
- Automatically add new subscribers to your Sender.net mailing lists.
- Create attractive popups and embedded opt-in forms that match your website’s design.
- Display different opt-in campaigns based on user behavior and page targeting.
- Grow your email list using notification bars, slide-ins, sidebar forms, and in-post forms.
- Automatically send new WordPress posts to your Sender.net subscribers through email newsletters.
This integration allows you to focus on growing your audience while MailOptin handles subscriber collection in the background.
Now that you’ve seen the benefits of connecting your WordPress site to Sender.net using MailOptin, let’s walk through the three simple steps to set up the integration.
Step 1: Install and Activate MailOptin
Begin by visiting the MailOptin website and purchasing a license. Once your purchase is complete, you’ll receive an email with the plugin download link and your unique license key.
Next, log in to your WordPress dashboard and navigate to Plugins > Add New. Click the Upload Plugin button, select the downloaded ZIP file, and click Install Now.
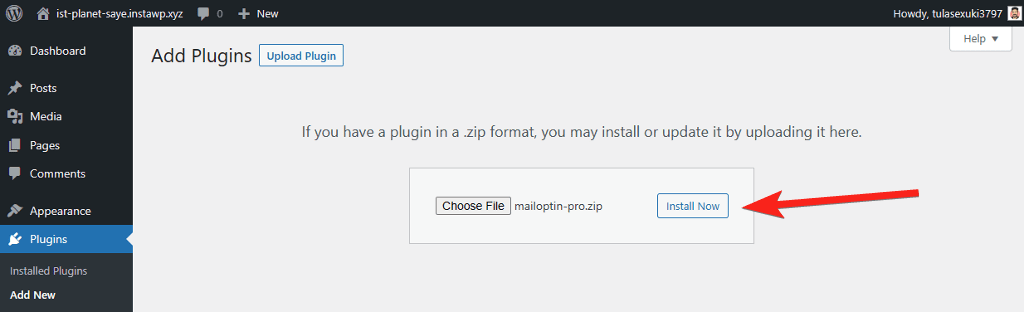
After the installation finishes, click Activate Plugin to complete the process.
Step 2: Generate Your Sender.net API Token
To do this, log in to your Sender.net dashboard and navigate to Account Settings > API Access Tokens. Click Create API Token, choose how long you want the token to remain valid, and then click Create.
Once the API token has been generated, copy it, as you’ll need it in the next step to connect MailOptin to your Sender.net account.
Step 3: Connect Sender.net to MailOptin
Return to your WordPress dashboard and navigate to MailOptin > Integrations. Locate the Sender.net integration, and click on Configure.
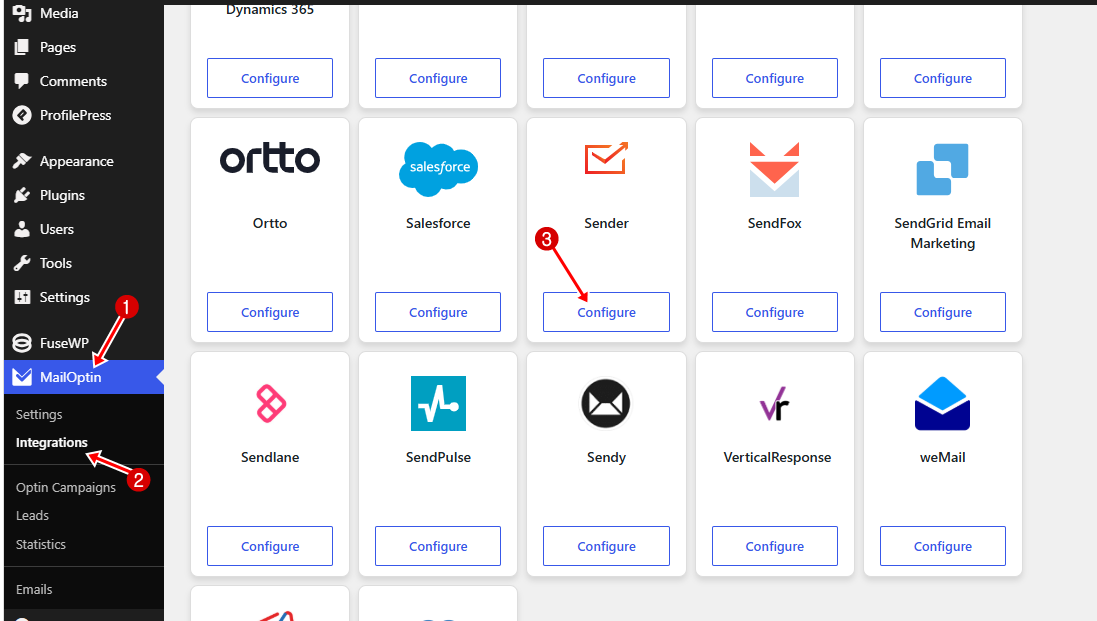
Next, the Sender.net configuration window will open. Paste your Sender.net API Token into the appropriate field, then click Save Changes.
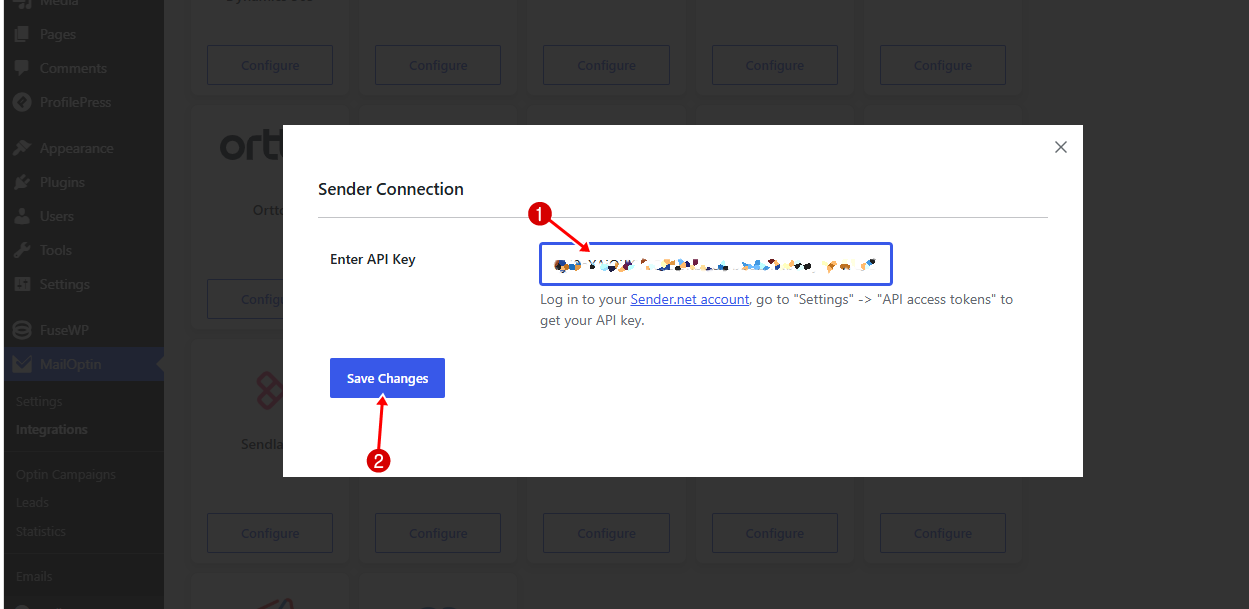
Once the connection has been verified, MailOptin will be successfully connected to your Sender.net account.
Next is to create an optin campaign with a form in WordPress that captures and saves leads to Sender.net.
How to Connect MailOptin Opt-in Forms to Sender.net
To create a Sender email signup form for your WordPress website, go to MailOptin > Optin Campaigns and click Add New.
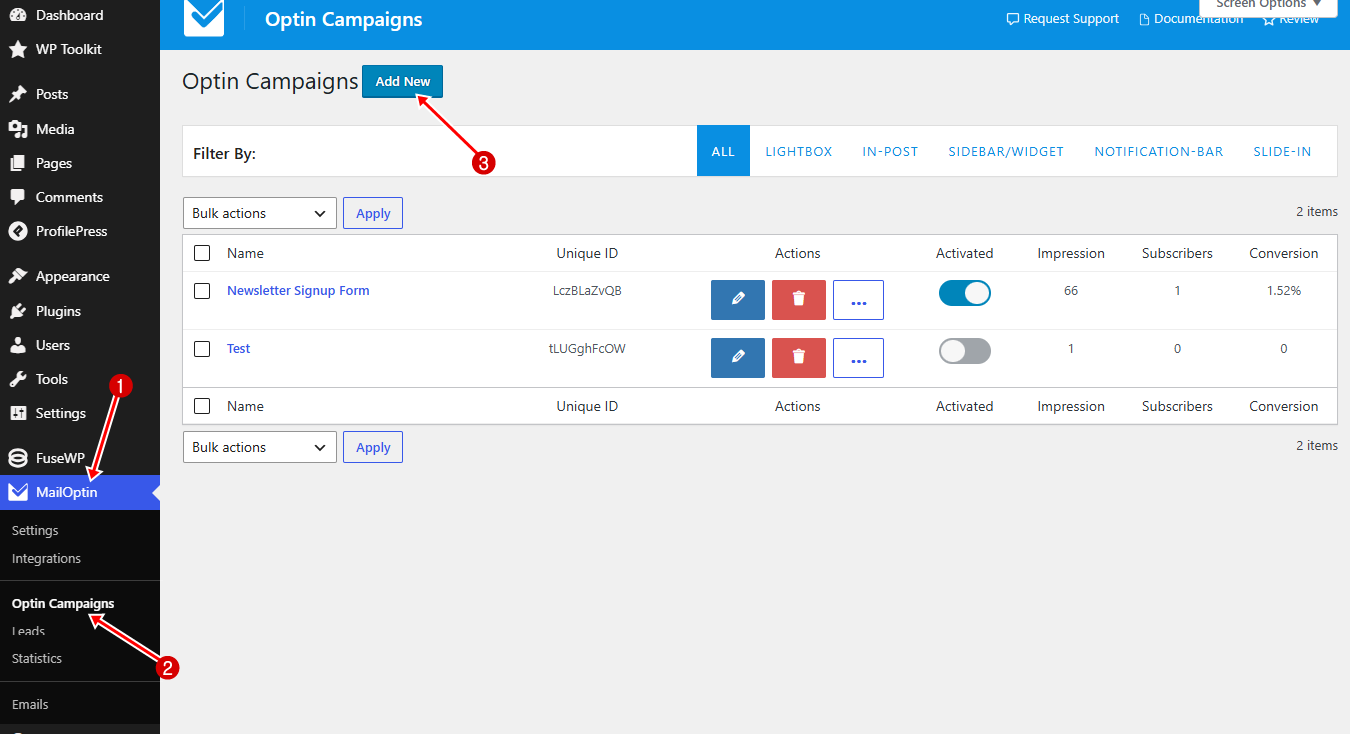
Enter a name for your campaign, then choose the type of opt-in form you want to create, such as a Lightbox Popup, Notification Bar, Slide-in, Sidebar Widget, or In-Post Form.
Next, select a template to start building your campaign. For this guide, we’ll use a Lightbox Popup.
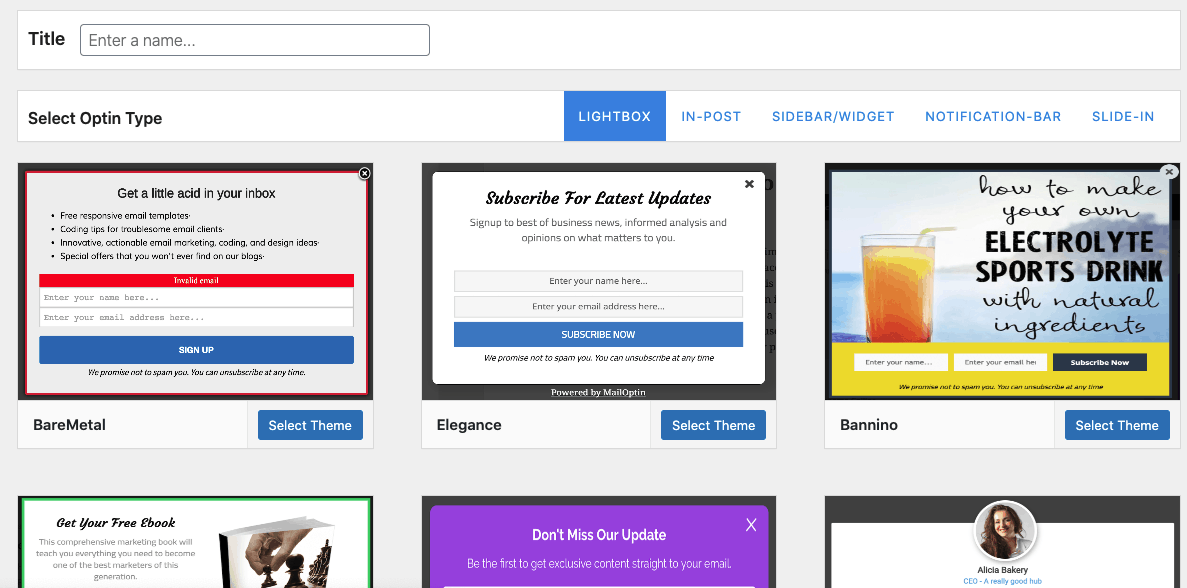
After selecting a template, you’ll be taken to the MailOptin campaign builder.
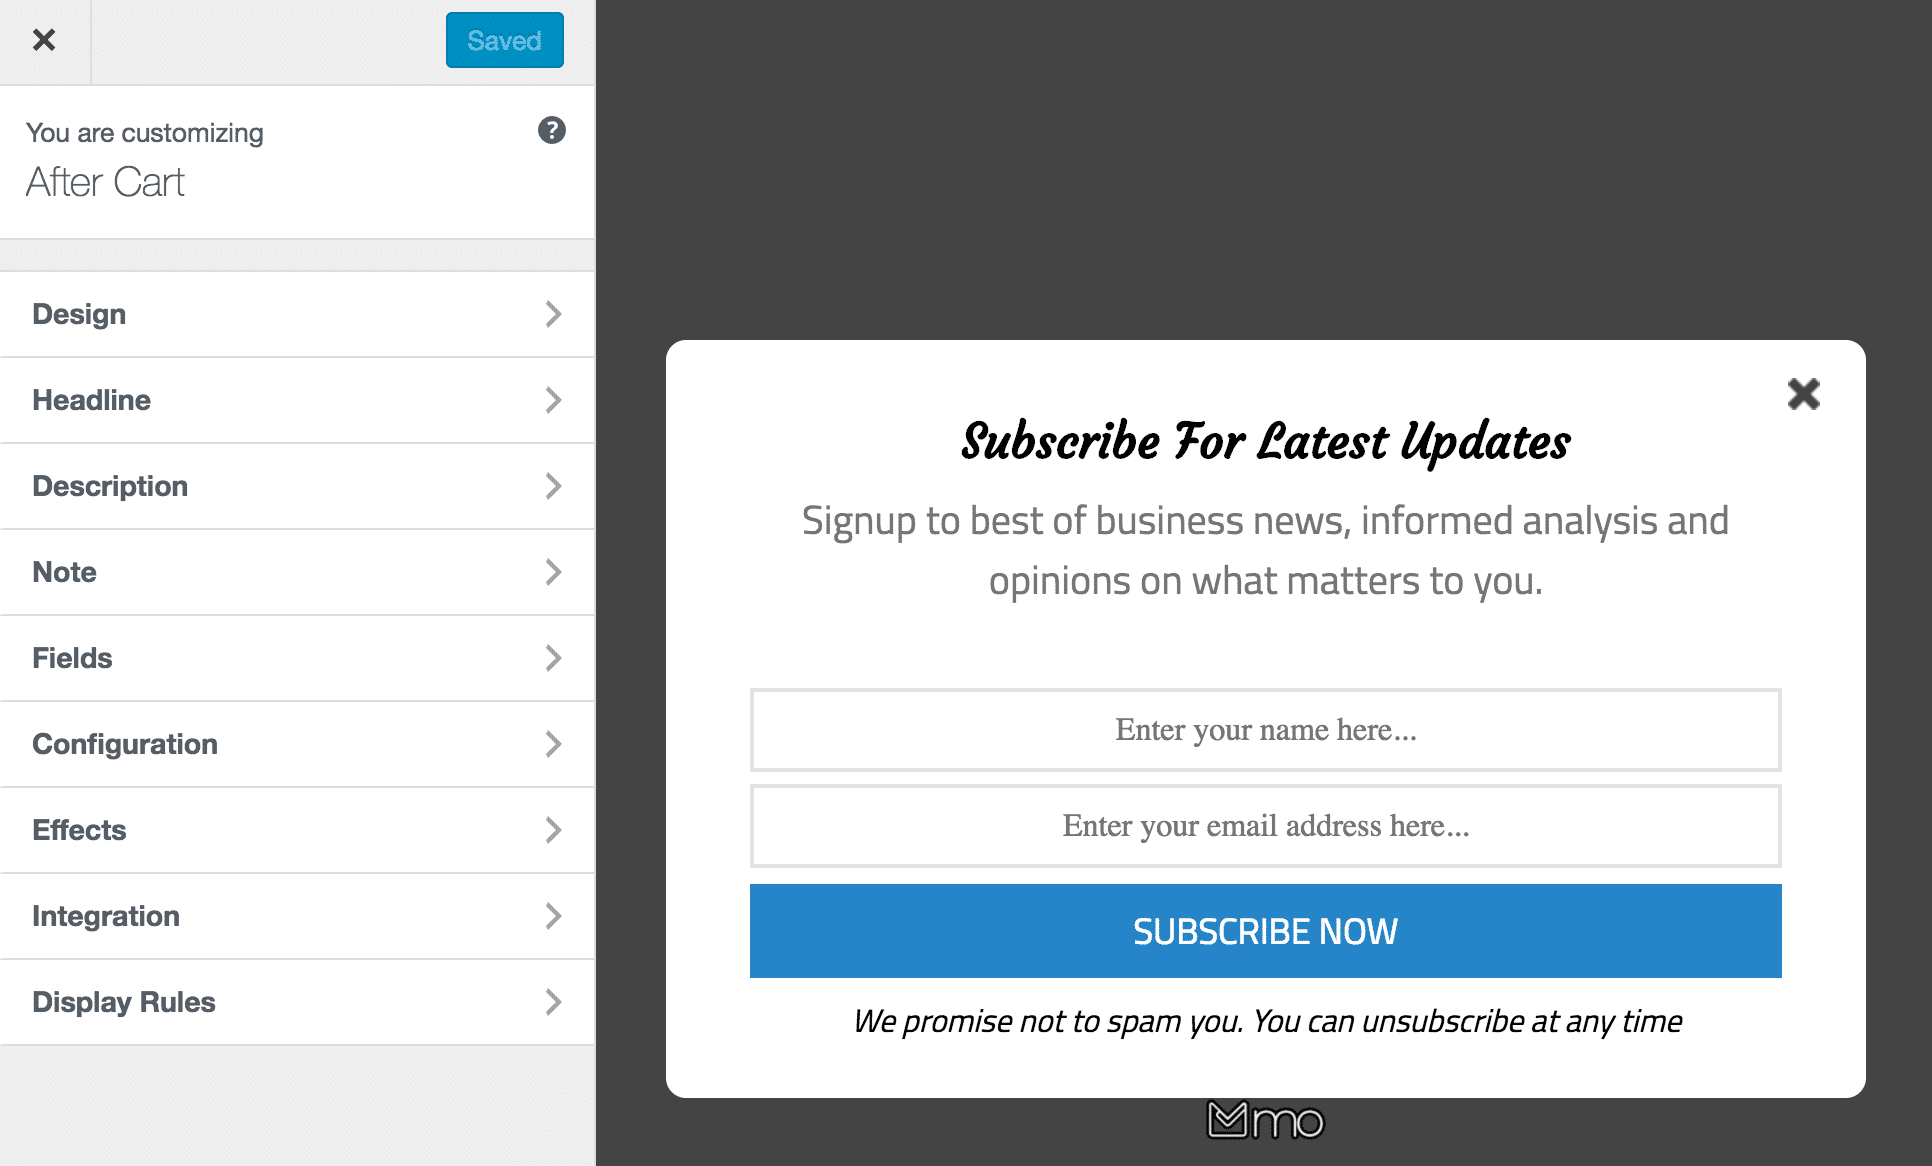
From there, you can customize your opt-in form by editing the headline, description, colors, images, call-to-action button, and form fields to match your website’s branding and marketing goals.
Next, open the Integration panel inside the campaign builder.
Select Sender as your email marketing integration, then choose the Sender.net email list or group where new subscribers should be added.
Click on “Map Custom Fields” to map any form field to custom fields in Sender.
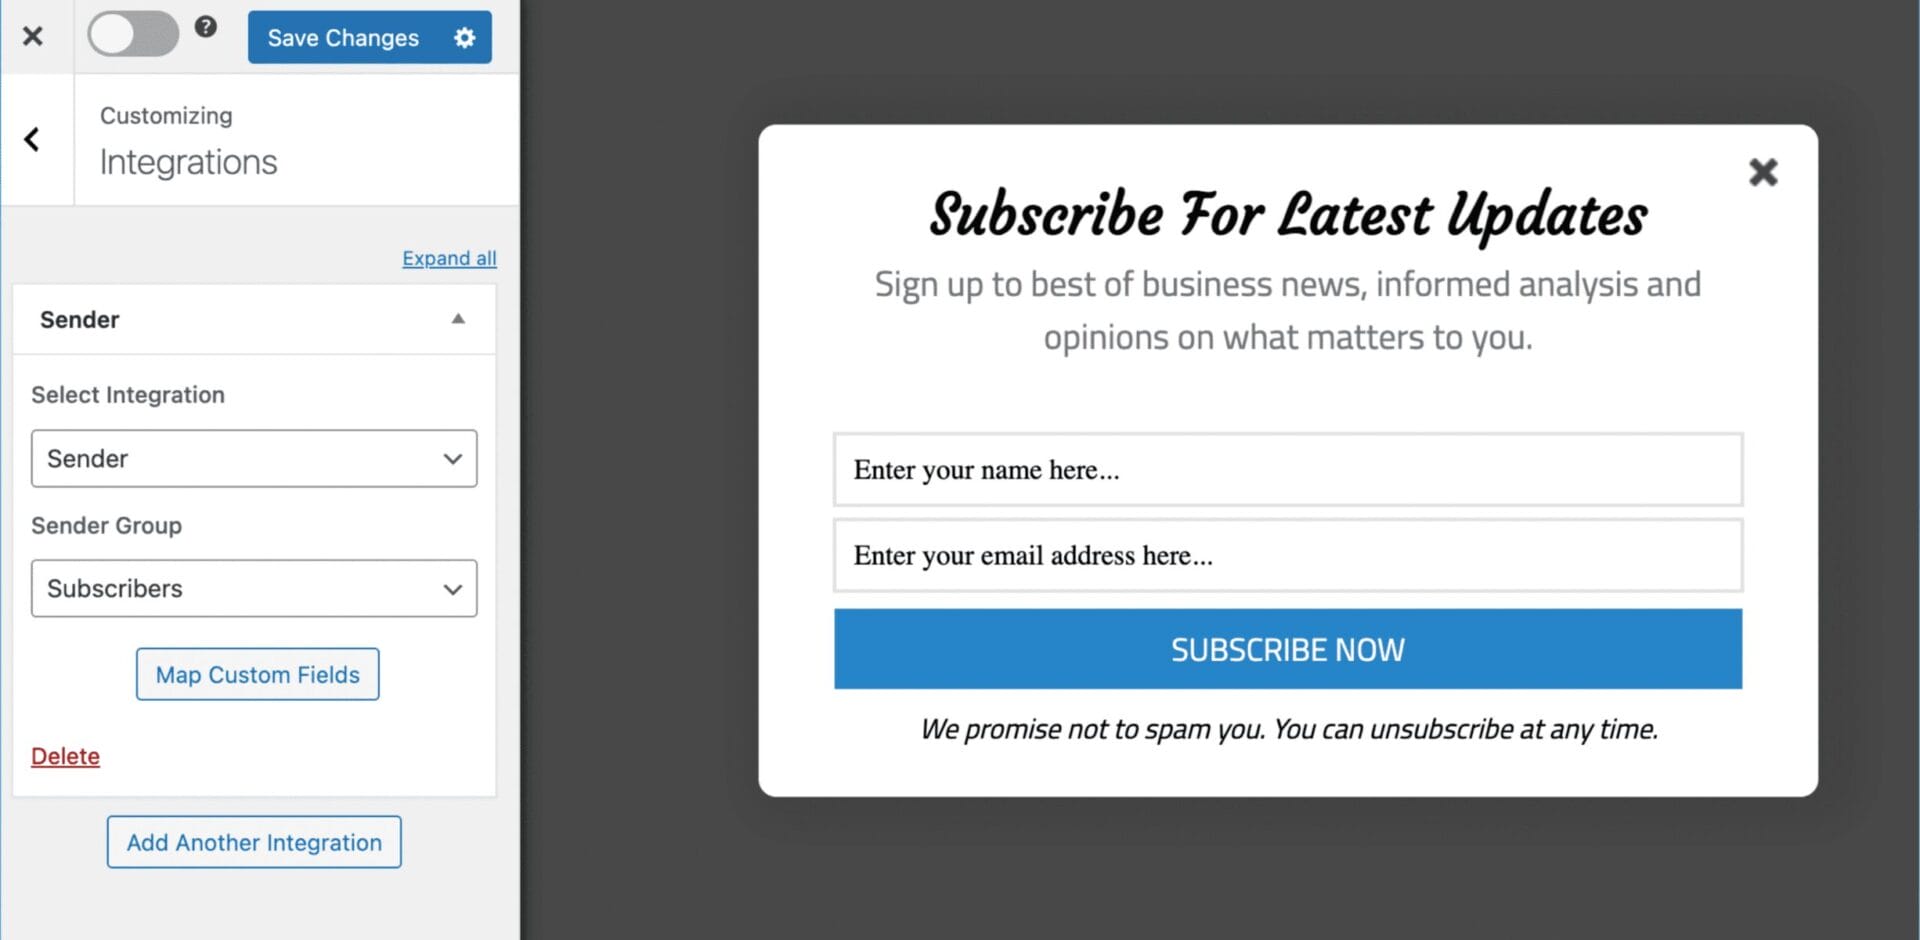
Once the integration has been configured, open the Display Rules panel.
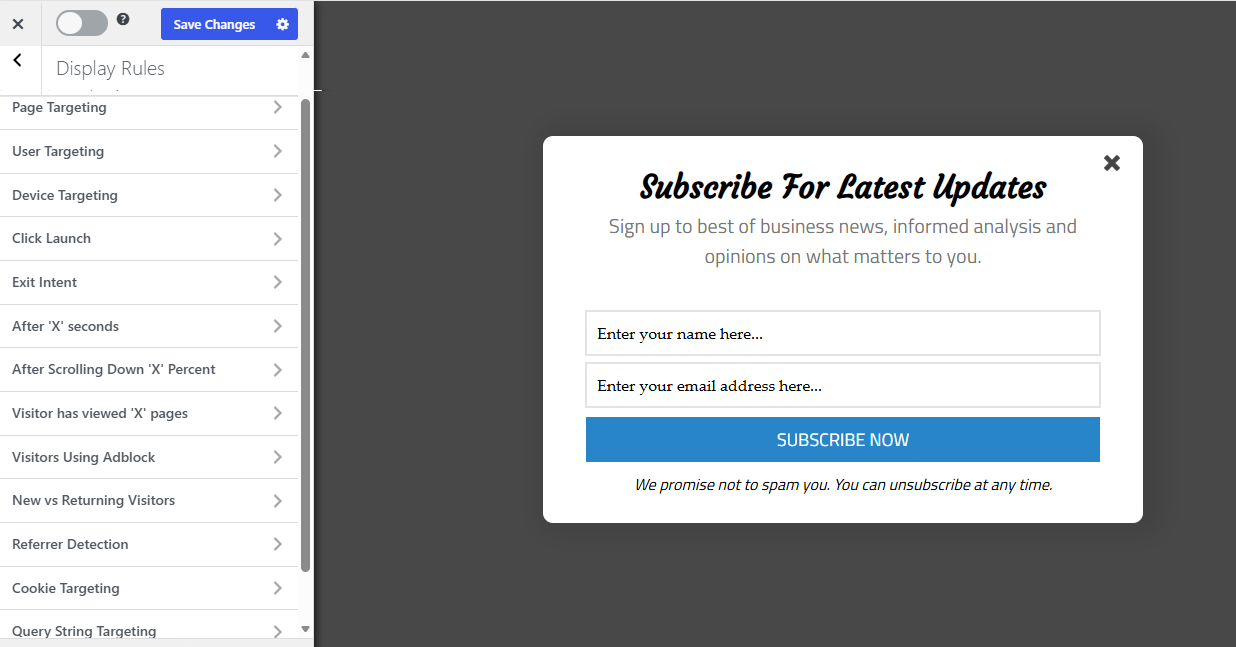
Here, you can choose exactly where and when your opt-in form appears. For example, you can display it across your entire website, limit it to specific pages or posts, or trigger it based on visitor behavior such as exit intent, scroll depth, or time spent on the page.
These display options help you show the right form to the right visitors at the right time.
When you’re satisfied with your design and settings, turn on the activation switch at the top of the page and click Save Changes to publish your opt-in campaign.
From this point forward, every visitor who subscribes through the form will be automatically added to your selected Sender.net mailing list. This eliminates manual imports and ensures your subscriber list stays up to date.
How to Automatically Send WordPress Posts to Sender.net Subscribers
This is a useful feature offered by MailOptin. Instead of creating and sending a newsletter manually every time you publish an article, MailOptin automatically emails your latest posts to your Sender.net subscribers. This helps you save time, drive more traffic to your website, and ensure your audience never misses your latest content.
To set it up, navigate to MailOptin > Email > Add New.
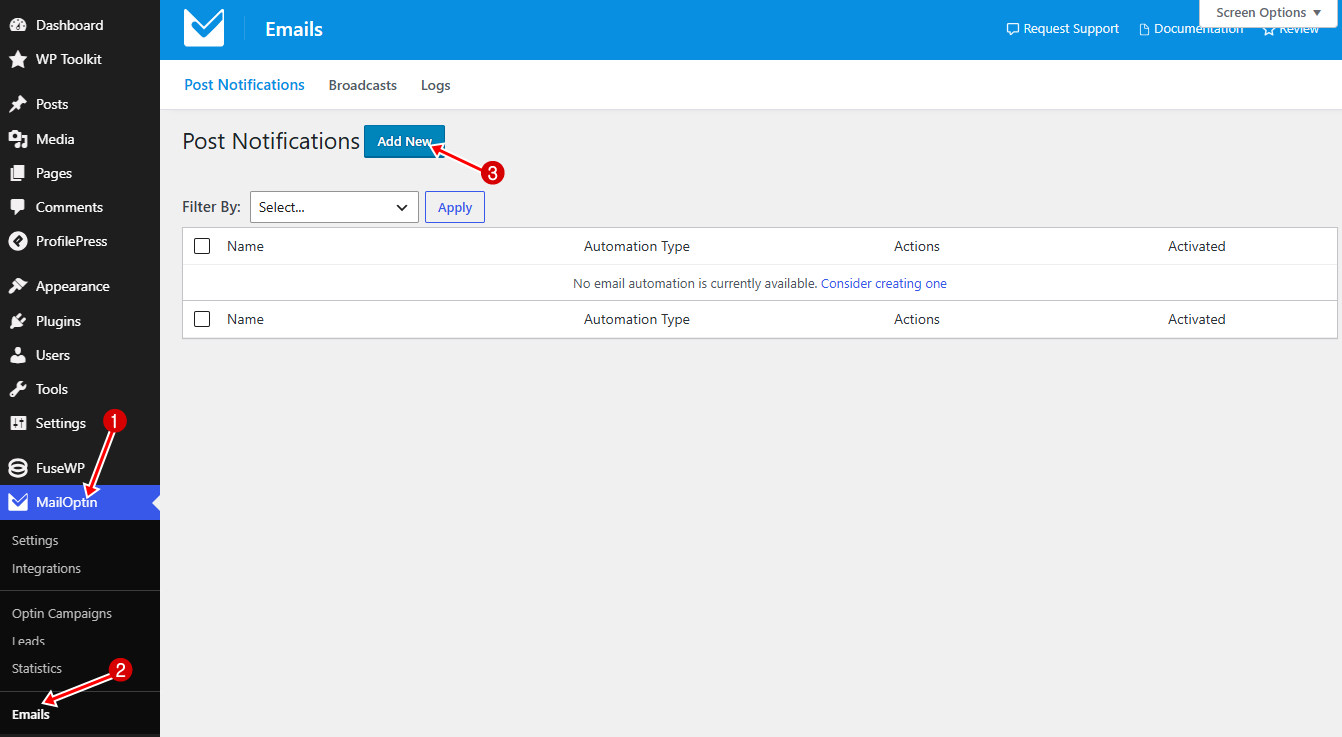
Locate the Email Automation option and click Setup Now.
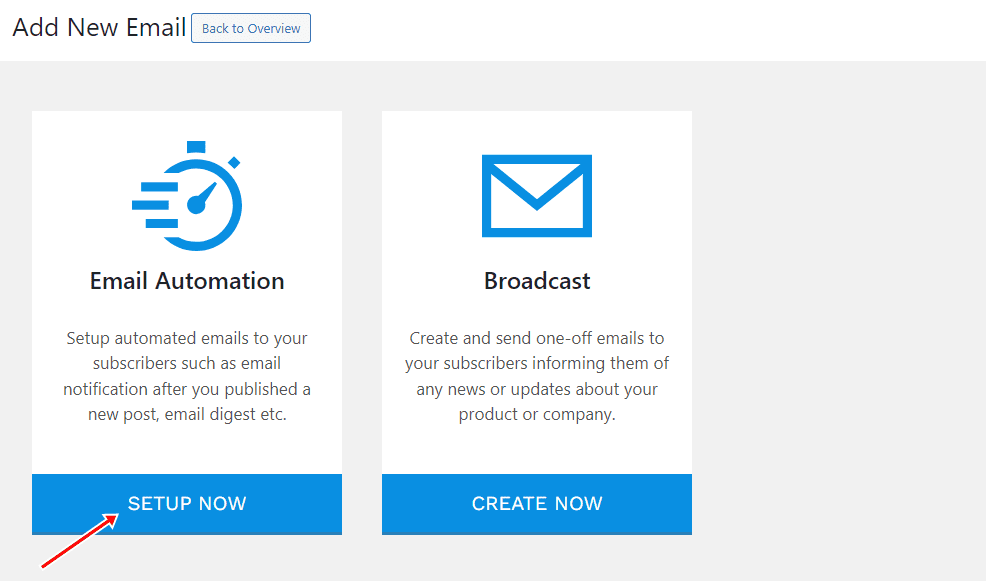
Next, enter a name for your automation, choose New Post Notification as the automation type, and select the email template you want to use.
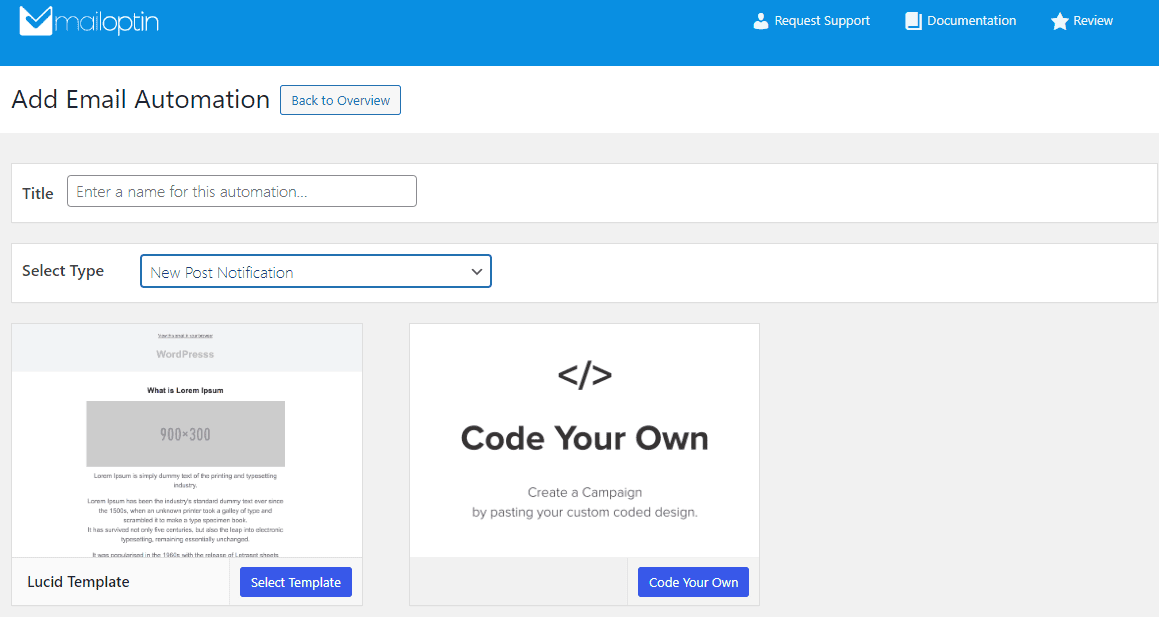
After selecting a template, you’ll be taken to the MailOptin email builder.
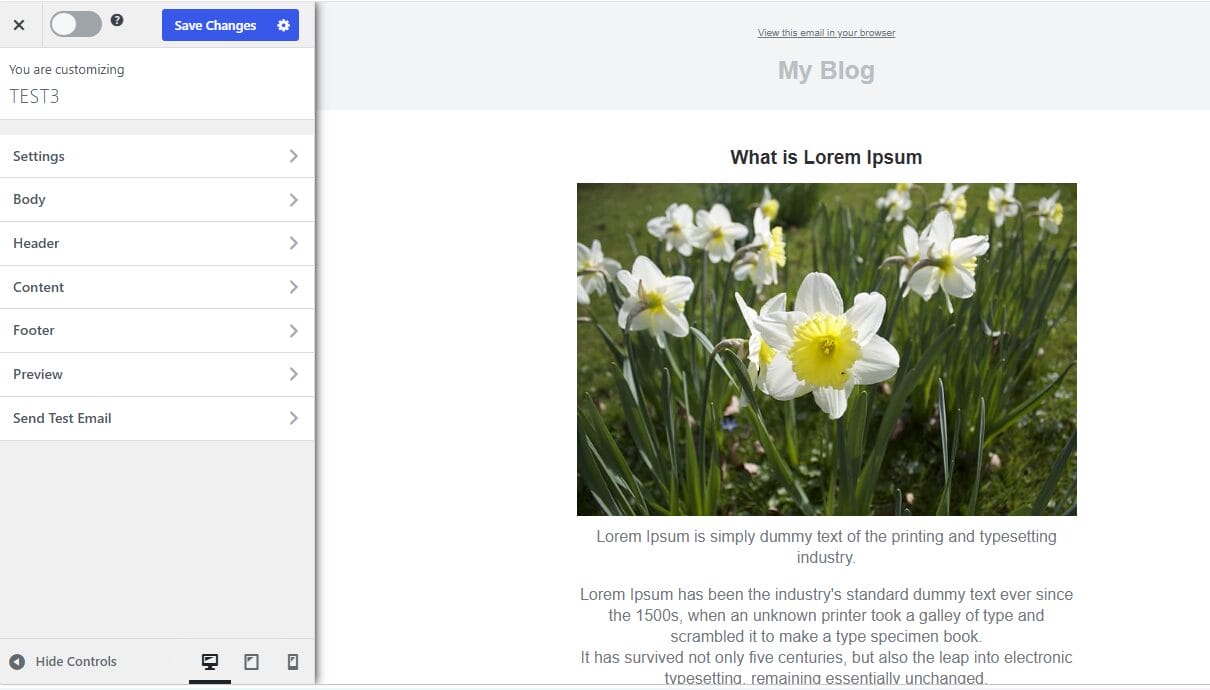
Here, you can customize the layout, branding, header, content, colors, and other email elements to match your website and brand. You can also send yourself a test email to preview how the newsletter will appear in your subscribers’ inboxes.
When you’re happy with the design, open the Settings panel in the automation builder. Select Sender as your email marketing integration, then choose the Sender.net email list or group that should receive your new post notifications.
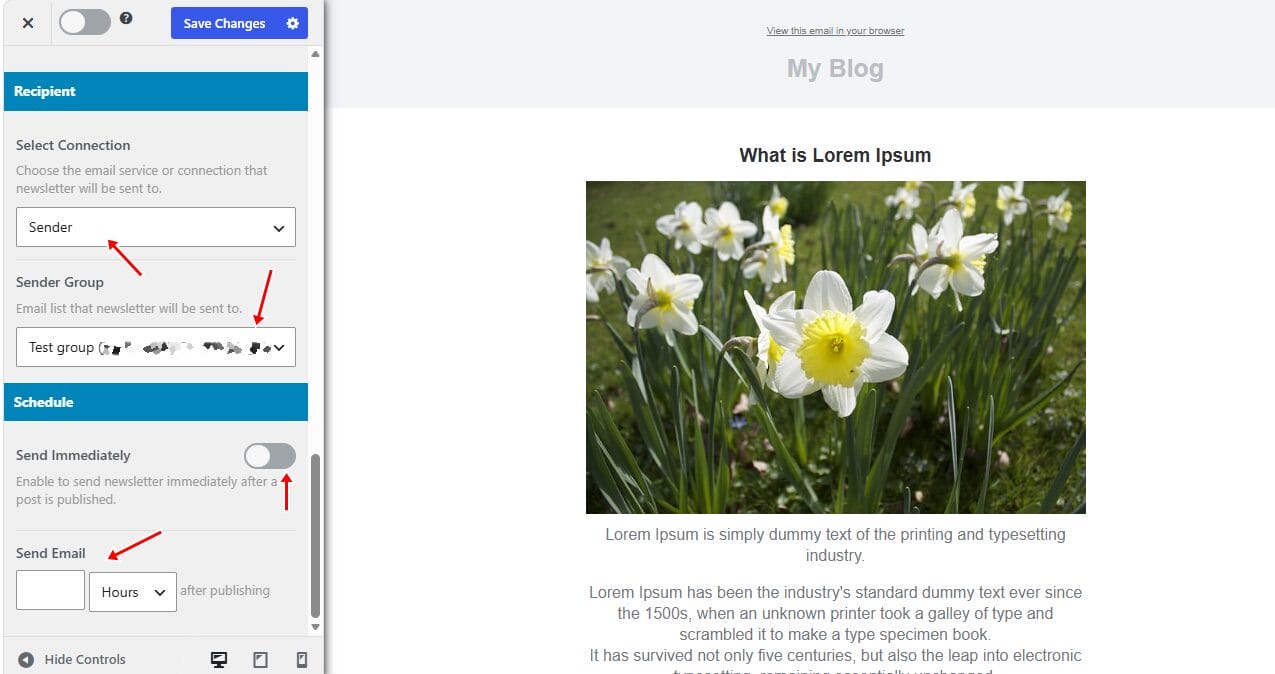
Next, decide when to send the email. You can have MailOptin send it immediately after a post is published or schedule it to be delivered after a specific number of minutes, hours, or days, depending on your preferred workflow.
Finally, enable the automation by turning on the activation switch at the top of the page, then click Save Changes.
And that’s it! With this setup in place, every new post that matches your automation settings will be automatically sent to your selected Sender.net subscribers, exactly when and how you’ve configured it.
Who Should Use the Sender.net + MailOptin Integration?
The Sender.net and MailOptin integration is ideal for WordPress users who want to focus on lead generation and email list growth.
This integration is particularly suitable for:
- Bloggers who want to convert readers into newsletter subscribers.
- Content creators and publishers who regularly share new articles.
- Small businesses looking to generate more leads through opt-in forms.
- WooCommerce store owners who want to grow their email lists with promotional popups.
- Coaches, consultants, and agencies collecting leads through landing pages and forms.
- Nonprofit organizations promoting newsletters, events, and fundraising campaigns.
If your primary goal is to capture more subscribers and automatically send them to Sender.net, MailOptin is an excellent choice. It complements Sender.net’s email marketing capabilities by providing advanced lead generation features that help you grow your audience directly from your WordPress website.
Final Thoughts on Sender Email Marketing
So, to quickly recap what we’ve covered: Sender.net is a solid, affordable email marketing platform that works well with WordPress. We walked through its excellent features, then broke down its pricing, which is refreshingly budget-friendly.
We also showed you two ways to connect it to your WordPress site: using FuseWP to automatically sync WordPress users, customers, members, and form submissions to your Sender.net email lists.
At the end of the day, Sender.net provides the features you need to grow your email list, engage your audience, and save time, all without breaking the bank or overwhelming you with complexity.
Give Sender.net a try today and start creating engaging email campaigns that help you attract, nurture, and retain your audience.