
Want to create a WordPress newsletter form that looks great and actually converts? If so, keep reading.
Adding a newsletter form to your website gives visitors an easy way to subscribe and stay connected with your content, products, or services. Instead of letting visitors leave after reading a post, you can invite them to become subscribers and continue the conversation through email.
With a WordPress newsletter plugin, you can create an email signup form, connect it to your email marketing platform and CRM, and add it to your posts, pages, sidebar, footer, or display it as a popup.
In this guide, we’ll explain what a WordPress newsletter form is, highlight the benefits of using one, show you how to create one, cover best practices, and answer some frequently asked questions about creating and using newsletter forms.
What Is a WordPress Newsletter Form?
In simple terms, a WordPress newsletter form is a signup box added to a WordPress website that lets visitors subscribe to your email list. It usually asks users for basic information, such as their name and email address, so that you can send newsletters, updates, promotions, blog posts, or other relevant content.
You can place newsletter forms in different areas of your website, including the homepage, sidebar, footer, blog posts, landing pages, or popups. When someone submits the form, their details are typically added to an email marketing platform or CRM where you can manage subscribers and send email campaigns.
For example, an online store can use a newsletter form to notify customers about new products and special offers. In contrast, a blogger may use one to share newly published articles with subscribers.
Benefits of a WordPress Newsletter Form
1. You Own Your Audience: Social media platforms come and go, or worse, they change their rules overnight. A million followers on Instagram mean nothing if the algorithm decides to show your posts to five people. Your email list, however, is yours. No algorithm can throttle it. No platform update can kill it. That form is your insurance policy against the ever-changing digital landscape.
2. Email Marketing Delivers the Highest ROI: This is not just marketing hype. Studies consistently show that email marketing generates an average return of $36 to $42 for every dollar spent. No other channel even comes close. That signup form is not just collecting names; it is planting seeds for future revenue, whether you sell products, services, or monetize through affiliate content.
3. You Build Genuine Relationships: This is something I do not hear enough people talk about: email feels personal. Unlike a fleeting social media scroll, an email lands in someone’s inbox, a space they actually care about. Over time, consistent, valuable emails transform casual visitors into loyal readers, customers, and even brand advocates. That form is the starting line for every one of those relationships.
4. It Gives You Data and Insights: Once people start subscribing, you gain access to invaluable information. Who are they? What content do they engage with? When do they open your emails? These insights help you refine your content strategy, adjust your offers, and genuinely understand what your audience wants.
5. It Drives Traffic Back to Your Site: Every time you send a newsletter with a link to your latest post, product, or update, you are sending a targeted traffic surge straight back to your WordPress site. That means more page views, more engagement, and better SEO signals. It is a cycle that feeds itself.
6. It Is Incredibly Cost-Effective: Compared to paid ads or influencer campaigns, email marketing is remarkably affordable. Most WordPress newsletter plugins and email services offer free tiers to get started, and even premium plans are a fraction of what you would spend on other acquisition channels. The form itself? Free to build. The returns? Potentially life-changing for your business.
What You Need to Create a WordPress Newsletter Form
Before creating your WordPress newsletter form, you’ll generally need three things:
- A WordPress website
- A newsletter or lead-generation plugin with a lead capture form feature, such as MailOptin
- An email marketing software or CRM where your subscribers will be stored and emails will be delivered through.
Below, we will show you how to create newsletter signup forms in WordPress using MailOptin and a contact form plugin (Fluent Forms).
Method 1: Create a WordPress Newsletter Form With MailOptin
MailOptin is an excellent WordPress lead-generation and email marketing plugin that allows you to create popups forms, contact forms, newsletter subscription forms, and even user registration forms from your WordPress dashboard.
It also works with many popular email marketing platforms and CRMs, including Mailchimp, Brevo, MailerLite, ActiveCampaign, Constant Contact, Salesforce, GetResponse, HubSpot, and Klaviyo.
Once someone fills out your WordPress newsletter form created with MailOptin, you can send their details directly to the mailing list or service you’ve connected.
MailOptin also comes with useful email automation features. For example, you can automatically notify subscribers whenever you publish a new blog post, send one-time email broadcasts, or schedule newsletters to go out at a later date.
In the steps below, we’ll walk you through creating a WordPress newsletter form with MailOptin and adding it to your website.
Step 1: Install and Activate MailOptin
First, get a copy of the MailOptin plugin, then install and activate it on your WordPress website.
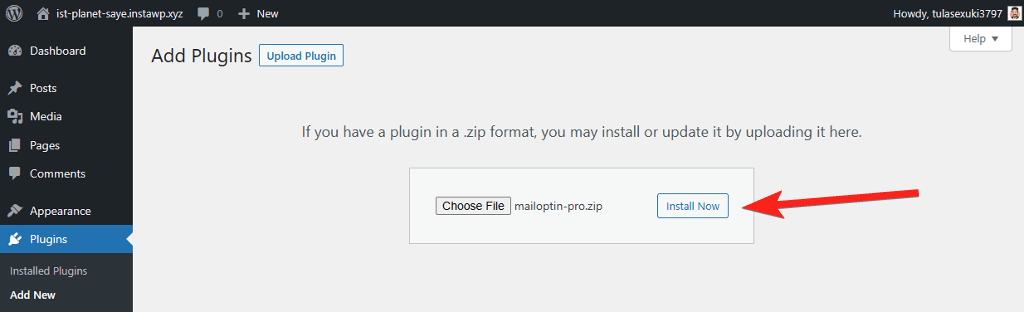
Step 2: Connect To CRM & Email Marketing Platform
MailOptin works with a wide range of popular email marketing platforms and CRMs. This makes it easy to send the subscribers collected through your WordPress newsletter form directly to your preferred email marketing platform.
To connect your account, go to MailOptin > Integrations and select your email marketing provider.
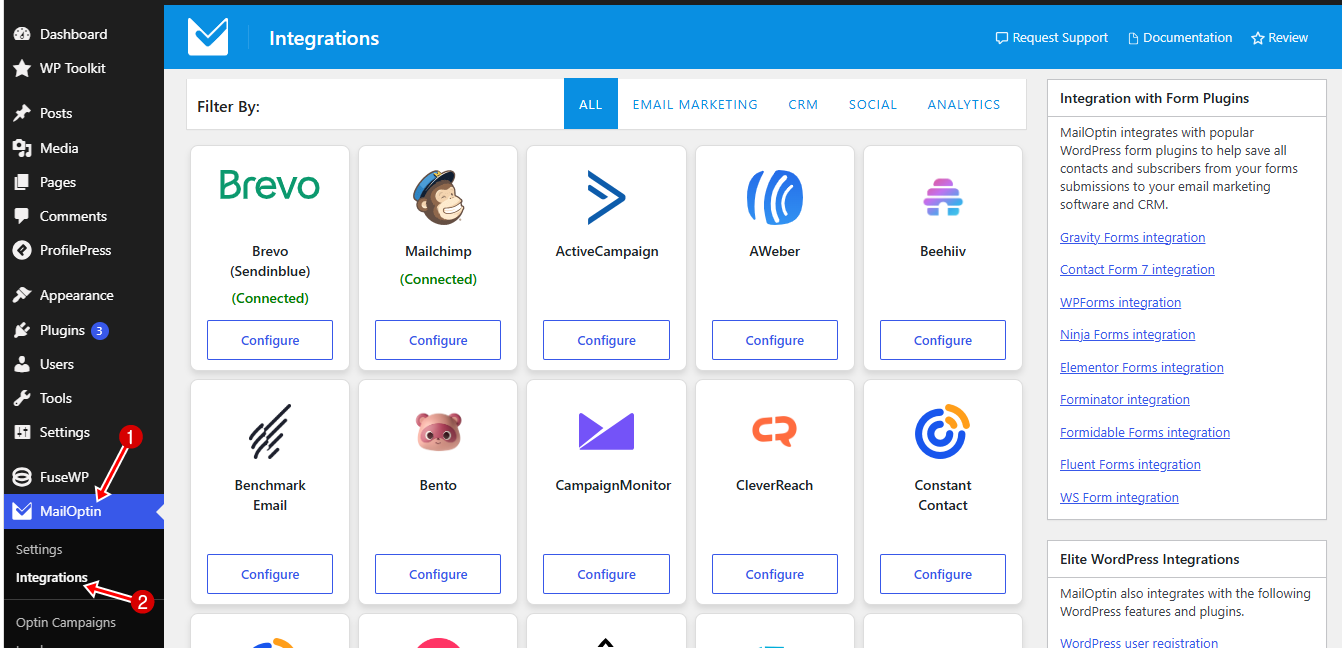
Next, enter the required API key or connection details provided by your email service. Once you’ve entered the information, click Save Changes to complete the connection.
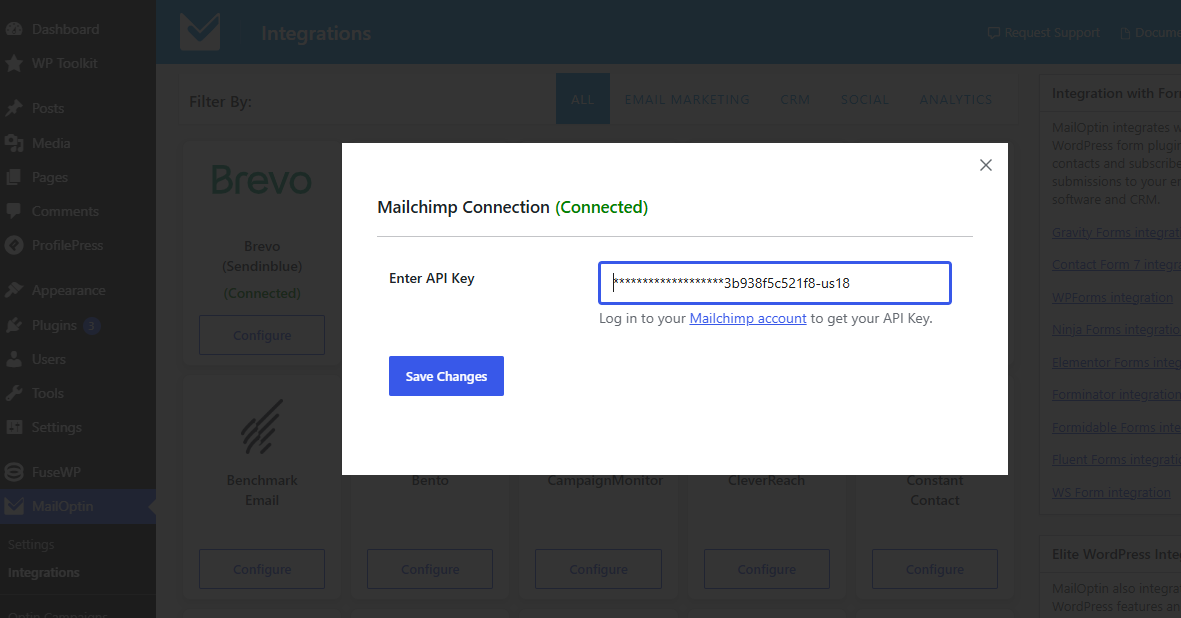
If you are not using an external email service yet, no worries. You can skip this step entirely and use MailOptin Leads instead, which stores your subscribers right inside WordPress.
Step 3: Create a New Optin Campaign for WordPress Newsletter Form
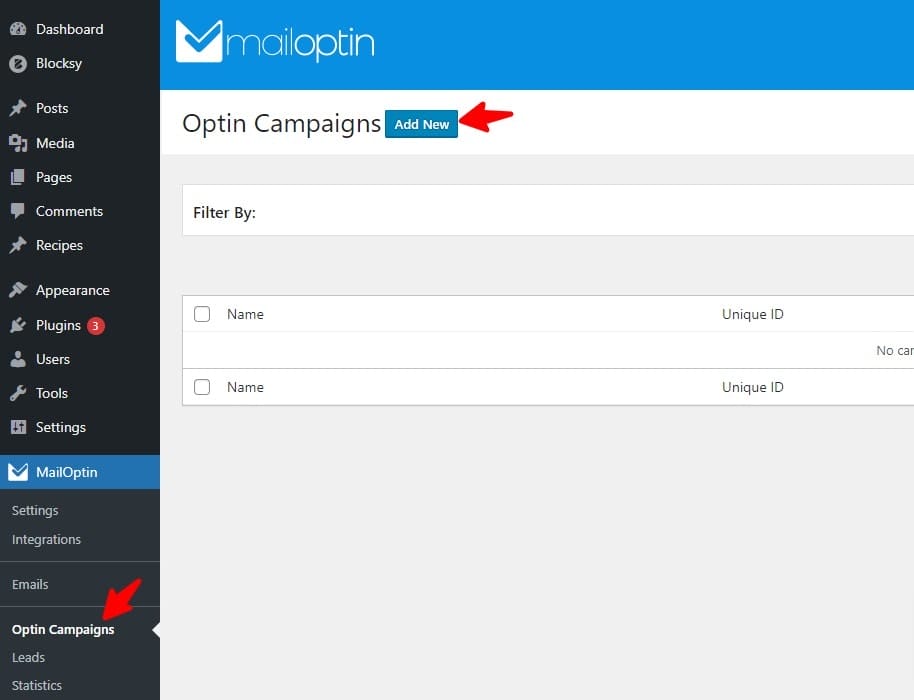
Now for the fun part: actually building your form. Head over to MailOptin > Optin Campaigns and click the “Add New” button.
First, give your optin campaign a name that helps you remember what it is. Something like “Weekly Newsletter Signup” works perfectly.
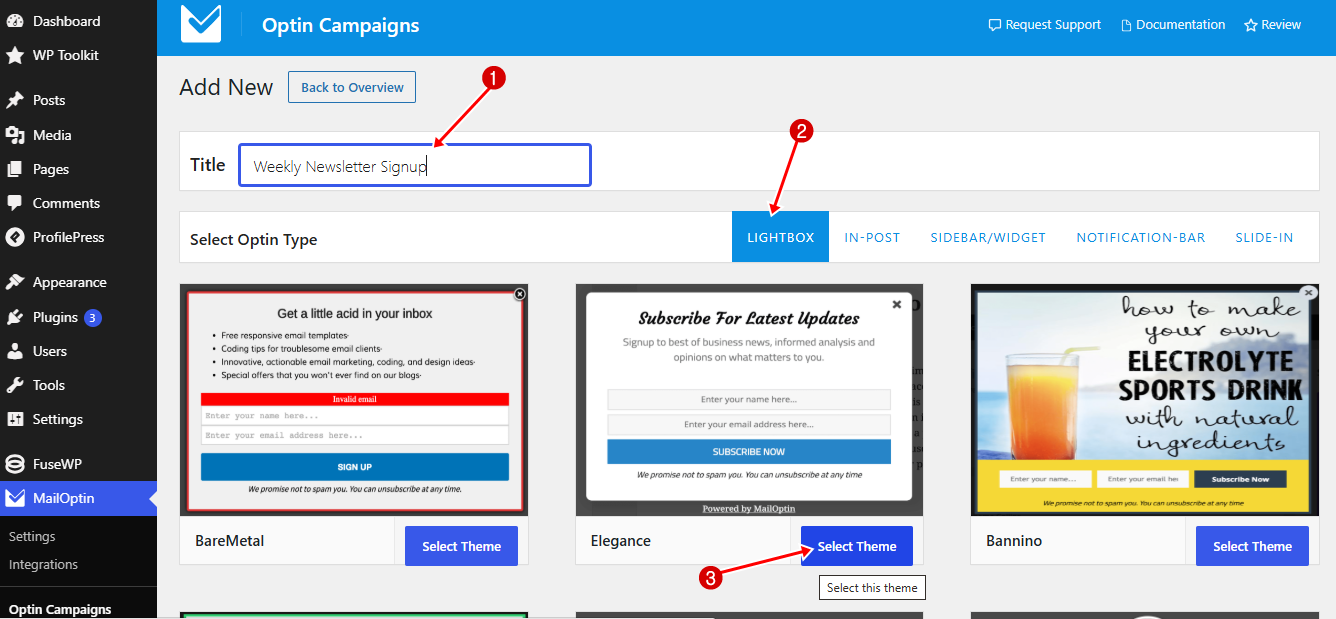
Next, choose the optin type you want to use. MailOptin gives you several options—lightbox popups, sidebar forms, notification bars, slide-ins, and in-post. For this tutorial, we’re using Popup and the Elegance theme.
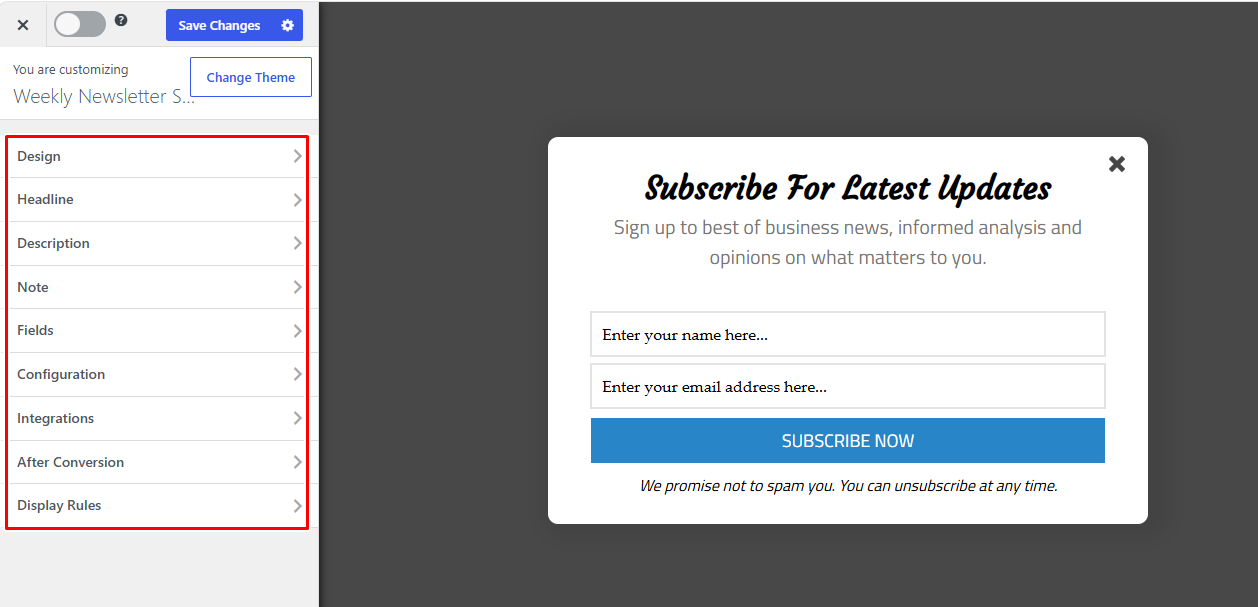
Once you select your template, you can customize the form to fit your website. You can change the headline, description, button text, images, form fields, background, typography, and other design elements.
With your design dialed in, the next question is: where and when should this newsletter form appear on your WordPress site? That is where display rules come in.
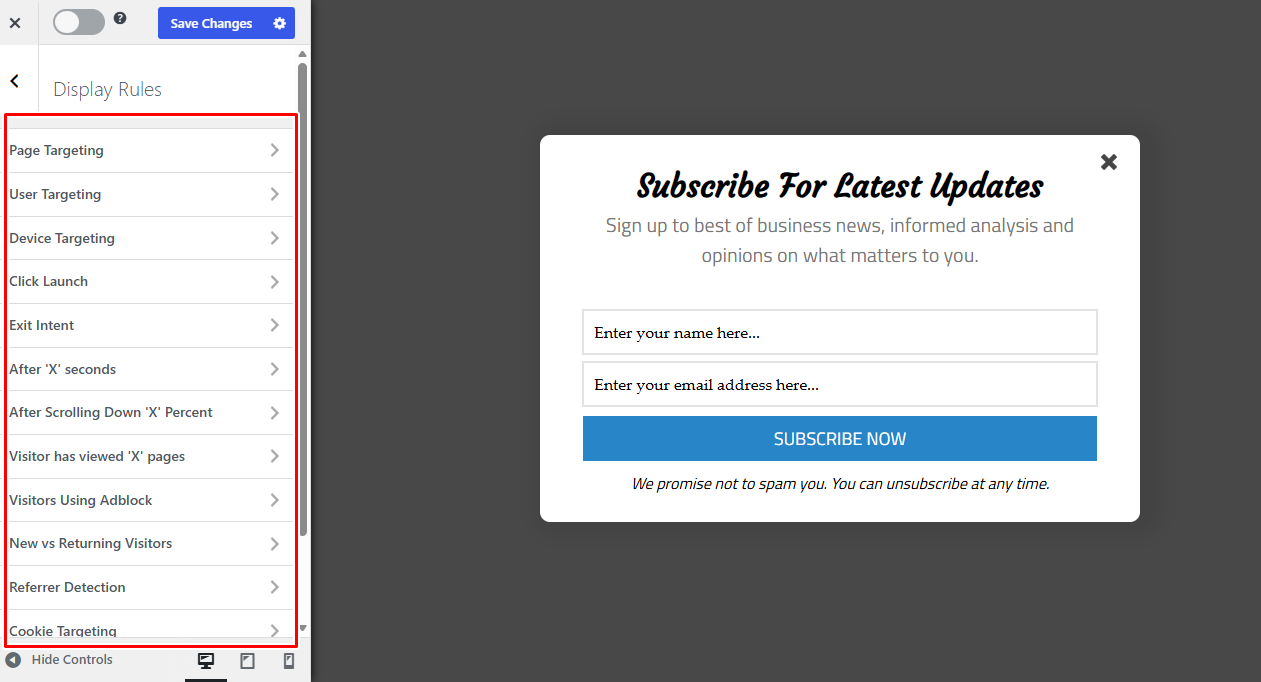
MailOptin’s Display Rules let you control your WordPress newsletter form’s appearance. You can choose the page, user roles, device types, and trigger options like button click, exit intent, referrer detection, cookie targeting, scroll depth, time on site, and page views. These settings let you decide where and when the WordPress newsletter form shows up.
Once you’ve finished setting your display rules, move to the Integration section to choose where to store your new subscribers.
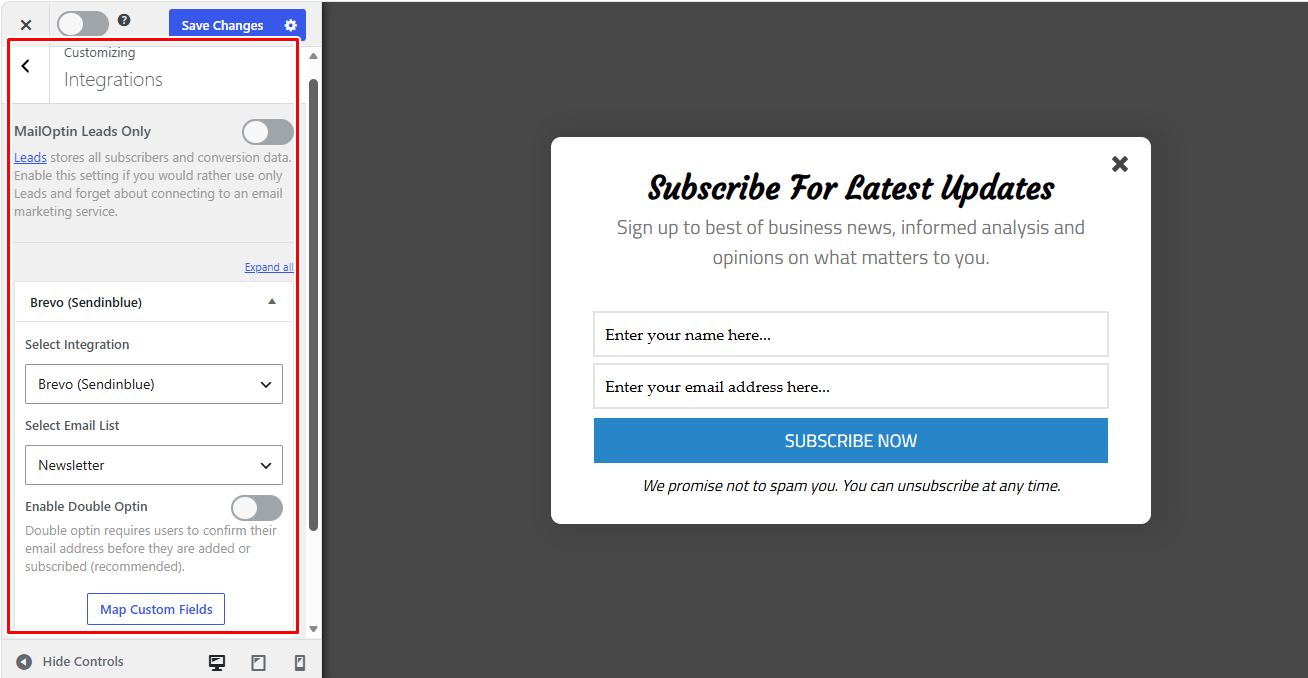
Select your CRM and email marketing software, then choose the appropriate email list. If you don’t want to connect an external email marketing platform, you can use MailOptin Leads to store email addresses collected through your form in your WordPress database.
Once everything is configured, click Save Changes at the top of the page and turn on the campaign using the toggle switch. Your newsletter subscription form will then become active and appear on your WordPress site frontend according to the display rules you selected.
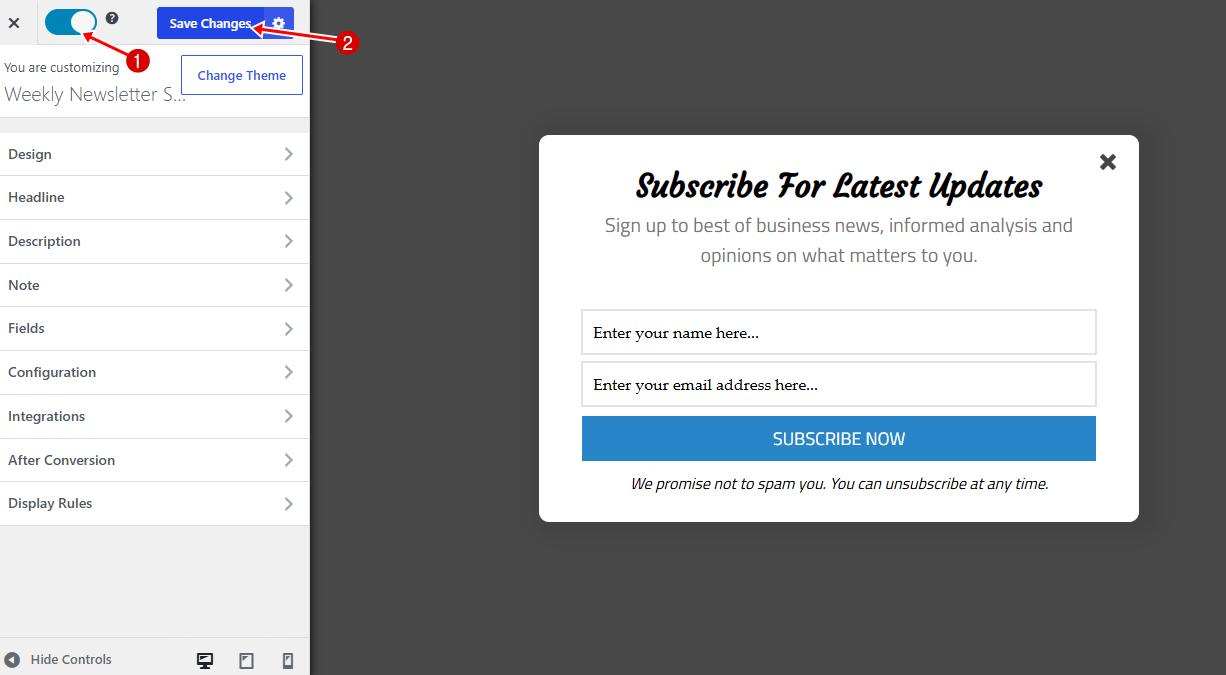
Below is a preview of the WordPress newsletter form we created.

Method 2: Create a Newsletter Form With WordPress Form Plugins
Another way to create a WordPress newsletter form is using a WordPress Contact Form plugin such as Fluent Forms. Fluent Forms is a drag-and-drop WordPress form builder that lets you create everything from simple contact forms to lead-generation and subscription forms without writing code.
You can start with a blank form or choose from pre-built templates, then add and customize the fields you need.
In this method, we’ll first create the WordPress newsletter form with Fluent Forms. After that, we’ll use FuseWP to automatically send new form submissions to your preferred email marketing service or CRM.
Step 1: Install and Activate Fluent Forms
First, install Fluent Forms on your WordPress website. From your WordPress dashboard, go to Plugins > Add New Plugin and search for Fluent Forms.
Click Install Now, then click Activate.
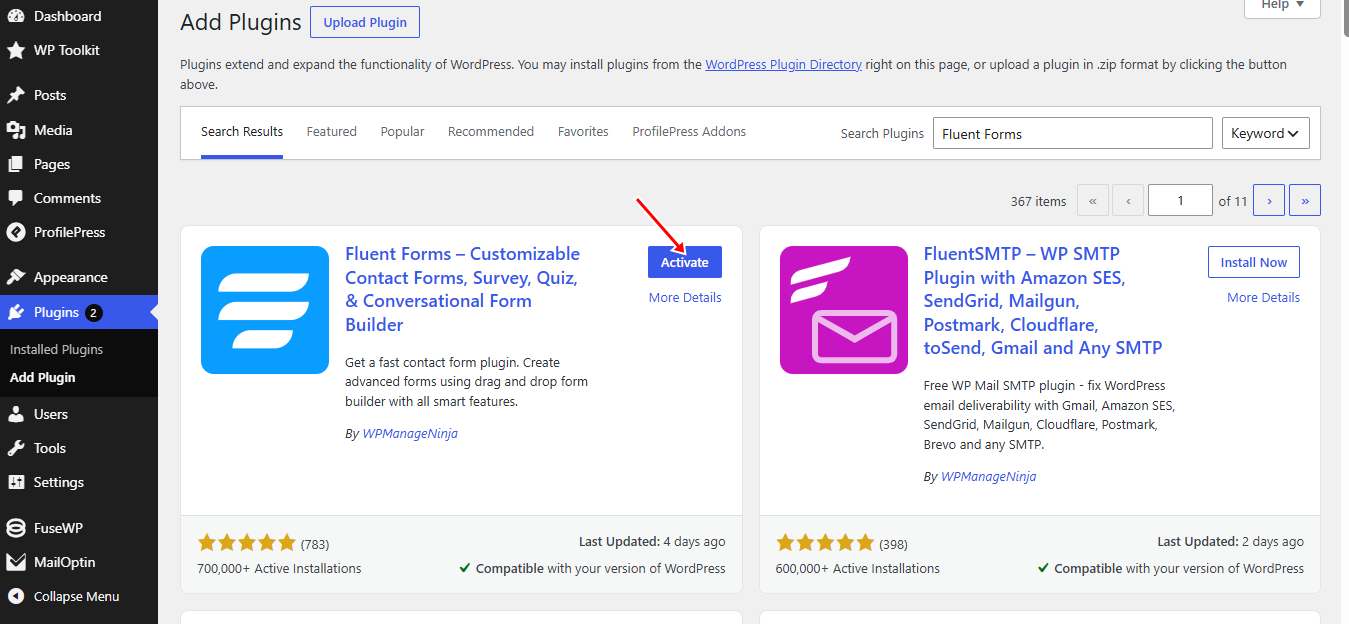
After activation, you should see Fluent Forms added to the WordPress admin menu.
Step 2: Create a New Newsletter Form
Next, go to Fluent Forms > Forms and click Add New Form.
Fluent Forms gives you several ways to create a form, including starting with a blank form, choosing a template, creating a conversational form, or using its AI form-building option.
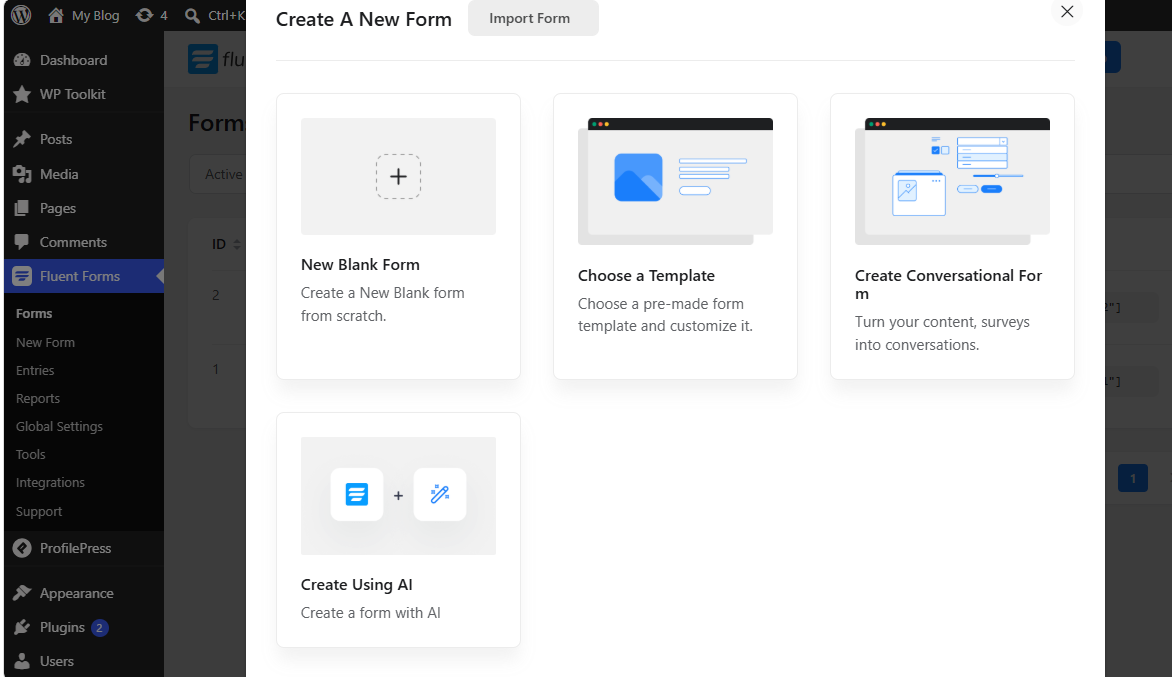
For this tutorial, select New Blank Form. Give the WordPress newsletter form a descriptive name, then add the fields you want subscribers to complete. For a newsletter form, you usually don’t need many fields. You can start with:
- Name
- Email Address
- Submit button
The email address should be the most important field, so make sure it is marked as required.
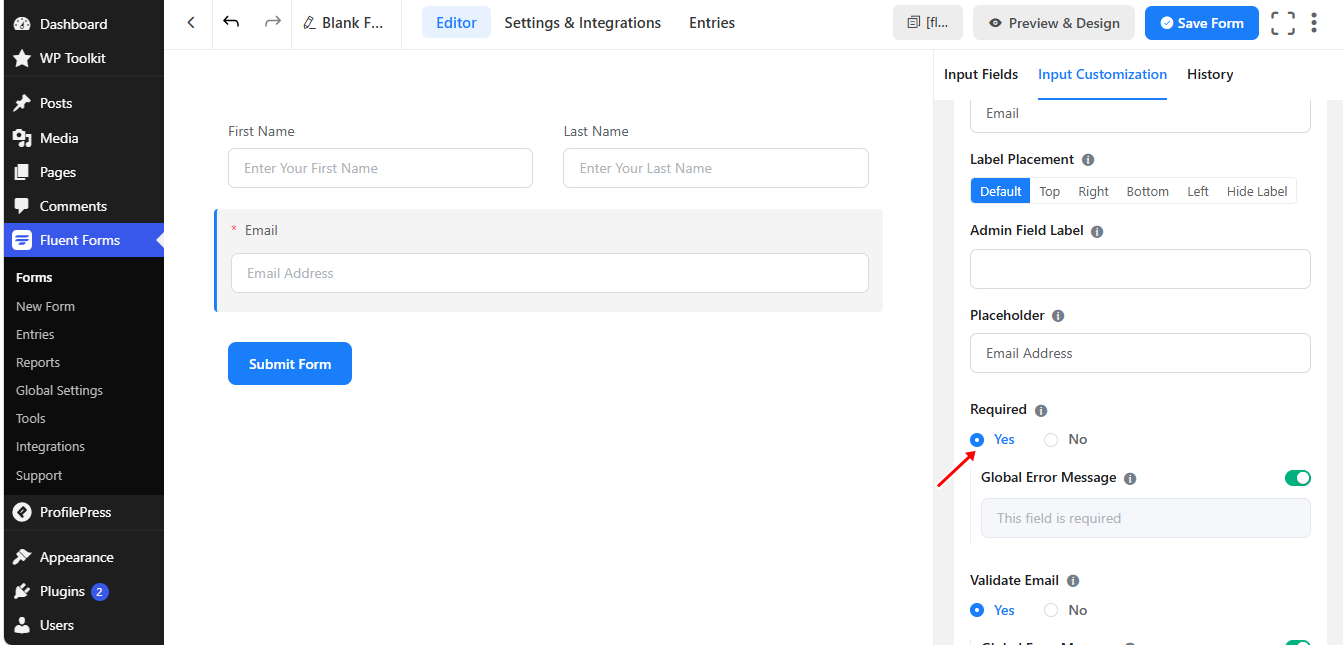
Once you’ve added the necessary fields, customize the email signup form so that it clearly tells visitors what they’re signing up for.
You can also change the submit button text from a generic phrase such as Submit to something more relevant, such as: Subscribe Now or Join the Newsletter.
Once you’re done creating and customizing the form, click Save Form.
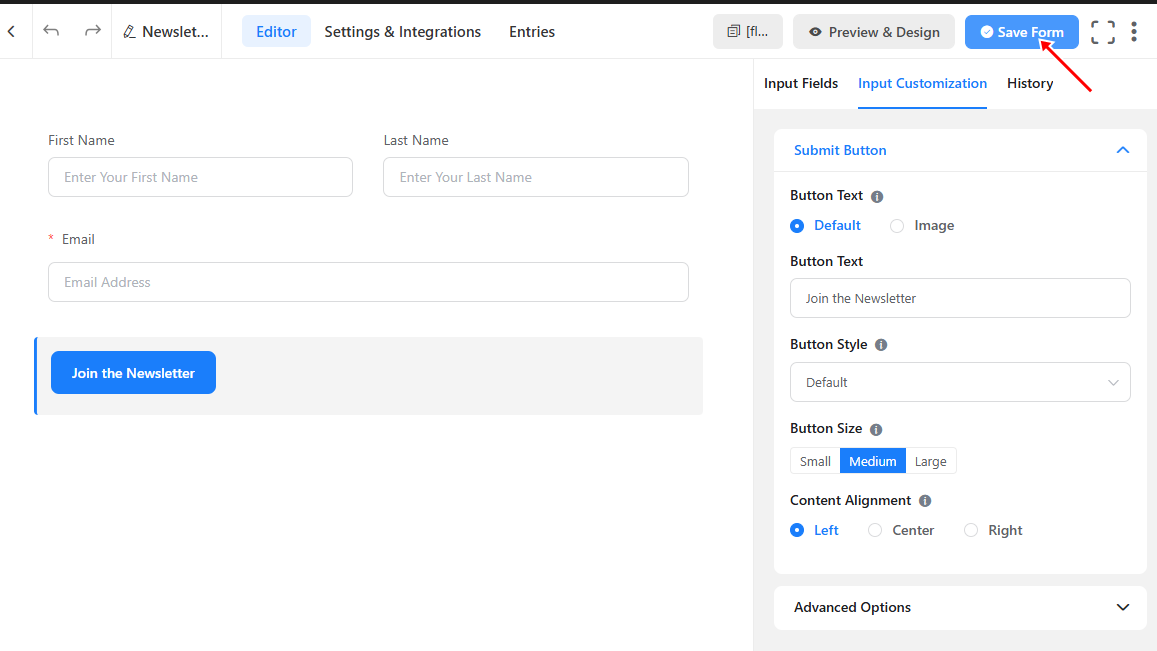
You can also use the Preview & Design option to check how the form looks before adding it to your website.
Step 3: Add the Newsletter Form to Your Website
Now it’s time to display the WordPress newsletter form where visitors can see it.
Fluent Forms provides a shortcode for each form, which you can copy from the form editor and paste into the page or post where you want the signup form to appear.
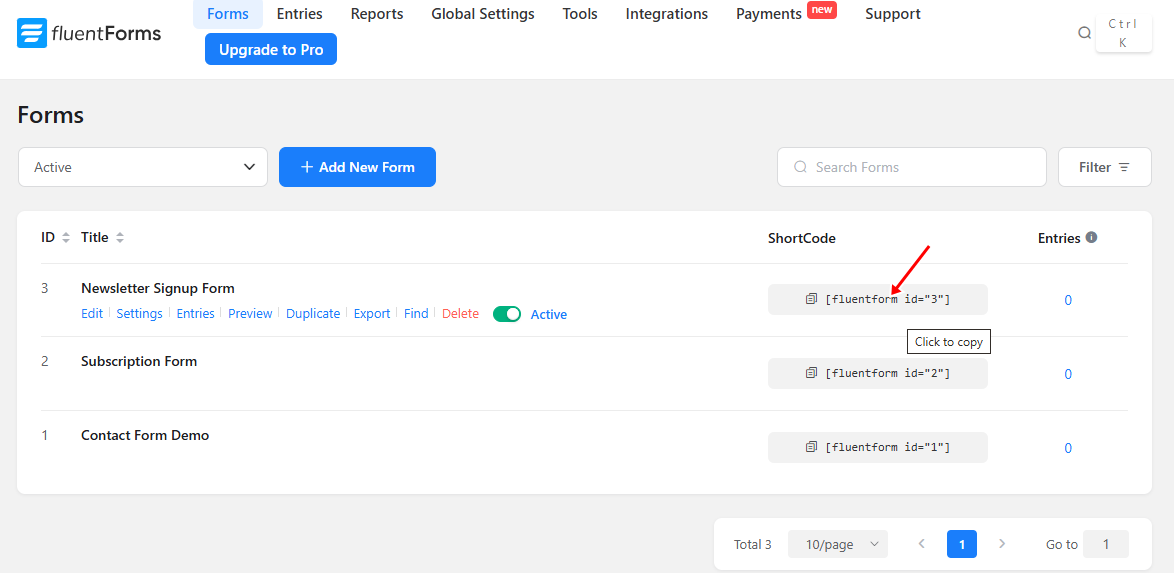
If you’re using the WordPress block editor, there’s an even easier option.
Open the page or post where you want to display your form, click the + icon to add a new block, and search for Fluent Forms.
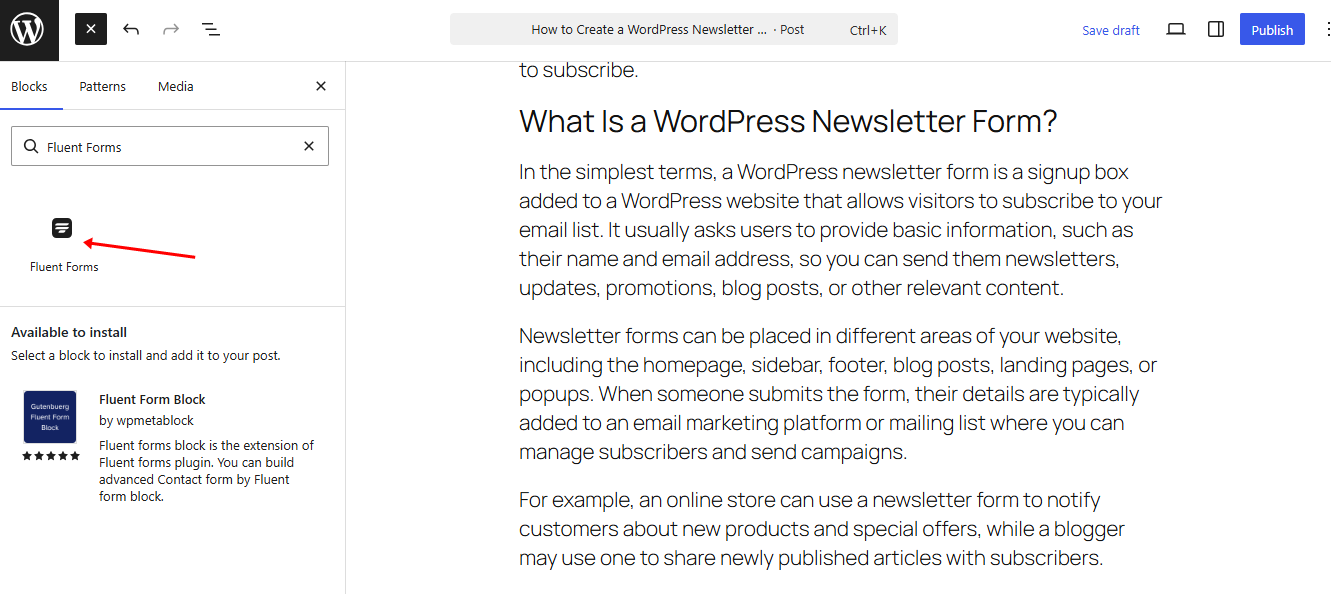
Add the Fluent Forms block and select your newsletter form from the dropdown menu. The form will then appear inside the editor. Click Update or Publish to make your changes live.
You can place your newsletter sign-up form on a dedicated newsletter page, homepage, landing page, blog post, or anywhere else visitors are likely to see it.
At this point, visitors can fill out and submit the form. However, if you want those subscribers added automatically to your email marketing platform or CRM, you’ll need to connect the form to your preferred service.
Step 4: Sync Fluent Forms Entries With Your Email Marketing Platform Using FuseWP
This is where FuseWP comes in.
FuseWP allows you to connect Fluent Forms to email marketing services and CRM platforms so that new leads can automatically be added to your mailing list after they submit your form. It also allows you to map form fields and assign tags to subscribers based on the form they submitted.
To set this up, first install and activate the FuseWP plugin on your WordPress website. You’ll also need to connect the email marketing or CRM platform you want to use with FuseWP.
Once that’s done, go to FuseWP > User Sync.
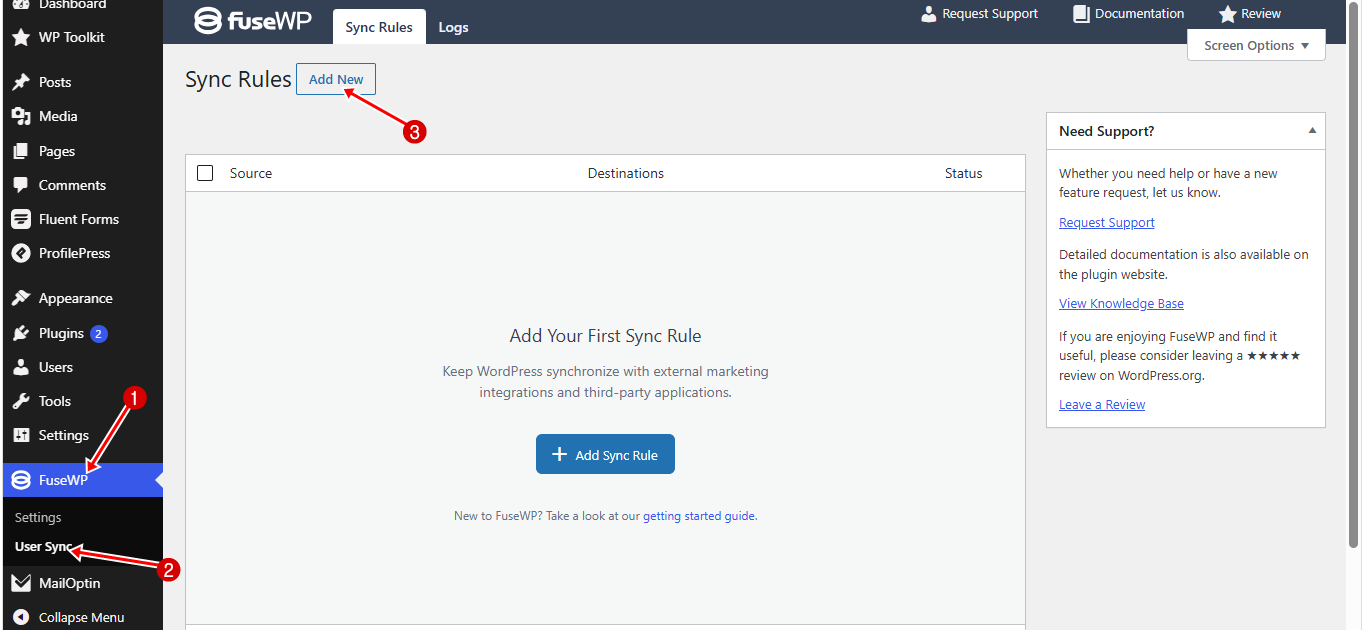
Then click Add New.
For the Source, select Fluent Forms.
Next, choose the specific newsletter form you created earlier as the Source Item. This tells FuseWP which Fluent Forms submissions should trigger the sync.
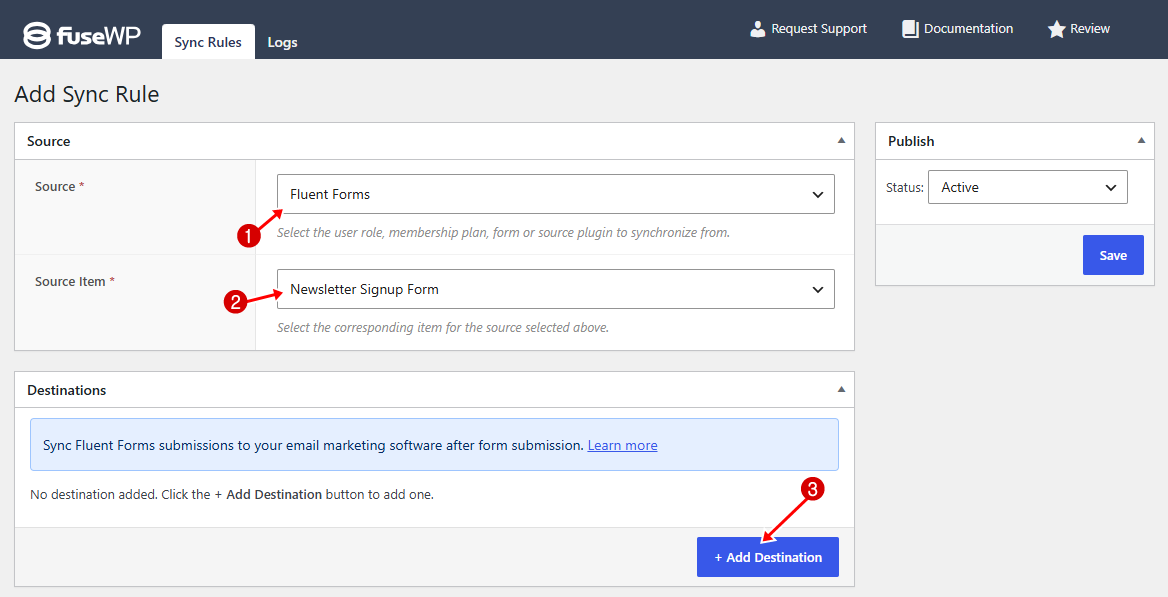
Next, move to the Destinations section. Here, select the email marketing service or CRM where you want to add your subscribers.
FuseWP supports a range of platforms, including Mailchimp, ActiveCampaign, Salesforce, Constant Contact, Campaign Monitor, AWeber, Zoho CRM, Zoho Campaigns, Kit (ConvertKit), Drip, Brevo (Sendinblue), HubSpot, MailerLite, Sendy, Klaviyo, Google Sheets, Keap (Infusionsoft), EmailOctopus, Flodesk, HighLevel, Omnisend, Ortto, GetResponse, Mailjet, Encharge, beehiiv, Sender.net, BirdSend, Bento, Mailercloud, Engage.so, SendPulse, Copper CRM, FluentCRM, MailPoet, Groundhogg.
Choose the appropriate email list or destination and map your newsletter email form fields created with Fluent Forms to the corresponding fields in your email marketing platform.
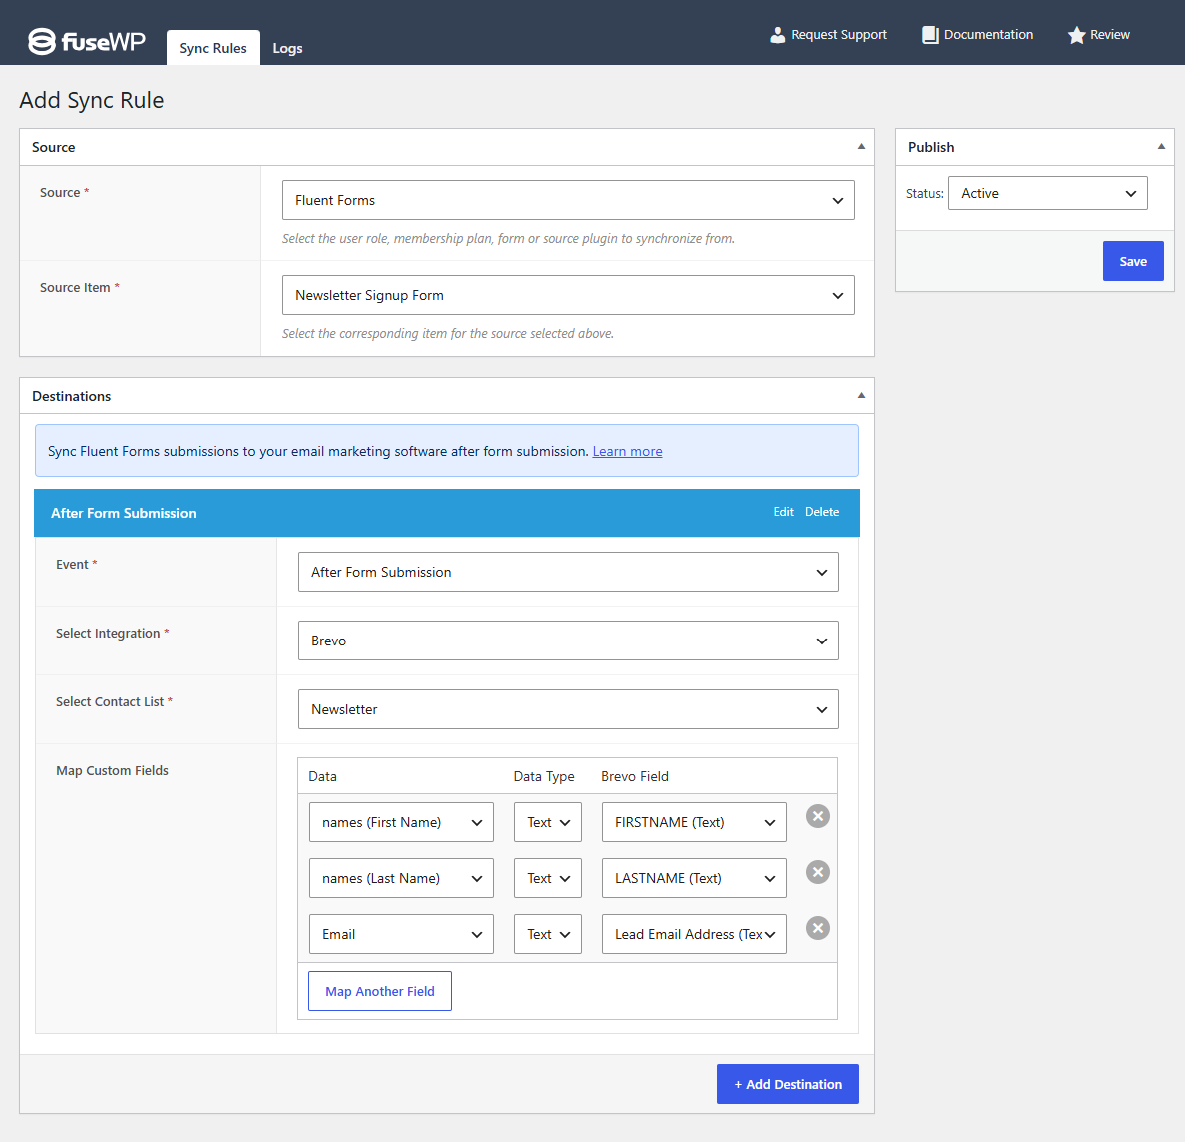
Once you’ve finished configuring the sync rule, click on Save.
So from now on, when someone submits your Fluent Forms newsletter sign-up form, FuseWP will automatically send their information to the email marketing list or CRM you’ve selected.
FuseWP also includes a Bulk Sync feature that lets you send previously recorded Fluent Forms entries to your connected email marketing or CRM platform, which can be useful if your form was already collecting submissions before you created the integration.
And that’s it. You now have a working WordPress newsletter form built with Fluent Forms, with FuseWP handling the connection between your form submissions and your email marketing or CRM platform.
WordPress Newsletter Form Best Practices
Regardless of which plugin you choose, follow these principles when creating a newsletter signup form for your website.
1. Keep the Form Simple: Avoid asking for too much information. In most cases, a name and email address are enough. The more fields you add to your newsletter sign-up form, the more effort visitors have to make before subscribing. If you do not genuinely need information such as a phone number, address, or company name, leave those fields out.
2. Use a Clear Call to Action: Your submit button should clearly tell visitors what will happen when they click it. Instead of a generic button like Submit, consider more specific text such as Subscribe Now, Join the Newsletter, Get Weekly Updates, or Send Me the Latest Posts. A clear call to action makes your WordPress newsletter form easier to understand and can encourage more visitors to complete it.
3. Tell Visitors What They Will Receive: People are more likely to subscribe when they know what they are signing up for. Add a short description above or below your newsletter subscription form in WordPress explaining what subscribers can expect. For example, you might tell them they will receive weekly articles, product updates, special offers, tutorials, or exclusive content. Also, be clear about how often you plan to email them, whenever possible.
4. Make Your Newsletter Form Easy to Find: Even a great WordPress newsletter form will not help much if visitors cannot find it.
Place your form in areas where people are likely to notice it, such as:
Your homepage, Blog posts, Website footer, Sidebar, Landing pages, Popup or slide-in forms, or a dedicated newsletter signup page. You can also test different locations to see which placement attracts the most subscribers.
5. Make Sure the Form Works on Mobile Devices: Many visitors browse on smartphones and tablets, so ensure your email forms are mobile-friendly. Make form fields easy to tap, keep text readable, and display the subscribe button clearly. Popups should fit screens without hindering closure. Test your forms on desktop and mobile before publishing.
6. Avoid Showing Popups Too Aggressively: Popup newsletter signup forms can be effective, but displaying them too soon or too frequently may annoy visitors. Allow visitors time to explore your website before showing a popup, using options like time delays, scroll triggers, or exit intent to display your newsletter subscription form at the right moment. For example, MailOptin’s exit-intent feature can display a form when a visitor appears ready to leave your website.
7. Test Your Newsletter Form Before Publishing: Before making your WordPress newsletter form available to visitors, submit a test entry yourself. Check that:
- The form submits successfully.
- The confirmation message appears correctly.
- Subscriber information is saved
- The subscriber is added to the correct email list or CRM
- Confirmation or welcome emails are delivered
- The form displays properly on mobile and desktop
If you are using Fluent Forms with FuseWP, also confirm that new form entries are syncing correctly with your connected email marketing platform or CRM.
8. Monitor and Improve Your Form: Creating a newsletter form isn’t a one-time task. Monitor how visitors interact and improve accordingly. Experiment with headlines, button text, placement, offers, and popup timing to find what works. Effective forms are simple, clear, easy to find, and provide a strong reason to subscribe.
Frequently Asked Questions About WordPress Newsletter Forms
Before we wrap up, let us tackle some common questions I hear from WordPress users just starting with newsletter forms. Chances are, at least one of these has crossed your mind too.
Q1. Do I need a WordPress plugin to create a newsletter form?
Technically, no. You could hard-code a custom form using HTML and PHP, but unless you are a developer with time to spare, I really would not recommend it. Plugins like MailOptin and Fluent Forms handle all the heavy lifting for you: design, integration, display rules, and analytics, so you can focus on growing your email list.
Q2. What is the best newsletter plugin for WordPress?
That depends on what you need. If you want a dedicated email newsletter form plugin with powerful display rules and automation, MailOptin is hard to beat. If you are already using Fluent Forms or any other contact form plugin and want to keep everything under one roof, that is a solid choice too.
Q3. How many form fields should I include?
Name and email address are a sweet spot. Adding extra fields lowers conversion rates because people get impatient. If you absolutely need more information, consider making it optional rather than required.
Q4. Should I use a popup or inline form?
Both serve different purposes. Popups attract attention and often convert higher, but they can annoy users if overused. Inline forms are less intrusive, ideal for blog posts or pages. Suggestion? Use popups sparingly, maybe with exit-intent, and inline forms for upgrades and lead magnets. A mix works best.
Q5. What is a double opt-in, and should I use it?
A double opt-in requires subscribers to confirm their email address by clicking a link in a verification email before they are officially added to your list. It keeps your list clean and protects your sender reputation, but you will lose some subscribers who forget to confirm.
That’s how to create a WordPress newsletter form!
And that’s it. You’ve seen two effective ways to create a WordPress newsletter form with MailOptin and Fluent Forms.
Whichever method you choose, the goal is to make it easy for visitors to join your email list and stay connected with your website. Keep your newsletter sign-up form simple, place it where people can easily find it, and make sure visitors know what they’ll get when they subscribe.
Once the form is live, take a moment to test it yourself. Confirm that new subscribers are added to the right email list or your CRM.
Now that you know how to create a WordPress newsletter form, go ahead and set one up on your site. The sooner you start collecting subscribers, the sooner you can begin building an audience you can reach directly.